
交換レンズ
Interchangeable Lens
Objectif interchangeable
取扱説明書
Operating Instructions
Mode d’emploi
Manual de instrucciones
E 11mm
F1.8
E-mount
SEL11F18
https://www.sony.net/
©2021 Sony Corporation
Printed in China
5-028-666-01(1)
AF MF
AF MF
–1
(1) (2)
–2
–3
(1)
(2)
7
使用上のご注意
フラッシュ使用時のご注意
周辺光量について
各部のなまえ
レンズの取り付けかた/取りはず
しかた
取 り 付 け か た( イ ラ ス ト
–
参照)
1
レンズリヤキャップとカメラのボディ
キャップをはずす。
2
レンズとカメラの白の点(マウント標点)を
合わせてはめ込み、レンズを軽くカメラに押
し当てながら、時計方向に「カチッ」とロック
がかかるまでゆっくり回す。
3
レンズフロントキャップをはずす。
取りはずしかた
1
レンズフロントキャップを取り付ける。
2
カメラのレンズ取りはずしボタンを押した
まま、レンズを反時計方向に回してはずす。
(イラスト
–
参照)
レンズフードを取り付ける
レンズフードの赤線をレンズの赤線(レンズ
フード指標)に合わせてはめ込み、レンズフード
の赤点とレンズの赤線が合って「カチッ」という
まで時計方向に回す。
ピントを合わせる
A F( オ ー ト フ ォ ー カ ス )/ M F( マ ニ ュ ア ル
フォーカス)の切り替え
レンズ側の設定
フォーカスモードスイッチを、AFまたはMFの
いずれか設定したいほうに合わせる(1)。
AF/MFコントロールボタンを装備したカメラをお
使いの場合
フォーカスホールドボタンを使用
する
主な仕様
商品名(型名)
E 11mm F1.8
(SEL11F18)
焦点距離(mm)
11
焦点距離イメージ*
1
(mm)
16.5
レンズ群-枚
11-12
画角*
2
104°
最短撮影距離*
3
(m)
オートフォーカス時
0.15
マニュアルフォーカス時
0.12
最大撮影倍率(倍)
オートフォーカス時
0.13
マニュアルフォーカス時
0.20
最小絞り
F16
フィルター径(mm)
55
外形寸法(最大径×長さ)
(約:mm)
66×57.5
質量(約:g)
181
手ブレ補正機能 なし
This instruction manual explains how to use
lenses. Precautions common to all lenses such
as notes on use are found in the separate
“Precautions before using”. Be sure to read both
documents before using your lens.
This lens is designed for Sony α camera system
E-mount cameras. You cannot use it on A-mount
cameras.
For further information on compatibility, visit the
web site of Sony in your area, or consult your dealer
of Sony or local authorized service facility of Sony.
For Customers in the U.S.A.
For question regarding your product or for the Sony
Service Center nearest you,
call 1-800-222-SONY (7669).
Supplier’s Declaration of Conformity
Trade Name : SONY
Model : SEL11F18
Responsible Party : Sony Electronics Inc.
Address : 16535 Via Esprillo, San Diego, CA 92127
U.S.A.
Telephone Number : 858-942-2230
This device complies with part 15 of the FCC rules.
Operation is subject to the following two conditions:
(1) This device may not cause harmful interference,
and (2) this device must accept any interference
received, including interference that may cause
undesired operation.
Notes on Use
• Do not leave the lens exposed to the sun or a bright
light source. Internal malfunction of the camera
body and lens, smoke, or a fire may result due to the
effect of light focusing. If circumstances necessitate
leaving the lens in sunlight, be sure to attach the lens
caps. When shooting against the sun, keep the sun
completely out of the angle of view.
• When carrying a camera with the lens attached,
always firmly hold both the camera and the lens.
• This lens is not water-proof, although designed with
dust-proofness and splash-proofness in mind. If using
in the rain etc., keep water drops away from the lens.
• If the lens alone is shaken or if a camera with the lens
attached is shaken while the camera is turned off,
an internal component of the lens may rattle. This,
however, does not indicate a malfunction.
In addition, while you carry around the lens, your
movement may cause the internal lens groups to
shake. This, however, does not affect the performance
of the lens groups.
Precautions on using a flash
• With certain combinations of lens and flash, the lens
may partially block the light of the flash, resulting in
a shadow at the bottom of the picture. In such a case,
adjust the focal length or the shooting distance before
shooting.
Vignetting
• When using the lens, the corners of the screen
become darker than the center. To reduce this
phenomena (called vignetting), close the aperture by
1 to 2 stops.
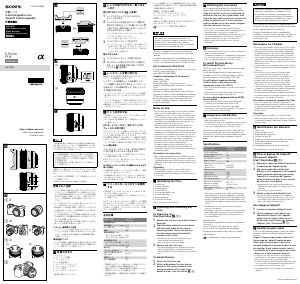
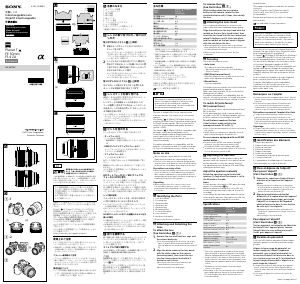
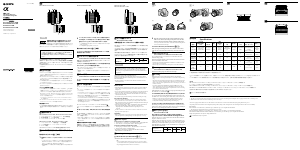
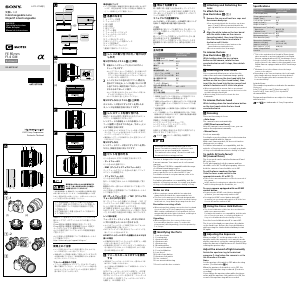
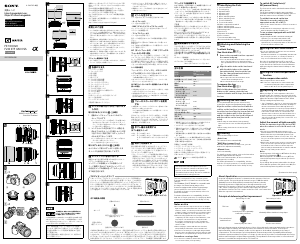
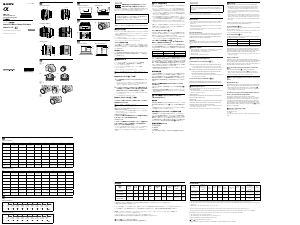
Identifying the Parts
1 Lens hood
2 Lens hood index
3 Focusing ring
4 Lens contacts*
5 Lens mount rubber ring
6 Focus hold button
7 Mounting index
8 Focus mode switch
*
Do not touch the lens contacts.
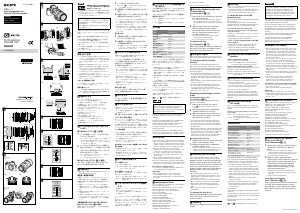
Attaching and Detaching the
Lens
To attach the lens
(See illustration
–
.)
1
Remove the rear lens cap and the camera
body cap.
2
Align the white index on the lens barrel
with the white index on the camera
(mounting index), then insert the lens
into the camera mount and rotate it
clockwise until it locks.
• Do not press the lens release button on the
camera when mounting the lens.
• Do not mount the lens at an angle.
3
Remove the front lens cap.
• You can attach/detach the front lens cap in two
ways, (1) and (2). When you attach/detach the
lens cap with the lens hood attached, use method
(2).
To detach the lens
1
Attach the front lens cap.
2
While holding down the lens release
button on the camera, rotate the lens
counterclockwise until it stops, then
detach the lens. (See illustration
–
.)
Attaching the Lens Hood
It is recommended that you use a lens hood to
reduce flare and ensure maximum image quality.
Align the red line on the lens hood with the
red line on the lens (lens hood index), then
insert the lens hood into the lens mount and
rotate it clockwise until it clicks into place
and the red dot on the lens hood is aligned
with the red line on the lens.
• If the lens hood is not rotated until it clicks into
place, there is a possibility that a shadow appears on
captured images or the lens hood falls off.
• If the flash light is partially blocked by the lens hood,
a shadow may appear at the bottom of captured
images. In such a case, remove the lens hood.
• When storing, fit the lens hood onto the lens
backwards.
Focusing
• The focus mode switch of this lens does not function
with some camera models.
For further information on compatibility, visit the web
site of Sony in your area, or consult your dealer of
Sony or local authorized service facility of Sony.
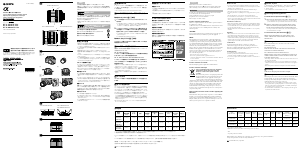
To switch AF (auto focus)/
MF (manual focus)
The focus mode can be switched between AF and
MF on the lens.
For AF photography, both the camera and lens
should be set to AF. For MF photography, either or
both the camera or lens should be set to MF.
To set the focus mode on the lens
Slide the focus mode switch to the
appropriate mode, AF or MF (1).
• Refer to the camera manuals to set the focus mode of
the camera.
• In MF, turn the focusing ring to adjust the focus (2)
while looking through the viewfinder, etc.
To use a camera equipped with an AF/MF
control button
• By pressing the AF/MF control button during AF
operation, you can temporarily switch to MF.
• Pressing the AF/MF control button during MF
operation lets you temporarily switch to AF if the lens
is set to AF and the camera to MF.
Using Focus Hold Button
• The focus hold button of this lens does not function
with some camera models.
For further information on compatibility, visit the web
site of Sony in your area, or consult your dealer of
Sony or local authorized service facility of Sony.
Press the focus hold button in AF to cancel AF. The
focus is fixed and you can release the shutter on
the fixed focus. Release the focus hold button while
pressing the shutter button halfway to start AF
again.
Specifications
Product name
(Model name)
E 11mm F1.8
(SEL11F18)
Focal length (mm)
11
35mm equivalent focal
length*
1
(mm)
16.5
Lens groups-elements
11-12
Angle of view*
2
104°
Minimum focus*
3
(m (feet))
Auto focus 0.15 (0.5)
Manual focus 0.12 (0.4)
Maximum magnification (X)
Auto focus 0.13
Manual focus 0.20
Minimum aperture
f/16
Filter diameter (mm)
55
Dimensions (maximum
diameter × height)
(approx., mm (in.))
66 × 57.5
(2 5/8 × 2 3/8)
Mass (approx., g (oz)) 181 (6.4)
SteadyShot
No
*
1
This is the equivalent focal length in 35mm format
when mounted on an Interchangeable Lens Digital
Camera equipped with an APS-C sized image sensor.
*
2
Angle of view is the value for Interchangeable Lens
Digital Cameras equipped with an APS-C sized image
sensor.
*
3
Minimum focus is the distance from the image
sensor to the subject.
• Depending on the lens mechanism, the focal length
may change with any change in shooting distance.
The focal lengths given above assume the lens is
focused at infinity.
Included items
(The number in parentheses indicates the number
of pieces.)
Lens (1), Front lens cap (1), Rear lens cap (1),
Lens hood (1), Set of printed documentation
Design and specifications are subject to change
without notice.
is a trademark of Sony Group Corporation.
Cette notice explique comment se servir des
objectifs. Les précautions communes à tous
les objectifs, par exemple les remarques sur
l’emploi, se trouvent sur la feuille « Précautions
avant toute utilisation ». Veuillez lire les deux
documents avant d’utiliser votre objectif.
Votre objectif est conçu pour les appareils photo à
monture E de type Sony α. Il ne peut pas être utilisé
pour les appareils photo à monture A.
Pour plus d’informations sur la compatibilité,
consultez le site de Sony de votre pays, ou adressez-
vous à un revendeur Sony ou à un service après-
vente agréé Sony.
Remarques sur l’emploi
• Ne laissez pas la lentille orientée vers le soleil ou une
source de lumière intense. Cela risque de provoquer
un problème de fonctionnement interne du boîtier
de l’appareil photo et de l’objectif, de dégager de la
fumée, voire de provoquer un incendie. Si toutefois
vous ne pouvez pas faire autrement, veillez à fixer les
capuchons sur l’objectif. Lors d’une prise de vue en
direction du soleil, veillez à ce que le soleil ne soit pas
dans l’angle de vue.
• Lorsque vous portez un appareil photo avec l’objectif
dessus, tenez toujours fermement l’appareil photo et
l’objectif.
• Cet objectif n’est pas étanche à l’eau bien qu’il
soit conçu pour résister à la poussière et aux
éclaboussures. Si vous l’utilisez sous la pluie, etc.
veillez à ce que de l’eau ne tombe pas dessus.
• Lorsque l'objectif seul est secoué ou lorsqu'un
appareil photo hors tension sur lequel est fixé
l'objectif est secoué, un composant interne de
l'objectif peut faire du bruit. Toufefois, ce phénomène
n’indique en aucune manière un dysfonctionnement.
En outre, lors du transport de l'objectif, votre
mouvement peut provoquer la vibration des groupes
de lentilles internes. Ceci n'influe toutefois pas sur les
performances des groupes de lentilles.
Précautions concernant l’emploi d’un flash
• Associé à certains types de flash, l’objectif peut
bloquer partiellement la lumière du flash et produire
un ombre au bas de l’image. Dans ce cas, corrigez la
longueur focale ou la distance de prise de vue avant
la prise de vue.
Vignetage
• Lorsque l’objectif est utilisé, les coins de l’écran
deviennent plus sombres que le centre. Pour réduire
ce phénomène (appelé vignetage), fermez l’ouverture
de 1 ou 2 crans.
Identification des éléments
1 Pare-soleil
2 Repère de pare-soleil
3 Bague de mise au point
4 Contacts d’objectif *
5 Bague en caoutchouc de montage de l’objectif
6 Bouton de maintien de la mise au point
7 Repère de montage
8 Commutateur de mode de mise au point
*
Ne touchez pas les contacts d’objectif.
Pose et dépose de l’objectif
Pour poser l’objectif
(Voir l’illustration
–
.)
1
Déposez le capuchon d'objectif arrière et
le capuchon de l'appareil photo.
2
Alignez le repère blanc du barillet
d’objectif sur le repère blanc de l’appareil
photo (repère de montage), puis posez
l’objectif sur la monture de l’appareil
photo et tournez-le dans le sens horaire
de sorte qu’il s’encliquette.
• N’appuyez pas sur le bouton de libération de
l’objectif sur l’appareil photo lorsque vous posez
l’objectif.
• Ne posez pas l’objectif de biais.
3
Retirez le capuchon d'objectif avant.
• Vous pouvez poser et déposer les capuchons
d’objectif avant de deux façons, (1) et (2). Si vous
posez/déposez le capuchon d’objectif avec le
pare-soleil, utilisez la méthode (2).
Pour déposer l’objectif
1
Installez le capuchon d'objectif avant.
2
Tout en appuyant sur le bouton de
libération de l’objectif sur l’appareil
photo, tournez l’objectif dans le sens
antihoraire jusqu’à l’arrêt, puis déposez
l’objectif. (Voir l’illustration
–
.)
Fixation du pare-soleil
Il est conseillé d’utiliser un pare-soleil pour réduire
la lumière parasite et obtenir la meilleure image
possible.
Alignez la ligne rouge du pare-soleil sur la
ligne rouge de l’objectif (repère de pare-
soleil), puis insérez le pare-soleil sur la
monture d’objectif et tournez-le dans le sens
des aiguilles d’une montre jusqu’à ce qu’il
s’encliquette et le point rouge du pare-soleil
s’aligne sur la ligne rouge de l’objectif.
• Si le pare-soleil n’est pas tourné à fond jusqu’à
entendre un clic, de l’ombre peut apparaître sur les
photos prises ou le pare-soleil peut tomber.
• Si l’éclair du flash est partiellement bloqué par le pare-
soleil, de l’ombre peut apparaître au bas des photos
prises. Dans ce cas, retirez le pare-soleil.
• Pour ranger le pare-soleil, insérez-le à l'envers dans
l’objectif.
(Suite à la page arrière)

Únase a la conversación sobre este producto
Aquí puedes compartir lo que piensas sobre Sony SEL11F18 Objetivo. Si tiene alguna pregunta, primero lea atentamente el manual. Puede solicitar un manual utilizando nuestro formulario de contacto.