
To set the alarm
The alarm clock allows you to set two dierent times
for the alarm:
In standby mode, press and hold the ALARM 1
or ALARM 2 button to select the alarm time
setting mode.
Press the BACKWARD or FORWARD buttons to
set the hour, then short press ALARM 1 or ALARM 2
again to set the minutes using the BACKWARD and
FORWARD buttons.
Finally short press the ALARM 1 or ALARM 2 button
again to confirm the alarm hour and activate the
alarm.
Ajustar la alarma
El despertador le permite configurar dos alarmas
diferentes:
Pulse y mantenga presionado el botón ALARMA 1
o ALARMA 2 para seleccionar la configuración de
alarma.
Pulse los botones ATRÁS o ADELANTE para
seleccionar la hora, y pulse de nuevo brevemente,
ALARMA 1 o ALARMA 2 para ajustar los minutos
utilizando los botones ATRÁS y ADELANTE.
Por último, presione ALARMA 1 o ALARMA 2 de
nuevo para confirmar la configuración del reloj y
activar la alarma.
Régler l’alarme
Le réveil vous permet de configurer deux alarmes
diérentess:
Appuyez sur le bouton ALARME 1 ou ALARME 2 et
maintenez-le enfoncé pour sélectionner le réglage
de l’alarme.
Appuyez sur les boutons PRÉCÉDENT ou SUIVANT
pour sélectionner l’heure, puis appuyez à nouveau
brièvement sur, ALARME 1 ou ALARME 2 pour
régler les minutes à l’aide des boutons PRÉCÉDENT
et SUIVANT.
Enfin, appuyez à nouveau sur ALARME 1 ou
ALARME 2 pour confirmer le réglage de l’horloge
et activer l’alarme.
To switch off the alarm
Press the alarm button corresponding to the alarm
that is ringing, ALARM 1 or ALARM 2 to deactivate it.
Apagar una alarma que está sonando
Para apagar una alarma que está sonando, presione su
tecla correspondiente, ALARMA 1 o ALARMA 2.
Éteignez une alarme qui sonne
Pour désactiver une alarme qui sonne, appuyez sur la
touche correspondante, ALARME 1 ou ALARME 2.
Snooze
To temporarily turn o the alarm, press the SNOOZE
button. The alarm will ring again when the snooze
time has elapsed (10 minutes).
The corresponding alarm 1 or alarm 2 indicator flashes
on the display during the snooze period.
To cancel the snooze and the alarm, press the alarm
button corresponding to the alarm that is in snooze
period, ALARM 1 or ALARM 2
to deactivate it.
Sleep
The sleep function defines the duration of time
before the alarm clock switches o automatically.
When the alarm clock is switched on, press the SLEEP
timer button repeatedly to select a sleep setting option
(Sleep timer: O, 15, 30 and 60 minutes).
Once activated, the SLEEP FUNCTION INDICATOR will
light up on the screen.
The alarm clock will automatically switch o when
the sleep period is over.
To cancel this function press the SLEEP button
repeatedly until the word OFF appears on screen
and the SLEEP FUNCTION INDICATOR turns o.
Snooze (Aplazar una alarma en curso)
Para aplazar una alarma que está sonando, presione
el botón SNOOZE. La alarma volverá a sonar después
de 10 minutos.
El indicador de ALARMA 1 o ALARMA 2, parpadea en la
pantalla durante el período de repetición.
Para cancelar el intervalo de repetición, presione
el botón de la alarma correspondiente ALARMA 1 o
ALARMA 2
para desactivarla.
Sleep (Dormir)
Esta función de dormir permite configurar el intervalo
de tiempo antes de que el despertador se apague
automáticamente.
Pulse el botón SLEEP repetidamente para seleccionar
un intervalo de tiempo para que se apague la radio
automáticamente (Opciones: Desactivado, 15, 30 y
60 minutos).
Una vez activado, el INDICADOR DE FUNCIÓN SLEEP
se iluminará en la pantalla.
El despertador se apagará automáticamente cuando
finalice dicho intervalo de tiempo.
Para desactivar esta función, presione repetidamente
el botón SLEEP hasta que la palabra OFF (desactivado)
aparezca en pantalla, y el INDICADOR DE FUNCIÓN
SLEEP se haya apagado.
Snooze (Reporter une alarme en cours)
Pour reporter une alarme qui sonne, appuyez sur le
bouton SNOOZE. L’alarme sonnera à nouveau après 10
minutes.
L’indicateur ALARME 1 ou ALARME 2, clignote à
l’écran pendant la période de répétition.
Pour annuler l’intervalle de répétition, appuyez sur
le bouton d’alarme correspondant ALARME 1 ou
ALARME 2
pour le désactiver.
Display brightness
In standby mode, short press the DIMMER button
to change the display brightness between low,
medium or high options.
Display ON/OFF
In standby mode, press and hold POWER button for
2 seconds to shut o the display.
Press and hold POWER button for another 2 seconds
to turn on the display again.
Long press POWER button and hold for 5 seconds
to reset the alarm clock.
Brillo de la pantalla
Presione la tecla DIMMER para cambiar el brillo de la
pantalla entre los niveles bajo, medio o alto.
Encender / apagar la pantalla
Mantenga presionado el botón de ENCENDIDO
durante 2 segundos para apagar la pantalla.
Mantenga presionado nuevamente el botón de
ENCENDIDO durante otros 2 segundos para volver
a encender la pantalla.
Mantenga pulsado el botón de ENCENDIDO durante
5 segundos para resetear el despertador.
Luminosité de l’écran
Appuyez sur la touche DIMMER pour modifier la
luminosité de l’écran en niveaux faible, moyen ou élevé.
Allumer / éteindre l’écran
Appuyez sur le bouton d’ALLUMAGE et maintenez-le
enfoncé pendant 2 secondes pour éteindre l’écran.
Appuyez de nouveau sur le bouton d’ALLUMAGE
pendant 2 secondes pour rallumer l’écran.
Appuyez sur le bouton d’ALLUMAGE et maintenez-le
enfoncé pendant 5 secondes pour réinitialiser l’alarme.
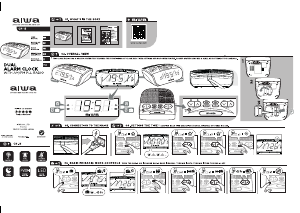
Bluetooth pairing
1. In standby mode short press the MODE/TIME SET
button once to enter in the Bluetooth function mode.
The BLUETOOTH MODE INDICATOR will light up
flashing on the screen, and a prompt voice will
notify that is ready to pair.
2. Turn on the Bluetooth function of your phone,
search for the Bluetooth devices and select
AIWA CRU-80BT.
Enter the code “0000” if needed.
3. If the devices are paired succesfully, the BLUETOOTH
MODE INDICATOR will keep bright, and a prompt
voice will notify that Bluetooth device is connected.
Having succesfully paired, the device will be
automatically connected next time.
Incoming calls
If there’s an incoming call while the Bluetooth function
mode is enabled, the alarm clock will ring a continuous
ringtone prompt.
Short press PLAY, PAUSE AND ANSWER CALLS button
to answer and hang up the phone call.
Short press PLAY, PAUSE AND ANSWER CALLS button
to end a call.
Long press PLAY, PAUSE AND ANSWER CALLS button
to reject phone calls when the alarm clock is ringing.
Promptly press twice PLAY, PAUSE AND ANSWER
CALLS button in order to redial the last phone number.
Emparejamiento Bluetooth
1. En modo standby pulse el botón MODE/TIME SET
una vez para acceder modo de función Bluetooth.
El INDICADOR DE MODO BLUETOOTH se encenderá
en la pantalla y parpadeará, acompañado de una
nota de voz avisando de que el despertador está
preparado para emparejarse.
2. Active la función Bluetooth de su smartphone
(teléfono inteligente), busque la lista de los
dispositivos Bluetooth disponibles y seleccione
AIWA CRU-80BT.
En caso necesario introduzca el código “0000”.
3. Si los dispositivos se emparejan con éxito, el
INDICADOR DE MODO BLUETOOTH se mantendrá
encendido, y una nota de voz nos avisará de que el
dispositivo Bluetooth está conectado.
A partir de ahora, su dispositivo se conectará
automáticamente al despertador.
Llamadas entrantes
Si recibe una llamada entrante en modo Bluetooth,
el despertador le permitirá recibir y responder dicha
llamada a través del micrófono integrado.
Pulse el botón de REPRODUCIR, PAUSAR Y RESPONDER
LLAMADAS para responder a una llamada entrante.
Pulse el botón de REPRODUCIR, PAUSAR Y RESPONDER
LLAMADAS para colgar una llamada en curso.
Mantenga pulsado el botón de REPRODUCIR, PAUSAR
Y RESPONDER LLAMADAS para rechazar una llamada
entrante.
Presione dos veces rápidamente el botón de
REPRODUCIR, PAUSAR Y RESPONDER LLAMADAS
para volver a llamar al último número.
Appariement Bluetooth
1. En mode veille, appuyez une fois sur le bouton
MODE/TIME SET pour accéder au mode de fonction
Bluetooth.
L’INDICATEUR DE MODE BLUETOOTH s’allume sur
l’écran et clignote, accompagné d’une note vocale
vous informant que le réveil est prêt à être couplé.
2. Activez la fonction Bluetooth de votre smartphone,
recherchez dans la liste des périphériques Bluetooth
disponibles et sélectionnez AIWA CRU-80BT.
Entrez le code “0000” si nécessaire.
3.
Si les appareils sont appariés avec succès,
l’INDICATEUR EN MODE BLUETOOTH reste allumé
et un message vocal nous informe que le périphérique
Bluetooth est connecté.
A partir de maintenant, votre appareil se connectera
automatiquement au réveil.
Appels entrants
Si vous recevez un appel entrant en mode Bluetooth,
le réveil vous permettra de recevoir et de répondre à
cet appel via le microphone intégré.
Appuyez sur le bouton JOUER, PAUSE ET RÉPONDRE
AUX APPELS pour répondre à un appel entrant.
Appuyez sur le bouton JOUER, PAUSE ET RÉPONDRE
AUX APPELS pour raccrocher un appel en cours.
Appuyez et maintenez enfoncé le bouton JOUER,
PAUSE ET RÉPONDRE AUX APPELS pour rejeter un
appel entrant.
Appuyez rapidement deux fois sur le bouton JOUER,
PAUSE ET RÉPONDRE AUX APPELS pour rappeler
le dernier numéro.
Charging the alarm clock
This alarm clock is provided with a rechargable battery:
Connect the USB charging cable to the MICRO USB
CHARGING PORT of the back of the unit.
The POWER AND CHARGING LED INDICATOR will
turn bright red during charging.
The red POWER AND CHARGING LED INDICATOR
will turn green after the battery is fully charged.
Cargando el despertador
Este despertador cuenta con una batería recargable:
Conecte el cable de carga al PUERTO DE CARGA
MICRO USB de la parte posterior del despertador.
El INDICADOR LED DE CARGA Y ENCENDIDO se
iluminará en rojo y parpadeará durante la carga.
El INDICADOR LED DE CARGA Y ENCENDIDO se
volverá verde cuando la batería se haya cargado.
Chargement du réveil
Ce réveil a une batterie rechargeable:
Connectez le câble de charge au PORT DE
CHARGE MICRO USB situé à l’arrière du réveil.
L’INDICATEUR LED DE CHARGE ET D’ALLUMAGE
s’allume en rouge et clignote pendant la charge.
L’INDICATEUR LED DE CHARGE ET D’ALLUMAGE
s’allume en vert lorsque la batterie est chargée.
USB & TF card play mode
Insert a USB or TF card to the back of the unit USB
PORT or TF CARD PORT respectively.
Once the USB or TF card has been inserted, a voice
prompt will announce that the alarm clock has entered
in USB or TF card mode.
Then it will start automatically the music playback.
Modo de reproducción USB y tarjeta TF
Introduzca un USB o una tarjeta TF en el PUERTO
USB o el PUERTO DE TARJETA TF respectivamente,
situados en la parte posterior del despertador.
Una vez insertado un USB o una tarjeta TF, una nota
de voz nos avisará de que el despertador ha entrado
en modo USB o tarjeta TF.
Seguidamente comenzará la reproducción automática
de música.
Mode de lecture USB et carte TF
Insérez une carte USB ou TF dans les ports PORT USB
ou TF CARD PORT, situés à l’arrière du réveil.
Une fois qu’une carte USB ou TF est insérée, un mémo
vocal nous informe que l’alarme est entrée en mode
USB ou sur la carte TF.
Ensuite, la lecture automatique de musique commencera.
Playing music
You can control the playback during Bluetooth, USB
or TF card mode with:
PLAY, PAUSE AND ANSWER CALLS:
· Short press the button to play or pause the
playback.
FORWARD AND VOLUME UP:
· Short press the button to skip forward to the next
song.
· Long press the button to turn up the playback
volume.
BACKWARD AND VOLUME DOWN:
· Short press the button to go to the previous song.
· Long press the button to turn down the playback
volume.
Reproducción de música
Puede controlar la reproducción en modo Bluetooth,
modo USB o modo tarjeta TF con:
REPRODUCIR, PAUSAR Y RESPONDER LLAMADAS:
· Pulse este botón una vez para reproducir o pausar
la reproducción.
SIGUIENTE Y SUBIR VOLUMEN:
· Pulse brevemente este botón para ir a la pista
siguiente.
· Mantenga presionado este botón para subir el
volumen de la reproducción.
ATRÁS Y BAJAR VOLUMEN:
· Pulse brevemente este botón para volver a la pista
anterior.
· Mantenga presionado este botón para bajar el
volumen de la reproducción.
Lecture de musique
Vous pouvez contrôler la lecture en mode Bluetooth,
en mode USB ou en mode carte TF avec:
JOUER, PAUSE ET RÉPONDRE AUX APPELS:
· Appuyez une fois sur cette touche pour lire ou
mettre en pause la lecture.
SUIVANT ET AUGMENTER LE VOLUME:
· Appuyez brièvement sur ce bouton pour passer à
la piste suivante.
· Maintenez ce bouton enfoncé pour augmenter le
volume de lecture.
PRÉCÉDENT ET RÉDUIRE LE VOLUME:
· Appuyez brièvement sur ce bouton pour revenir à
la piste précédente.
· Maintenez ce bouton enfoncé pour diminuer le
volume de lecture.
Auxiliary input function mode
Plug an auxiliary cable ended in 3.5mm jack to the
AUXILIARY INPUT socket at the back of the unit.
The AUXILIARY MODE INDICATOR will light up on
the screen, and a prompt voice will notify that has
entered in auxiliary input mode.
Modo de entrada auxiliar
Conecte el cable auxiliar de 3,5mm a la toma AUX IN
situada en la parte posterior del despertador.
El INDICADOR DE MODO AUXILIAR se encenderá en
la pantalla, y una nota de voz nos avisará de que el
despertador ha accedido al modo de entrada auxiliar.
Mode d’entrée auxiliaire
Connectez le câble auxiliaire de 3,5mm à la prise
AUX IN située à l’arrière du réveil.
L’INDICATEUR DE MODE AUXILIAIRE s’allumera à
l’écran et un mémo vocal nous avertira que le réveil
est entré en mode d’entrée auxiliaire.
To reduce the risk of electric shock, do not open the
device, there are no parts that can be changed by
the consumer.
Refer all servicing to qualified personnel.
IMPORTANT!
- Make sure to have a minimum distance of 5cm
around the unit for sucient ventilation.
-
Ensure that the ventilation openings are not covered
with items such as newspapers, tablecloths, curtains, etc.
- Do not place naked flame sources, such as lighted
candles on the apparatus.
- Do not expose the device to dripping or splashing
water.
- Do not place objects filled with liquids, such as a
glass or a vase on the device.
- Do not throw batteries into fire! Respect the
environment when disposing used batteries.
- Batteries should not be exposed to excessive heat
such as sunshine, fire or other similar heat sources.
- The power plug at all times must be easily accessible.
Unplug the device to switch it o completly.
- If exposed to any electrostatic phenomenon, the
product may malfunction and the user must reset
of the device. (To do this, remove the battery and
unplug the unit for 1 minute, repeat the process in
reverse to complete the reset).
Para reducir el riesgo de descarga eléctrica no abra
el dispositivo, no hay ninguna pieza reparable por el
usuario.
Para cualquier reparación acuda a servicio técnico
cualificado.
¡IMPORTANTE!
- Asegúrese de que haya una distancia mínima de 5cm
alrededor de la unidad para su correcta ventilación.
- Asegúrese de que las aberturas de ventilación
de la unidad no estén bloqueadas.
- No coloque fuentes candentes, como velas
encendidas sobre el aparato.
- No exponga este aparato a goteos o salpicaduras.
- No coloque objetos llenos de líquidos, como
jarrones sobre el aparato.
- ¡No arroje las pilas al fuego!, podrían explosionar.
Respete el medio ambiente al desechar las baterías
usadas.
- Las baterías no deben exponerse a temperaturas
elevadas, como la luz solar, fuego o fuentes de calor
similares.
- La toma de corriente debe encontrarse cerca
del equipo y ser de fácil acceso.
- Un fenómeno eléctrico transitorio y/o electrostático
rápido podría impedir el funcionamiento correcto del
aparato. En ese caso deberá reiniciar el dispositivo.
Pour réduire le risque de choc électrique, n’ouvrez
pas l’appareil, il n’y a aucune pièce réparable par
l’utilisateur.
Pour toute réparation, contactez un technicien
qualifié.
IMPORTANT!
- Assurez-vous qu’il y a une distance minimale de 5cm
autour de l’appareil pour une ventilation adéquate.
- Assurez-vous que les orifices de ventilation de
el’appareil ne sont pas obstrués.
- Ne placez pas de sources chaudes, telles que des
bougies allumées sur l’appareil.
- N’exposez pas cet appareil à des gouttes d’eau ou des
éclaboussures.
- Ne placez pas d’objets remplis de liquides, tels que
des vases, sur l’appareil.
- Ne jetez pas les piles dans le feu!, elles
pourraient exploser.
Respectez l’environnement lorsque vous jetez des
piles usagées.
- Les piles ne doivent pas être exposées à des
températures excessives, telles que la lumière du
soleil, le feu ou des sources de chaleur similaires.
- La prise de courant doit être proche de l’équipement
et facilement accessible.
- Un phénomène électrique électrostatique transitoire
et/ou rapide pourrait empêcher le bon
fonctionnement de l’appareil. Dans ce cas, vous
devez redémarrer l’appareil.
When this crossed-out wheeled bin symbol is attached
to a product, it means the product is covered by the
European Directive 2012/19/EC.
All electrical and electronic products including batte-
ries should be disposed of separately from the muni-
cipal waste stream via designated collection facilities
appointed by the government or the local authorities.
The correct disposal of your old appliance will help
prevent potential negative consequences for the
environment and human health.
El símbolo del cubo de basura tachado sobre el
producto, significa que el producto cumple con la
Directiva Europea 2012/19 / EC.
Todos los productos eléctricos y electrónicos,
incluida la batería, deben arrojarse por separado
cumpliendo con la regulación de desechos municipales
a través de las instalaciones de recolección designadas
por el gobierno o las autoridades locales.
La eliminación correcta de su aparato antiguo ayudará
a reducir posibles consecuencias negativas en la salud
humana y el medioambiente.
Le symbole de poubelle à roulettes barrée sur
le produit signifie que celui-ci est conforme à la
directive européenne 2012/19 / CE.
Tous les produits électriques et électroniques, y
compris les piles, doivent être éliminés séparément
conformément à la réglementation municipale
en matière de déchets, dans des installations de
collecte désignées par le gouvernement ou les
autorités locales.
La mise au rebut correcte de votre ancien appareil
aidera à réduire les éventuelles conséquences
négatives sur la santé humaine et l’environnement.
Turning the alarm on or off
Press the ALARM 1 or ALARM 2 button to set the
desired alarm. The corresponding alarm 1 or alarm 2
indicator will light up or light o depending of their
current state.
Encender o apagar las alarmas
Presione el botón ALARMA 1 o ALARMA 2 para activar
o desactivar la alarma deseada.
El indicador de alarma correspondiente se iluminará
en la pantalla, o se apagará según su estado actual.
Activer ou désactiver les alarmes
Appuyez sur le bouton ALARME 1 ou ALARME 2 pour
activer ou désactiver l’alarme désirée.
L’indicateur d’alarme correspondant s’allumera sur
l’écran ou s’éteindra en fonction de son statut actuel.
Note:
The alarm can be set at any function mode.
Nota:
Las alarmas se pueden activar y desactivar durante
todos los modos de función.
Note:
Les alarmes peuvent être activées et désactivées
dans tous les modes de fonctionnement.
Note:
When the alarm rings, the current hour and the
corresponding Alarm 1 or Alarm 2 indicator flashes on
the display, even if the screen has been switched o.
Nota:
Cuando la alarma suena, el indicador de ALARMA 1 o
ALARMA 2 se ilumina en la pantalla, y esta parpadea
(e incluso tras haber desactivado la pantalla).
Note:
Lorsque l’alarme sonne, le témoin ALARM 1 ou
ALARM 2 s’allume à l’écran et il clignote (et même
après la désactivation de l’écran).
Due to continual revision and improvement on our
products, design and specifications are subject to
change without further notice.
Notes:
Before charging make sure the voltage is compatible.
Before the first use we recommend to fully charge
the device.
Notas:
Antes de cargar, asegúrese de que el voltaje sea
compatible.
Antes del primer uso recomendamos cargar al
completo la batería del dispositivo.
Notes:
Avant de charger, assurez-vous que la tension est
compatible.
Avant la première utilisation, nous vous recommandons
de charger complètement la batterie de l’appareil.
Debido a la continua revisión y mejora de nuestros
productos, el diseño y las especificaciones están
sujetos a cambios sin previo aviso.
En traison de l’examen et de l’amélioration continus
de nos produits, la conception et les spécifications
sont sujettes à modification sans préavis.
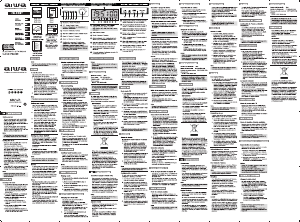
USER
MANUAL
MANUAL DE
USUARIO
MODE
D’EMPLOI
BEDIENUNG-
SANLEITUNG
MANUALE
DELL’UTENTE
MANUAL
DO USUÁRIO
CRU-80BT
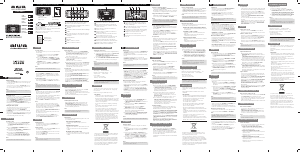
ACCESSORIES / ACCESORIOS / ACCESSOIRES
BUTTONS FUNCTION / FUNCIÓN DE LOS BOTONES /
FONCTIONS DES BOUTONS
SCREEN FUNCTIONS / FUNCIONES DE LA PANTALLA /
FONCTIONS D’ÉCRAN
REAR VIEW / VISTA POSTERIOR / VUE ARRIÈRE
Clock radio
Radio despertador
Radio-réveil
Aiwa nylon braided cable with alluminium shell and
USB AC adaptor (2A)
Cable trenzado de nylon Aiwa con carcasa de aluminio
y adaptador de corriente USB (2A)
Câble tressé en nylon Aiwa avec coque en aluminium
et adaptateur AC USB (2A)
Backward and volume down / Atrás y bajar el
volumen / Précédent et réduire le volume
SLEEP
DIMMER
SNOOZE
MODE/TIME SET
Hour system indicator (12 hours) / Indicador de
formato horario (12 horas) / Indicateur du format
d’heure (12 heures)
Micro USB charging port / Puerto de carga Micro
USB / Port de charge Micro USB
Forward and volume up / Adelante y subir el volumen /
Suivant et augmenter le volume
Play, pause and answer calls / Reproducir, pausar
y responder llamadas / Jouer, pause et répondre
aux appels
Microphone / Micrófono / Microphone
Power and charging LED indicator / Indicador
LED de carga y encendido / Indicateur LED de
charge et d’allumage
Power button / Botón de encendido / Bouton d’allumage
Alarm 2 / Alarma 2 / Alarme 2
Alarm 1 / Alarma 1 / Alarme 1
Alarm 1 indicator / Indicador de la alarma 1 /
Indicateur d’alarme 1
Auxiliary input / Entrada auxiliar / Entrée auxiliaire
Bluetooth mode indicator / Indicador de modo
Bluetooth / Indicateur de mode Bluetooth
Sleep function indicator / Indicador de función
Sleep / Indicateur de fonction Sleep
TF card port / Puerto de tarjeta TF / Port pour
carte TF
Auxiliary mode indicator / Indicador de modo
auxiliar / Indicateur de mode auxiliaire
Alarm 2 indicator / Indicador de la alarma 2 /
Indicateur d’alarme 2
USB port / Puerto USB / Port USB
On and o switch / Interruptor de encendido y
apagado / Interrupteur marche et arrêt
FM mode and MHz indicator / Indicador de
modo FM y MHz / Indicateur de mode FM et MHz
User manual
Manual de usuario
Mode d’emploi
Warranty sheet
Hoja de garantía
Fiche de garante
INSTRUCTIONS
RADIO FM
ALARM
ALARMAS
ALARMES
ALARMAS
ALARMES
DISPLAY
BLUETOOTH
MODE
MODO
BLUETOOTH
MODE
BLUETOOTH
BATTERY
AND CHARGE
CARGA
Y BATERÍA
CHARGE ET BATTERIE
USB
& TF CARD MODE
MODO USB Y TARJETA TF
MODE USB ET CARTE TF
AUX
IN MODE
MODO
AUXILIAR
MODE
AUXILIAIRE
PLAYING MUSIC
REPRODUCIR
MÚSICA
LECTURE
DE MUSIQUE
PANTALLA
ÉCRAN
WARNING
PRECAUCIÓN
PRÉCAUTION
1.
1.
1.
1.
1.
1.
2.
2.
2.
2.
2.
2.
3.
3.
3.
Listening to radio
1. In standby mode short press the MODE/TIME SET
button twice to enter in the FM function mode.
The FM MODE AND MHz INDICATOR will light up on
the screen.
2. Press the BACKWARD or FORWARD
button to
adjust the frequency.
3. Press and hold the BACKWARD or FORWARD button
to turn down or turn up the volume.
4. Press and hold the MODE/TIME SET button to
automatically search and save the radio stations.
5. Short press the PLAY, PAUSE AND ANSWER CALLS
button to switch between the saved radio stations.
Modo radio FM
1. Pulse brevemente el botón MODE/TIME SET para
acceder al modo de función de radio FM.
El INDICADOR DE MODO FM Y MHz se iluminarán en
la pantalla.
2. Presione los botones ATRÁS y ADELANTE
para
ajustar la frecuencia.
3.
Mantenga presionado los botones ATRÁS o
ADELANTE para bajar o subir el volumen.
4. Mantenga presionado el botón MODE/TIME SET
para buscar y guardar automáticamente las
emisoras de radio disponibles.
5. Presione bremente el botón REPRODUCIR, PAUSAR
Y RESPONDER LLAMADAS para cambiar entre las
emisoras de radio guardadas.
Mode radio FM
1. Appuyez brièvement sur le bouton MODE/TIME SET
pour passer en mode de fonction radio FM.
Les INDICATEURS DE MODE FM ET MHz s’allument
à l’écran.
2. Appuyez sur les boutons PRÉCÉDENT et SUIVANT
pour régler la fréquence.
3.
Appuyez et maintenez les boutons PRÉCÉDENT ou
SUIVANT pour diminuer ou augmenter le volume.
4. Maintenez enfoncé le bouton MODE/TIME SET
pour rechercher et enregistrer automatiquement les
stations de radio disponibles.
5. Appuyez brièvement sur le bouton JOUER, PAUSE
ET RÉPONDRE AUX APPELS pour basculer entre les
stations de radio enregistrées.
RADIO FM
RADIO FM
Note:
You can store up to 40 preset stations.
Nota:
Puede almacenar hasta 40 emisoras preestablecidas.
Note:
Vous pouvez mémoriser jusqu’à 40 stations préréglées.
Tuner range: FM 87.5-108 MHz
Number of preset radio stations: 40
Output power: 10W*2 (RMS)
Power supply
DC: 5V 1000 mA max
Battery: 7.4V 2000 mAh
Rango de frecuencia: FM 87.5-108 MHz
Número de emisoras FM presintonizadas: 40
Potencia de salida nominal: 10W*2 (RMS)
Alimentación de CA
D
C: 5V 1000 mA max
Batería: 7,4V 2000 mAh
Gamme de fréquence: FM 87.5-108 MHz
Nombre de stations FM présélectionnés: 40
Puissance de sortie nominale: 10W*2 (RMS)
Courant alternatif
DC: 5V 1000 mA max
Batería: 7,4V 2000 mAh
SPECIFICATIONS
ESPECIFICACIONES
SPÉCIFICATIONS
INSTRUCCIONES
INSTRUCTIONS
Note:
While the display and mood light are o, the clock and
alarms will still be working
.
Nota:
Aunque la pantalla esté desactivada, el reloj y las
alarmas siguen funcionando
.
Note:
Même si l’écran est éteint, l’horloge et les alarmes
fonctionnent toujours.
Note:
The auxiliary input mode only allows the user to
control the volume from the unit.
Nota:
El modo de entrada auxiliar desde el despertador
sólo permite controlar el volumen.
Note:
Le mode d’entrée auxiliaire du réveil ne vous permet
que de contrôler le volume.
Getting started
Slide the ON AND OFF switch of the back of the unit
to ON position, the alarm clock screen will light up
showing the time.
To turn o the clock, slide the ON AND OFF switch to
OFF position, while the display and mood light are o,
the clock and alarms still be working.
Primer paso
Primeramente deslice el interruptor de ENCENDIDO Y
APAGADO de la parte posterior del despertador a la
posición ON (encendido).
La pantalla del despertador se encenderá mostrando
la hora.
Para apagar la pantalla, deslice el interruptor de
ENCENDIDO Y APAGADO a la posición OFF (apagado).
Mientras la pantalla está apagada, el reloj y las alarmas
seguirán funcionando.
Commencer
Faites glisser le Interrupteur MARCHE ET ARRÊT de
l’arrière du réveil à la position ON (marche).
L’écran s’allume indiquant l’heure.
Pour éteindre l’écran, faites glisser le interrupteur
MARCHE ET ARRÊT à la position OFF (arrêt).
Lorsque l’écran est éteint, l’horloge et les alarmes
continueront à fonctionner.
Note:
T
he first time the clock is powered on the display will
show the hour 00:00.
Nota:
Al encender el despertador por primera vez, la pantalla
mostrará la hora
00:00.
Note:
Lorsque vous activez le réveil pour la première fois,
l’écran ache l’heure
00:00.
Setting the clock
In standby mode, press and hold the MODE/TIME SET
button to enter the clock setting mode.
After the first press the clock will allow you to set the hour
with the BACKWARD and FORWARD buttons, then short
press the MODE/TIME SET button to set the minutes
using the BACKWARD and FORWARD buttons.
Finally short press the MODE/TIME SET button again to
confirm the clock settings.
Setting the hour system
The clock allows the user to select the desired hour
system, between the 12 and 24 hours format.
In standby mode short press BACKWARD or
FORWARD buttons to select between the 12 and 24
hours format.
When the 12 hours format is activated, the screen will
bright up the HOUR SYSTEM INDICATOR showing AM
or PM, depending the time of the day.
Ajustar el reloj
Presione y mantenga presionado el botón MODE/
TIME SET para acceder a la configuración del reloj.
Al acceder al modo de configuración del reloj, podrá
cambiar la hora actual pulsando los botones ATRÁS
y ADELANTE; presione brevemente de nuevo el botón
MODE/TIME SET y podrá configurar los minutos
utilizando las teclas ATRÁS y ADELANTE.
Vuelva a pulsar el botón MODE/TIME SET para
confirmar la configuración del reloj.
Modo de formato horario
El reloj permite al usuario seleccionar el formato
horario deseado, entre 12 y 24 horas.
Para ello presione brevemente los botones ATRÁS o
ADELANTE para seleccionar entre los formatos de 12
o 24 horas.
Si el formato horario de 12 horas está activado, en
la pantalla se iluminará el INDICADOR DE FORMATO
HORARIO, junto a la hora actual aparecerán las letras
AM y PM, dependiendo del momento del día en que
se encuentre.
Régler l’horloge
Appuyez sur le bouton MODE/TIME SET et maintenez-le
enfoncé pour accéder aux réglages de l’horloge.
Lorsque vous entrez dans le mode de réglage de
l’horloge, vous pouvez modifier l’heure actuelle en
appuyant sur les boutons PRÉCÉDENT et SUIVANT;
appuyez brièvement sur le bouton MODE/TIME SET
et vous pouvez régler les minutes à l’aide des touches
PRÉCÉDENT et SUIVANT.
Appuyez à nouveau sur le bouton MODE/TIME SET
pour confirmer le réglage de l’horloge.
Mode de format de l’heure
La montre permet à l’utilisateur de sélectionner le
format d’heure souhaité, entre 12 et 24 heures.
Pour ce faire, appuyez brièvement sur les boutons
PRÉCÉDENT ou SUIVANT pour sélectionner un format
12 ou 24 heures.
Si le format d’heure 12 heures est activé, l’INDICATEUR
DE FORMAT D’HEURE
s’allumera à l’écran. À côté de
l’heure actuelle, les lettres AM et PM apparaîtront, en
fonction de l’heure du jour où vous vous trouvez.
Sleep (Dormir)
Cette fonction de veille vous permet de définir l’intervalle
de temps avant que la radio s’éteigne automatiquement.
Appuyez plusieurs fois sur la touche SLEEP pour
sélectionner un intervalle de temps pendant lequel
la radio s’éteindra automatiquement (Options: Arrêt,
15, 30, et 60 minutes).
Une fois activé, l’INDICATEUR DE FONCTION SLEEP
s’allumera à l’écran.
Le réveil s’éteindra automatiquement à la fin de cet
intervalle.
Pour désactiver cette fonction, appuyez sur la touche
SLEEP à plusieurs reprises jusqu’à ce que le mot OFF
(arrêt) apparaisse à l’écran et que l’INDICATEUR DE
FONCTION SLEEP se soit éteint.
USER
MANUAL
MANUAL DE
USUARIO
MODE
D’EMPLOI
BEDIENUNG-
SANLEITUNG
MANUALE
DELL’UTENTE
MANUAL
DO USUÁRIO
CRU-80BT


Únase a la conversación sobre este producto
Aquí puedes compartir lo que piensas sobre Aiwa CRU-80BT Radiodespertador. Si tiene alguna pregunta, primero lea atentamente el manual. Puede solicitar un manual utilizando nuestro formulario de contacto.