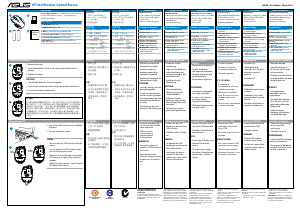
WT460 Wireless Optical Mouse
ENGLISH
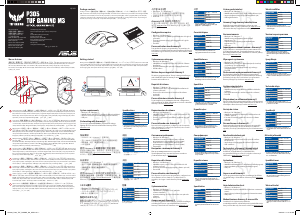
Installing the batteries.
Connecting to PC.
1. Insert the USB receiver into an available
USB port.
2. Turn on the power switch.
NOTES:
• You can store the USB receiver inside the
mouse.
• To save power, turn off the power when
you are not using the mouse.
• When you turn on the mouse, the power
LED temporarily lights up for about ten
seconds.
• When the battery power is low, the power
LED blinks continuously.
Your package includes: a. 2.4GHz wireless optical mouse /
b. Nano USB 2.4 GHz receiver / c. 2 x AAA batteries /
d. Quick Start Guide
NCC警語
低功電波輻射性電機管理辦法第十二條:經型式認證合格之低功率射頻電
機,非經許可,公司、商號或使用者均不得擅自變更頻率、加大功率或變
更原設計之特性及功能。第十四條:低功率射頻電機之使用不得影響飛
航安全及干擾合法通信;經發現現象時,應立即停用,並改善至無干擾時
方得繼續使用。前項合法通信,指依電信法規定作業之無線電信。低功
率射頻電機需忍受合法通信或工業、科學及醫療用電波輻射性電機設備之
干擾。
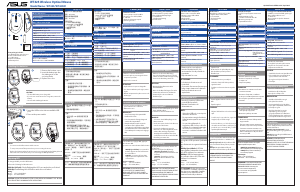
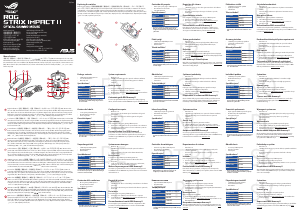
Button functions
1 Left button: Left-click
2 Right button: Right-click
3 Wheel: Scroll up/down and middle-click
4 Left side upper button: Forward (Internet)
5 Left side lower button: Back (Internet)
6 DPI Switch: Allows you to change the DPI level
(800/1200/1600).
1
2
3
4
5
6
1. Remove the cover.
2. Insert the batteries into the slot, taking note of the correct
polarity.
3. Replace the cover.
CAUTION:
• The bundled batteries are not chargeable.
• If you do not use the mouse for a long time, remove the batteries.
• Use new and similar-type batteries.
Q8220 / First Edition / March 2013
China RoHS EFUP
Labeling
N13219
BSMI
Certification
Federal Communications
Commission Interference
Statement
This equipment has been tested and
found to comply with the limits for a Class
B digital device, pursuant to Part 15 of
the FCC Rules.
These limits are designed to provide
reasonable protection against harmful
interference in a residential installation.
This equipment generates, uses and can
radiate radio frequency energy and, if
not installed and used in accordance
with the instructions, may cause harmful
interference to radio communications.
However, there is no guarantee that
interference will not occur in a particular
installation.
If this equipment does cause harmful
interference to radio or television
reception, which can be determined
by turning the equipment off and on,
the user is encouraged to try to correct
the interference by one or more of the
following measures:
-- Reorient or relocate the receiving
antenna.
-- Increase the separation between the
equipment and receiver.
-- Connect the equipment into an
outlet on a circuit different from that to
which the receiver is connected.
-- Consult the dealer or an experienced
radio/TV technician for help.
This device complies with part 15 of the
FCC Rules.
Operation is subject to the following two
conditions:
(1) This device may not cause harmful
interference, and
(2) this device must accept any
interference received, including
interference that may cause undesired
operation.
CAUTION: Any changes or modifications
not expressly approved by the grantee of
this device could void the user’s authority
to operate the equipment
.
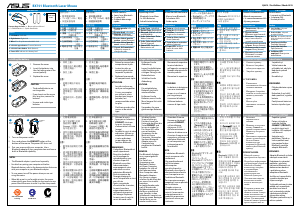
繁體中文
包裝內容物:
a. 2.4GHz 無線光學滑鼠
b. Nano USB 2.4 GHz 接收器
c. 2 x AAA 電池
d.
快速安裝指南
安裝電池
1. 移除上蓋。
2. 將電池放入電池槽並注
意正負極。
3. 裝回上蓋。
注意
:
• 附贈的電池不能充電。
• 若您在長時間內不會使
用電池,請移除電池。
• 使用新的同一型號的
電池。
連接到電腦
1. 將 USB 接收器插入電腦
上的 USB 連接埠。
2. 開啟電源開關。
注意
:
•
您可以將USB接收器存放
在滑鼠內。
•
為了節省電能,在不使
用滑鼠時請關閉電源。
按鍵功能
1 左鍵: 左鍵點選
2 右鍵:右鍵點選
3 滾輪: 向上/下滾動與中
鍵點選
4 左前側按鈕: 向前
(網路)
5 左後側按鈕: 向後
(網路)
6 DPI 開關:允許您更改
DPI 等級(800/1200/1600)
簡體中文
包裝內容物:
a.
2.4GHz 無線光電鼠標
b. Nano USB 2.4 GHz 接收器
c. 2 x AAA 電池
d. 快速安裝指南
安裝電池
1. 打開上蓋。
2. 將電池放入電池槽並注意
正負極。
3. 裝回上蓋。
注意
:
• 附贈的電池不能充電。
• 若您在長時間內不會使
用電池,請移除電池。
• 使用新的同一型號的
電池。
連接到電腦
1. 將 USB 接收器插入電腦
上的 USB 接口。
2. 開啟電源開關。
注意:
•
您可以將USB接收器存
放在鼠標內。
•
為了節省電能,在不使
用鼠標時請關閉電源。
按鍵功能
1
左鍵: 左鍵點擊
2
右鍵:右鍵點擊
3
滾輪: 向上/下滾動與中
鍵點擊
4
左前側按鈕: 向前
(網絡)
5
左後側按鈕: 向後
(網絡)
6 DPI 開關:允許您更改 DPI
等級(800/1200/1600)
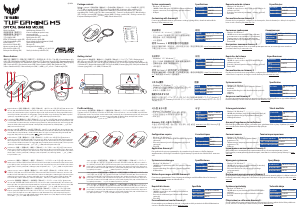
FRANÇAIS
Contenu de la boîte
:
a. Souris optique sans fil 2.4GHz
b. Mini-récepteur USB 2.4GHz
c. 2 x piles AAA
d. Guide de démarrage rapide
Installer la batterie
1. Retirez le couvercle du
compartiment à pile.
2. Insérez les piles en
prenant garde à bien
respecter la polarité.
3. Replacez le couvercle du
compartiment à pile.
ATTENTION :
• Les piles incluses ne sont
pas rechargeables.
• Si vous ne comptez pas
utiliser la souris pendant
une longue période, il est
recommandé de retirer
les piles.
• N’utilisez que des piles
neuves et de même type.
Connexion à un PC
1.
Insérez le récepteur USB
sur l’un des ports USB de
votre ordinateur.
2.
Mettez la souris
sous tension via
son interrupteur
d’alimentation.
REMARQUES
:
•
Vous pouvez placer le
récepteur USB à l’intérieur
de la souris
.
•
Pour économiser de
l’énergie, éteignez la souris
lorsque vous ne l’utilisez
pas.
Fonction des boutons
1 Bouton gauche : clic gauche
2 Bouton droit : clic droit
3
Molette : défilement haut/
bas et clic central
4
Bouton latéral gauche
arrière : suivant (Internet)
5
Bouton latéral gauche
avant : retour (Internet)
6 Bouton DPI : permet de
modifier la résolution DPI
(800/1200/1600)
DEUTSCH
Verpackungsinhalt:
a. 2.4G Hz optische drahtlose Maus
b. Nano-USB 2,4 GHz-Empfänger
c. 2 AAA-Batterien
d. Schnellstartanleitung
Einlegen der Batterien
1. Entfernen Sie die
Abdeckung.
2. Legen Sie die Batterien
unter Beachtung der
richtigen Polung in das
Batteriefach ein.
3. Schließen Sie die
Abdeckung.
ACHTUNG:
• Die mitgelieferten
Batterien sind nicht
wiederaufladbar.
• Entfernen Sie die
Batterien, wenn Sie die
Maus längere Zeit nicht
benutzen.
• Verwenden Sie neue
gleichwertige Batterien.
Verbinden mit einem PC
1.
Stecken Sie den USB-
Empfänger in einen freien
USB-Anschluss.
2.
Schalten Sie den Schalter
ein.
.
HINWEISE
:
•
Sie können den USB-
Empfänger im Inneren der
Maus aufbewahren.
•
Um Energie zu sparen,
schalten Sie bitte den
Schalter aus, wenn Sie die
Maus nicht benutzen.
Tastenfunktionen
1 Linke Taste: Linksklick
2 Rechte Taste: Rechtsklick
3
Mausrad: Bildlauf auf/ab
und Mittelklick
4 Linke Seite obere Taste:
Weiter (Internet)
5 Linke Seite untere Taste:
Zurück (Internet)
6 DPI-Schalter: Hier können
Sie die DPI-Stufe ändern
(800/1200/1600).
ITALIANO
Nella confezione sono compresi:
:
a. Mouse ottico wireless da 2.4GHz
b. Ricevitore Nano USB 2.4 GHz
c. 2 batterie AAA
d. Guida rapida
Installazione della
batteria
1. Rimuovere la copertura.
2. Inserire le batterie
nell’apposito scomparto,
facendo attenzione alla
corretta polarità.
3. Rimontare la copertura.
ATTENZIONE:
• Le batterie in dotazione
non sono ricaricabili.
• Se non si usa il mouse
per lungo tempo,
rimuovere le batterie.
• Utilizzare batterie nuove
e di tipo simile.
Connessione al PC
1.
Inserire il ricevitore USB in
una porta USB disponibile.
2.
Accendere l’interruttore di
alimentazione.
NOTE
:
•
Il ricevitore USB può essere
riposto all’interno del
mouse.
• Per risparmiare energia,
disattivare l’alimentazione
quando non si utilizza il
mouse.
Funzioni dei pulsanti
1 Tasto sx: clic di sinistra
2 Tasto dx: clic di destra
3 Rotellina: Scorrimento
su/giù e clic al centro.
4 Tasto in alto a sinistra:
Avanti (Internet)
5 Tasto in basso a sinistra:
Indietro (Internet)
6 Tasto DPI: consente di
modificare il livello di DPI
(800/1200/1600).
РУССКИЙ
В комплект входят
:
a.
2.4ГГц беспроводная оптическая мышь
b. USB приемник 2,4 ГГц
c. 2 элемента питания типа ААА
d. Краткое руководство
Установка аккумулятора
1. Снимите крышку.
2. Вставьте батарейки,
соблюдая полярность.
3. Закройте крышку.
ОСТОРОЖНО:
• В комплекте
поставляются обычные
элементы питания.
• Извлеките батарейки,
если Вы не пользуетесь
мышью длительное
время.
• Используйте однотипные
элементы питания.
Подключение к ПК
1.
Подключите USB-
приемник к свободному
порту USB.
2.
Включите переключатель
питания.
.
ПРИМЕЧАНИЯ
:
•
Вы можете хранить USB-
приемник внутри мыши.
•
Для экономии энергии,
выключите питание, когда
не используете мышь.
Функции кнопок
1 Левая кнопка: Щелчок левой
кнопкой
2 Правая кнопка: Щелкните
правой кнопкой
3 Колесико
: Прокрутка вверх
/ вниз и щелчок средней
кнопкой мыши
4 Верхняя кнопка на левой
стороне: Вперед (Internet)
5 Нижняя кнопка на левой
стороне: Назад (Internet)
6 DPI переключатель
:
Позволяет изменять уровень
DPI (800/1200/1600).
ČEŠTINA
Obsah krabice::
a. Bezdrátová optická myš 2,4 GHz
b. Přijímač Nano USB 2,4 GHz
c. 2 x baterie AAA
d. Stručná příručka
Vložení baterie
1. Sejměte kryt.
2. Vložte baterie do
přihrádky tak, aby byla
dodržena správná
polarita.
3. Nasaďte kryt.
UPOZORNĚNÍ
:
• Přiložené baterie nejsou
nabíjecí.
• Nebudete-li myš delší
dobu používat, vyjměte
baterie.
• Použijte nové baterie a
baterie stejného typu.
Připojení k POČÍTAČI
1. Zasuňte přijímač USB do
volného portu USB.
2. Zapněte vypínač
.
POZNÁMKY
:
•
Přijímač USB můžete
uchovávat uvnitř myši.
.
•
Jestliže myš nepoužíváte,
vypněte napájení, aby se
šetřila energie.
Funkce tlačítka
1 Levé tlačítko: klepnutí
levým tlačítkem
2
Pravé tlačítko: klepnutí
pravým tlačítkem
3
Kolečko: posouvání nahoru/
dolů a klepnutí prostředním
tlačítkem
4 Levé horní tlačítko:
Dopředu (Internet)
5 Levé dolní tlačítko:
Zpět (Internet)
6 Přepínač DPI: Umožňuje
měnit úroveň DPI
(800/1200/1600).
NEDERLANDS
Inhoud van de verpakking:
a. 2.4GHz draadloze optische muis
b. Nano USB 2.4 GHz-ontvanger
c. 2 x AAA-batterijen
d. Beknopte handleiding
De batterijen installeren.
1. Verwijder de klep.
2. Stop de batterijen in
de sleuven en let op de
juiste polariteit.
3. De klep naar voor duwen
en erop drukken om deze
terug te plaatsen.
OPGELET:
• De bijgeleverde
batterijen zijn niet
oplaadbaar.
• Verwijder de batterijen
als u de muis niet zult
gebruiken gedurende
langere tijd.
• Gebruik nieuwe
batterijen of batterijen
van hetzelfde type.
Aansluiten op een pc.
1. Steek de USB-ontvanger
in een vrije USB-
aansluiting.
2. Schakel de muis in.
OPMERKINGEN:
• U kunt de USB-ontvanger
in de muis bewaren.
• Om energie te besparen,
schakelt u de muis uit als
hij niet in gebruik is.
Knopfuncties
1 Linkerknop: links klikken
2 Rechterknop: rechts klikken
3 Wiel: omhoog/omlaag
scrollen en midden klikken
4 Knop linksboven: volgende
(Internet)
5 Knop linksonder: vorige
(Internet)
6 DPI-schakelaar: Hiermee
verandert u het DPI-niveau
(800/1200/1600).

Únase a la conversación sobre este producto
Aquí puedes compartir lo que piensas sobre Asus WT460 Ratón. Si tiene alguna pregunta, primero lea atentamente el manual. Puede solicitar un manual utilizando nuestro formulario de contacto.