Manual de uso Black and Decker GL605 Tijeras cortasetos

¿Necesita un manual para su Black and Decker GL605 Tijeras cortasetos? A continuación puedes ver y descargar el manual en PDF gratis en español. Este producto actualmente tiene 4 preguntas frecuentes, 0 comentarios y tiene 1 voto con una calificación promedio de producto de 0/100. Si este no es el manual que desea, , contáctenos.

¿Su producto tiene algún defecto y el manual no ofrece ninguna solución? Vaya a Repair Café para solicitar un servicio de reparación gratuito.

Manual de uso

Loading…

8
ENGLISH
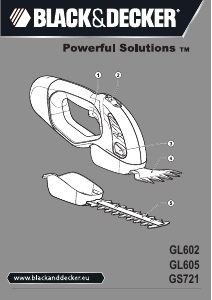
Features
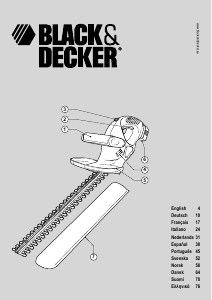
1. On/off switch
2. Lock-off button
3. Blade release button
4. Shear blade (GL602/GL605)
5. Trim blade (GS721/GL605)
Assembly
Warning! Avoid accidentally switching the tool on during
assembly.
GL605-Fittingandremovingtheblade(g.A)
The shear blade (4) has been designed for trimming grass
and weeds. The trim blade (5) has been designed for trimming
hedges and shrubs.
u To t the blade, line it up with the receptacle on the tool.
Slide the blade into the receptacle and push until the
blade snaps into place.
u To remove the blade, push the two release buttons (3)
simultaneously while at the same time pulling the blade
out of the receptacle.
Residual risks.
Additional residual risks may arise when using the tool which
may not be included in the enclosed safety warnings. These
risks can arise from misuse, prolonged use etc.
Even with the application of the relevant safety regulations
and the implementation of safety devices, certain residual
risks can not be avoided. These include:
u Injuries caused by touching any rotating/moving
parts.
u Injuries caused when changing any parts, blades or
accessories.
u Injuries caused by prolonged use of a tool. When
using any tool for prolonged periods ensure you take
regular breaks.
u Impairment of hearing.
u Health hazards caused by breathing dust developed
when using your tool (example:- working with wood,
especially oak, beech and MDF.)
Use
Warning! Let the tool work at its own pace. Do not overload.
Chargingthebattery(g.B)
The battery needs to be charged before rst use and
whenever it fails to produce sufcient power on jobs that were
easily done before. When charging the battery for the rst
time, or after prolonged storage, it will only accept an 80%
charge. After several charge and discharge cycles, the battery
will attain full capacity. The battery may become warm while
charging; this is normal and does not indicate a problem.
Warning! Do not charge the battery at ambient temperatures
below 4 °C or above 40 °C. Recommended charging
temperature: approx. 24 °C.
u Insert the charger plug (6) into the charger connector (7)
at the rear of the tool.
u Plug the charger into a mains outlet.
u Switch on at the mains.
The battery can be left connected to the charger indenitely.
u When you want to use the tool, press the tab (8) to take
the charger connector from the tool and unplug the charger.
To maximise the lifetime of the battery, it is recommended to
keep the battery connected to the charger whenever the tool
is not in use. When the battery is full, the power consumption
of the charger is negligible.
Switching on and off
Switching on
u Push the lock-off button (2) backward using your thumb
and at the same time squeeze the trigger switch (1).
u Release the lock-off button.
Switching off
u Release the switch (1).
Warning! Never attempt to lock the switch in the on position.
Hintsforoptimumuse(g.C&D)
Trimming grass
u In order to achieve optimum cutting results, only cut dry
grass.
u Hold the tool as shown in g. C1 - C3. Keep your other
hand well away from the blade. Maintain a stable working
position so that you do not slip. Do not overreach.
u When cutting long grass, work in stages from the top.
Take small cuts.
u Keep the tool away from hard objects and delicate plants.
u If the tool starts running slowly, reduce the load.
u To make a closer cut, slightly tilt the tool.
Trimming hedges
u Slightly tilt the tool (up to 15° relative to the line of cut) so
that the blade tips point slightly towards the hedge (g. D1).
This will cause the blades to cut more effectively.
u Start by trimming the top of the hedge. Hold the tool at the
desired angle and move it steadily along the line of cut
(g. D2). The double-sided blade allows you to cut in
either direction.
u In order to obtain a very straight cut, stretch a piece of
string along the length of the hedge at the desired height.
Use the string as a guideline, cutting just above it.
Descargue el manual en Español (PDF, 2.1 MB)
(Piense en el medioambiente y solo imprima este manual si es de verdad necesario)

Loading…

Puntuación

Dé su opinión de la Black and Decker GL605 Tijeras cortasetos calificando el producto. ¿Quiere compartir su experiencia con este producto o hacer una pregunta? Deje un comentario en la parte inferior de la página.
¿Estás satisfecho con elBlack and Decker GL605 Tijeras cortasetos?
No
0%
100%
1 voto

Únase a la conversación sobre este producto

Aquí puedes compartir lo que piensas sobre Black and Decker GL605 Tijeras cortasetos. Si tiene alguna pregunta, primero lea atentamente el manual. Puede solicitar un manual utilizando nuestro formulario de contacto.

Más sobre este manual

Entendemos que es bueno tener un manual en papel para tus Black and Decker GL605 Tijeras cortasetos. Siempre puedes descargar el manual desde nuestro sitio web e imprimirlo tú mismo. Si deseas tener un manual original te recomendamos contactar con Black and Decker. Es posible que puedan proporcionar un manual original. ¿Estás buscando el manual de tu Black and Decker GL605 Tijeras cortasetos en otro idioma? Elija su idioma preferido en nuestra página de inicio y busque el número de modelo para ver si lo tenemos disponible.

Especificaciones

Marca Black and Decker
Modelo GL605
Categoría Tijeras cortasetos
Tipo de archivo PDF
Tamaño del archivo 2.1 MB

Todos los manuales para Black and Decker Tijeras cortasetos
Más manuales de Tijeras cortasetos

Preguntas frecuentes sobre Black and Decker GL605 Tijeras cortasetos

Nuestro equipo de atención al cliente busca información útil sobre los productos y responde a las preguntas frecuentes. Si encuentra inexactitudes en las preguntas frecuentes, indíquenoslo usando nuestro formulario de contacto.

¿Cómo sé que mi cortasetos no tiene filo? Verificado

Cuando se arrancan ramas en lugar de cortarlas, el cortasetos está desafilado y debe afilarse.

Ha sido de gran ayuda (348) Leer más

¿Cómo afilo las cuchillas de mi cortasetos? Verificado

Afilar las cuchillas de su cortadora de setos es importante para mantener el rendimiento y la eficiencia de la herramienta. Para afilar las cuchillas, necesitará una lima o una piedra de afilar diseñada específicamente para el tipo de cuchilla de su cortasetos.

Ha sido de gran ayuda (304) Leer más

¿Cómo lubrico las cuchillas de mi cortasetos? Verificado

Lubricar las cuchillas de su cortadora de setos ayudará a reducir la fricción y el desgaste, prolongando la vida útil de la herramienta. Utilice un aceite lubricante de alta calidad diseñado específicamente para cortasetos y aplique una pequeña cantidad a las cuchillas después de cada uso.

Ha sido de gran ayuda (149) Leer más

¿Cómo puedo evitar que se forme óxido en las hojas de mi cortasetos? Verificado

El óxido puede dañar las cuchillas de su cortadora de setos, reduciendo su rendimiento y vida útil. Para evitar la oxidación, limpie y seque bien las cuchillas después de cada uso y guárdelas en un lugar seco y limpio. También puede considerar aplicar una capa protectora, como aceite o un inhibidor de óxido, a las cuchillas antes de guardarlas.

Ha sido de gran ayuda (90) Leer más
Manual de uso Black and Decker GL605 Tijeras cortasetos

Productos relacionados

Categorias relacionadas

×
Download