
Residualrisks.
Additional residual risks may arise when using the tool which
may not be included in the enclosed safety warnings. These
risks can arise from misuse, prolonged use etc.
Even with the application of the relevant safety regulations
and the implementation of safety devices, certain residual
risks can not be avoided. These include:
u Injuries caused by touching any rotating/moving
parts.
u Injuries caused when changing any parts, blades or
accessories.
u Injuriescausedbyprolongeduseofatool.When
using any tool for prolonged periods ensure you take
regularbreaks.
u Impairmentofhearing.
u Health hazards caused by breathing dust developed
when using your tool (example:- working with wood,
especiallyoak,beechandMDF.)
Use
Warning! Let the tool work at its own pace. Do not overload.
Setting the tool to trimming or edging mode
(g.C,E&F)
The tool can be used in trimming mode as shown in g. E or
in edging mode to trim overhanging grass along lawn edges
and ower beds as shown in g. F.
Trimmingmode(g.C&E)
For trimming, the trimmer head should be in the position
shown in g. E. If it is not:
u Set the tool to the working position.
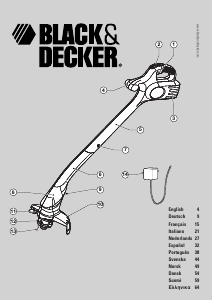
u Depress the adjustment button (6).
u Rotate the handle (2), while releasing the button.
u When the head is in position, the button will lock into place.
Note: The head will only rotate in one direction.
Edgingmode(g.C&F)
For edging, the trimmer head should be in the position shown
in g. F. If it is not:
u Set the tool to the working position.
u Depress the adjustment button (6).
u Rotate the handle (2), while releasing the button.
u When the head is in position, the button will lock into place.
Note: The head will only rotate in one direction.
Adjustingtheheightofthetool(g.C)
This tool has a telescopic mechanism, allowing you to set it to
a comfortable height. There are three height settings.
To adjust the height setting, proceed as follows:
u Depress the adjustment button (6).
u Gently pull the tube (14) in or out of the motor housing (2)
to the desired height, while releasing the button.
u When the tube is in position, the button will lock into place.
Switching on and off
u To switch the tool on, squeeze the trigger lever (1).
u To switch the tool off, release the trigger lever.
Warning! Never attempt to lock the trigger lever in the on
position.
Hints for optimum use
General
u In order to achieve optimum cutting results, only cut dry
grass.
Trimming
u Hold the tool as shown in g. E.
u Gently swing the trimmer from side to side.
u When cutting long grass, work in stages from the top.
Take small cuts.
u Keep the tool away from hard objects and delicate plants.
u If the tool starts running slowly, reduce the load.
Edging
Optimum cutting results are achieved on edges deeper than
50 mm.
u Do not use the tool to create edges. To create edges,
use an edging spade.
u Guide the tool as shown in g. F.
u To make a closer cut, slightly tilt the tool.
Maintenance
Your tool has been designed to operate over a long period of
time with a minimum of maintenance. Continuous satisfactory
operation depends upon proper tool care and regular cleaning.
Warning! Before performing any maintenance, switch off and
unplug the tool.
u Regularly clean the ventilation slots in your tool using
a soft brush or dry cloth.
u Regularly clean the motor housing using a damp cloth.
Do not use any abrasive or solvent-based cleaner.
u Regularly clean the cutting line and spool using a soft
brush or dry cloth.
u Regularly use a blunt scraper to remove grass and dirt
from the underneath of the guard.



Únase a la conversación sobre este producto
Aquí puedes compartir lo que piensas sobre Black and Decker GL655 Cortabordes. Si tiene alguna pregunta, primero lea atentamente el manual. Puede solicitar un manual utilizando nuestro formulario de contacto.