Manual de uso Black and Decker LM175 Cortacésped
¿Necesita un manual para su Black and Decker LM175 Cortacésped? A continuación puedes ver y descargar el manual en PDF gratis en español. Este producto actualmente tiene 8 preguntas frecuentes, 0 comentarios y tiene 0 votos. Si este no es el manual que desea, , contáctenos.
¿Su producto tiene algún defecto y el manual no ofrece ninguna solución? Vaya a Repair Café para solicitar un servicio de reparación gratuito.
Manual de uso
Loading…

Loading…
Puntuación
Dé su opinión de la Black and Decker LM175 Cortacésped calificando el producto. ¿Quiere compartir su experiencia con este producto o hacer una pregunta? Deje un comentario en la parte inferior de la página.Más sobre este manual
Entendemos que es bueno tener un manual en papel para tus Black and Decker LM175 Cortacésped. Siempre puedes descargar el manual desde nuestro sitio web e imprimirlo tú mismo. Si deseas tener un manual original te recomendamos contactar con Black and Decker. Es posible que puedan proporcionar un manual original. ¿Estás buscando el manual de tu Black and Decker LM175 Cortacésped en otro idioma? Elija su idioma preferido en nuestra página de inicio y busque el número de modelo para ver si lo tenemos disponible.
Especificaciones
| Marca | Black and Decker |
| Modelo | LM175 |
| Categoría | Cortacéspedes |
| Tipo de archivo | |
| Tamaño del archivo | 1 MB |
Todos los manuales para Black and Decker Cortacéspedes
Más manuales de Cortacéspedes
Preguntas frecuentes sobre Black and Decker LM175 Cortacésped
Nuestro equipo de atención al cliente busca información útil sobre los productos y responde a las preguntas frecuentes. Si encuentra inexactitudes en las preguntas frecuentes, indíquenoslo usando nuestro formulario de contacto.
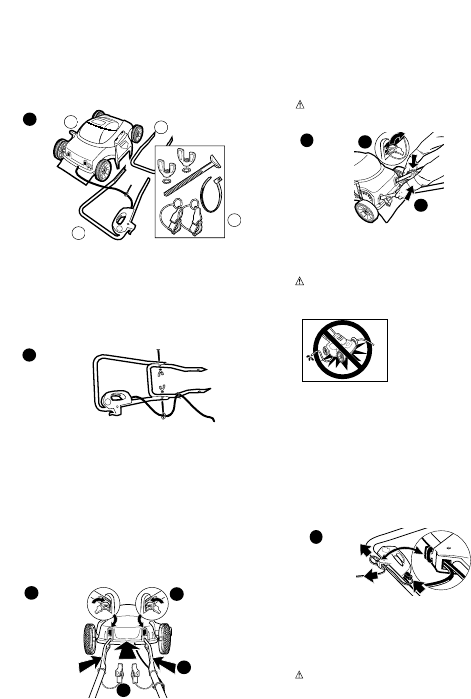
¿Cómo puedo saber cuándo cambiar las cuchillas de la cortacésped? Verificado
Las cuchillas afiladas cortarán el césped limpiamente. Las cuchillas desgastadas desgarran el césped toscamente y este se volverá marrón enseguida. Cuando la cortadora desgarre el césped, será el momento de cambiar o afilar las cuchillas.
Ha sido de gran ayuda (2373) Leer más¿Qué es el mantillo? Verificado
Algunos cortacéspedes son capaces de procesar la hierba para que forme un mantillo orgánico. Trituran la hierba finamente y la soplan sobre el césped. Allí el mantillo nutre y protege la hierba.
Ha sido de gran ayuda (780) Leer másMe equivoqué y eché gasoil a mi cortacésped de gasolina. ¿Qué debo hacer? Verificado
NO use el cortacésped. La única opción es vaciar completamente el depósito y llenarlo con el combustible adecuado.
Ha sido de gran ayuda (707) Leer más¿Cuál es la mejor longitud para mi césped? Verificado
Para evitar que la hierba se seque, no debe ser demasiado corta. Es mejor cortar la hierba más a menudo que dejarla demasiado corta. La longitud óptima es de entre 3 y 4 centímetros.
Ha sido de gran ayuda (413) Leer más¿Puedo cortar el césped cuando está mojado? Verificado
Es posible, pero no recomendable. Cuando el césped está húmedo, se amontonará durante el corte, lo que evitará un resultado óptimo.
Ha sido de gran ayuda (275) Leer más¿Cuál es el momento adecuado para cortar mi césped? Verificado
La mejor época para cortar el césped es de marzo a octubre. La siega debe hacerse una o dos veces por semana dependiendo de la rapidez con la que crezca la hierba. La mejor hora del día para cortar el césped es al final de la tarde y nunca a plena luz del sol. Así evitará que la hierba se seque después de cortarla.
Ha sido de gran ayuda (253) Leer más¿A partir de qué superficie de césped es mejor elegir un cortacésped eléctrico y cuándo uno de gasolina? Verificado
Para superficies de hasta 300 m² puede utilizar un cortacésped a batería. Para superficies más grandes se recomienda usar un cortacésped de gasolina.
Ha sido de gran ayuda (201) Leer más¿Puedo dejar que un robot cortacésped funcione por la noche? Verificado
Es mejor no dejar que un robot cortacésped funcione durante la noche. Algunos animales, como los erizos, son principalmente activos durante la noche. A menudo, no son lo suficientemente rápidos para escapar del robot cortacésped y pueden resultar gravemente heridos o muertos.
Ha sido de gran ayuda (192) Leer más


Únase a la conversación sobre este producto
Aquí puedes compartir lo que piensas sobre Black and Decker LM175 Cortacésped. Si tiene alguna pregunta, primero lea atentamente el manual. Puede solicitar un manual utilizando nuestro formulario de contacto.