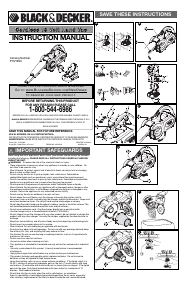
INSTALLATION
FITTING THE CHARGING BASE TO THE WALL (FIG. A)
The charging base can be placed on a work top or fitted to the wall to provide a convenient
storage and charging point for the appliance.
ASSEMBLY
ADJUSTING THE PIVOTING NOZZLE (FIG. B)
• The pivoting nozzle (9) is stored under the appliance. To adjust for use, lift the appliance
from the charging base.
• Depress the pivot lock button (3) and rotate the nozzle to the required position.
• Release the pivot lock button to lock in position.
• The pivoting nozzle can be extended by pulling the extension piece (8) until it locks into
position.
• The extension can be retracted by depressing the button (12) and pushing the extension
back into the nozzle.
• The pivoting nozzle should be returned to the storage position under the appliance after use
and when charging.
FITTING THE ACCESSORIES (FIG. C)
These models are supplied with the following accessories:
• A crevice tool (10) for confined spaces.
• A brush tool (11) for furniture and stairs.
To fit an accessory, proceed as follows:
• Take the accessories from the charging base.
• Insert the appropriate accessory into the front of the appliance.
OPERATION
• Before first use, the battery must be charged for at least 16 hours.
• Place the appliance on the charging base whenever it is not in use.
CHARGING THE BATTERY (FIG. D)
• Make sure that the appliance is switched off.
The battery will not be charged with the on/off switch in the on position.
• Place the appliance on the charging base as shown.
• Plug in the charger.
The charging indicator (6) will be lit.
• Leave the appliance to charge for at least 16 hours.
SAFETY WARNINGS AND INSTRUCTIONS: CHARGING
• While charging, the charger may become warm. This is normal and does not indicate a
problem.
• The appliance can be left connected to the charger indefinitely. The charging indicator (6)
will be lit as long as the appliance is connected to the plugged-in charger.
• Do not charge the battery at ambient temperatures below 39° F (4 °C) or above 104°
(40 °C).
SWITCHING ON AND OFF (FIG. E)
• To switch the appliance on, slide the on/off switch (4) forward to the number 1 position (low
speed/extended runtime). For high speed (maximum performance) slide the on/off switch (4)
forward to the number (2) position.
• To switch the appliance off, slide the on/off switch (4) back.
HANGING THE CHARGING BASE (FIG. A)
Use the hardware provided only if hanging on conventional hollow wall construction such
as sheet rock or plaster walls. If not hanging on conventional sheet rock or plaster walls,
please use the appropriate fasteners for that material.
• Locate the charging base within reach of an electrical outlet.
• Mark the position of both hang holes as shown in figure A.
• The bottom mounting screw should be inserted first and driven in to about an 1/8” (3mm)
from the wall.
• Place the charging base over the screw head until it is fully seated.
• Check that the charging base is straight up and down and tighten the screw.
• Insert the top screw and check to see that the charging base is firmly attached to the wall
so it will not pull out.
• Plug in and place the product in position. The charging base can be fixed, or simply placed,
in a convenient vertical position.
OPTIMIZING THE SUCTION FORCE (FIG. F)
In order to keep the suction force optimized, the filters must be cleared regularly during use.
• Rotate the wheel (5) a few turns to shake out dust clogging the filters.
CLEANING AND MAINTENANCE
CAUTION: Regularly clean the filters (13 & 14).
CLEANING THE DUST CONTAINER AND FILTERS (FIG. G - J)
The filters are re-usable and should be cleaned regularly.
• Press the release latch (1) and open the container door (2) (fig. G).
• Remove the filters (13 & 14) by twisting them counterclockwise (fig. H).
• Empty the dust container (fig. I)
• Brush any loose dust off the filters.
• Wash the filters in warm, soapy water (fig. J).
• Make sure that the filters are dry.
• Refit the filters (13 & 14) on to the appliance, twisting them clockwise until they lock into
place.
• Close the container door (2). Make sure that the release latch (1) clicks into place.
WARNING: Projectile/Respiratory Hazard: Never use the appliance without the filters.
Optimum dust collection will only be achieved with clean filters.
REPLACING THE FILTERS
The filters should be replaced every 6 to 9 months and whenever worn or damaged.
Replacement filters are available from your Black & Decker dealer (cat. no. PVF100):
• Remove the old filters as described above.
• Fit the new filters as described above.
MAINTENANCE
Use only mild soap and damp cloth to clean the tool. Never let any liquid get inside the tool;
never immerse any part of the tool into a liquid.
IMPORTANT: To assure product SAFETY and RELIABILITY, repairs, maintenance and
adjustment (other than those listed in this manual) should be performed by authorized service
centers or other qualified service personnel, always using identical replacement parts.
Troubleshooting
Problem Possible Cause Possible Solution
• Unit will not start. • Battery not charged. • Check battery charging
requirements.
• Battery will not charge. • Charger not plugged in. • Plug charger into a
working outlet. Refer to
“Important Charging
Notes” for more details.
• Check current at
receptacle by plugging in
a lamp or otherappliance.
• Check to see if
receptacle is connected
to a light switch which
turns power off when
you turn out the lights.
• Surrounding air temperature • Move charger and tool
too hot or too cold. to a surrounding air
temperature of above 40
degrees F(4,5°C) or
below 105 degrees F
(+40,5°C).
For assistance with your product, visit our website www.blackanddecker.com for the
location of the service center nearest you or call the BLACK & DECKER help line at
1-800-544-6986.
ACCESSORIES
Recommended accessories for use with your tool are available from your local dealer or
authorized service center. If you need assistance regarding accessories, please call:
1-800-544-6986.
WARNING: The use of any accessory not recommended for use with this tool could be
hazardous.
BATTERY REMOVAL AND DISPOSAL
This product uses nickel-cadmium (Ni-Cd) rechargeable and recyclable batteries. When
the batteries no longer hold a charge, they should be removed from the Vac and recycled.
They must not be incinerated or composted.
The batteries can be taken for disposal to a Black & Decker, Company-Owned or
Authorized Service Center. Some local retailers are also participating in a national
recycling program (see “RBRC
TM
Seal”). Call your local retailer for details. If you bring the
batteries to a Black & Decker Company-Owned or Authorized Service Center, the Center
will arrange to recycle old batteries. Or, contact your local municipality for proper disposal
instructions in your city/town.
To remove the battery pack for disposal:
1.) First, before attempting to disassemble the product, turn it on and leave it on until the
motor completely stops insuring a complete discharge of the batteries.
2.) Ensure nozzle is rotated out of storage position.
3.) Using a phillips screwdriver, remove the seven screws securing the two housing halves.
4.) Lift the housing cover away from the assembly.
5.) Remove the single screw which secures the motor assembly. (located at bottom of unit,
adjacent to the bowl.
6.) Lift out the motor assembly.
7.) Remove the three screws in the cover and lift the cover off of the assembly exposing
the batteries.
8.) Detach motor connections and lift motor away from assembly.
9.) Detach all lead connections and remove batteries from battery casing.
10.) Dispose of batteries as per recommended guidelines.
THE RBRC™ SEAL
The RBRC™ (Rechargeable Battery Recycling Corporation)
Seal on the nickel-cadmium battery (or battery pack) indicates that the costs to
recycle the battery (or battery pack) at the end of its useful life have already been paid by
Black & Decker. In some areas, it is illegal to place spent nickel-cadmium batteries in the
trash or municipal solid waste stream and the RBRC program provides an environmentally
conscious alternative.
RBRC in cooperation with Black & Decker and other battery users, has established
programs in the United States and Canada to facilitate the collection of spent nickel-
cadmium batteries. Help protect our environment and conserve natural resources by
returning the spent nickel-cadmium battery to an authorized Black & Decker service center
or to your local retailer for recycling. You may also contact your local recycling center for
information on where to drop off the spent battery, or call 1-800-8-BATTERY.
SERVICE INFORMATION
All Black & Decker Service Centers are staffed with trained personnel to provide customers
with efficient and reliable power tool service. Whether you need technical advice, repair, or
genuine factory replacement parts, contact the Black & Decker location nearest you. To find
your local service location, refer to the yellow page directory under "Tools—Electric" or call:
1-800-544-6986 or visit www.blackanddecker.com
FULL TWO-YEAR HOME USE WARRANTY
Black & Decker (U.S.) Inc. warrants this product for two years against any defects in
material or workmanship. The defective product will be replaced or repaired at no charge in
either of two ways.
The first, which will result in exchanges only, is to return the product to the retailer from
whom it was purchased (provided that the store is a participating retailer). Returns should be
made within the time period of the retailer’s policy for exchanges (usually 30 to 90 days after
the sale). Proof of purchase may be required. Please check with the retailer for their specific
return policy regarding returns that are beyond the time set for exchanges.
The second option is to take or send the product (prepaid) to a Black & Decker owned or
authorized Service Center for repair or replacement at our option. Proof of purchase may be
required. Black & Decker owned and authorized Service Centers are listed under "Tools-
Electric" in the yellow pages of the phone directory and on our website
www.blackanddecker.com.
This warranty does not apply to accessories. This warranty gives you specific legal rights
and you may have other rights which vary from state to state. Should you have any
questions, contact the manager of your nearest Black & Decker Service Center. This
product is not intended for commercial use.
FREE WARNING LABEL REPLACEMENT: If your warning labels become illegible or are
missing, call 1-800-544-6986 for a free replacement.
See ‘Tools-Electric’
– Yellow Pages –
for Service & Sales
Imported by
Black & Decker (U.S.) Inc.,
701 E. Joppa Rd.
Towson, MD 21286 U.S.A.
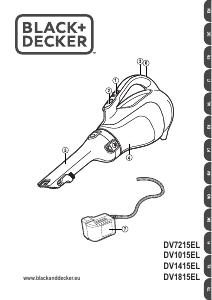
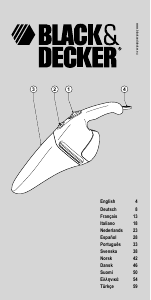
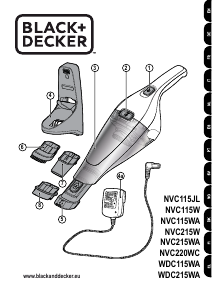
Product Features
1. Release latch for container door
2. Container door
3. Pivot lock release button
4. Two-speed on/off switch
5. Filter cleaning wheel
6. Charging indicator
7. Charging base
8. Extending extension nozzle
9. Pivoting nozzle
10. Small crevice tool
11. Upholstery brush
12. Release button


Únase a la conversación sobre este producto
Aquí puedes compartir lo que piensas sobre Black and Decker PHV1800 Aspirador de mano. Si tiene alguna pregunta, primero lea atentamente el manual. Puede solicitar un manual utilizando nuestro formulario de contacto.