
DE EN
Install/remove headlight
Adjustment
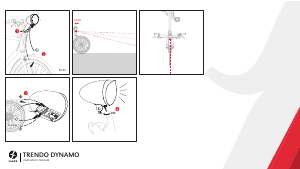
Adjust the headlight so it is glare-free for oncoming traffic. The
light/dark boundary should be aligned parallel to the road.
To check correct alignment: Put the bicycle on a horizontal
surface and shine against a wall. The visible light/dark boundary
should not be higher than the upper edge of the headlight.
Vertical adjustment: The headlight’s pitch is set by the position-
ing of the handlebar mount.
Horizontal adjustment: Continuously swivel headlight to the left
or right (within a finite range).
No mounting beneath the handlebar: When mounted hanging,
the headlight’s light field is upside down. Oncoming traffic will
then be glared, violating traffic regulations. Additionally, splash
or rain water may enter the headlight, causing damage not cov-
ered by product warranty.
Charging the battery
The IXON Core/Fyre has a firmly installed rechargeable lithium
battery. Prior to first use, the battery has to be charged.
To charge, open the rear cap on the headlight. Connect enclosed
USB cable to the headlight’s micro-USB
2
port. Connect the
USB cable with the included mains charger (if applicable), with a
different standard USB charger (max. 2000 mA, 5 V) or with a
computer. During charging, the indicator LED shines blue. When
the LED extinguishes, the charging process is complete. Over-
charging is not possible, as the power supply is cut off automati-
cally. Only charge battery at temperatures of over 0 °C.
Tip for battery protection: During longer periods of disuse, store
headlight in a cool and dry place with at least 30 % remaining
battery capacity.
No product warranty can be assumed when other USB chargers
are used.
Charging times
• With original Busch & Müller charger:
approx. 3.5 hours (IXON Core), approx. 5 hours (IXON Fyre)
• With other USB chargers or connected to a computer’s USB
port: longer charging times
Charging the battery using dynamo power
Using the E-WERK (ref. 361, setting 4.9 V/1A) or the USB-WERK
(ref. 361BW)
by Busch & Müller, a hub dynamo’s power can be
used to charge the IXON Core/Fyre while cycling. Please note
that during charging, the headlight is neither splash- nor rainwa-
ter-proof. The headlight can be switched on during charging.
Product warranty
Damage caused by improper use (e.g. dropping the headlight,
immersing it in water) is excluded from product warranty. The
warranty is also void once the headlight’s glass cover (held by
3 screws) is removed. (IXON Core)
Technische Änderungen vorbehalten.
Technical modifications reserved.
IXON Core
Akku-LED-Scheinwerfer mit IQ2-Lichttechnik
HighPower: ca. 50 Lux, Leuchtdauer mehr als 3 Stunden,
gleichbleibend hell
LowPower: ca. 12 Lux, Leuchtdauer etwa 15 Stunden,
gleichbleibend hell
IXON Fyre
Akku-LED-Scheinwerfer mit IQ-Lichttechnik
HighPower: ca. 30 Lux, Leuchtdauer mehr als 5 Stunden,
gleichbleibend hell
LowPower: ca. 10 Lux, Leuchtdauer etwa 15 Stunden,
gleichbleibend hell
Taster
1
EIN/AUS Taster etwa 1 Sekunde drücken
UMSCHALTEN Taster kurz drücken (funktioniert auch
High-Power/LowPower bei ausgeschaltetem Scheinwerfer)
Indikator-LEDs
1
Blau permanent HighPower-Licht
Rot permanent LowPower-Licht
In beiden Modi zeigen die Indikator-LEDs alle zwei Minuten die
Restkapazität durch Blinken an:
5 x Blinken – Restkapazität ca. 80-100 %
4 x Blinken – Restkapazität ca. 60-80 %
3 x Blinken – Restkapazität ca. 40-60 %
2 x Blinken – Restkapazität ca. 20-40 %
1 x Blinken – Restkapazität ca. 0-20 %
Um die Anzeige der Restkapazität vor Ablauf der zwei Minuten
herbeizuführen, entweder den Modus wechseln oder Scheinwerfer
aus und dann wieder einschalten.
Bei Unterschreiten einer gewissen Kapazität schaltet der
Scheinwerfer automatisch in den LowPower-Modus (blaue
Indikator-LED erlischt, rote Intikator-LED leuchtet).
Etwa 45 Minuten nach dem automatischen Wechsel in den
LowPower-Modus (bzw. bei Erreichen des gleichen Ladezustands
beim Fahren im LowPower-Modus):
Indikator-LEDs blinken rot/blau
Die gesetzlich vorgeschriebene Mindestlichtstärke von
10 Lux wird in Kürze unterschritten. Akku laden.
Die Lichtstärke nimmt nun kontinuierlich ab. Bis der Scheinwer-
fer dann endgültig abschaltet (zum Schutz des Akkus vor Tief-
entladung), vergeht noch etwa eine Stunde.
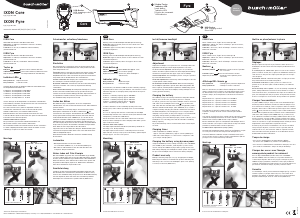
Montage
Busch &
Müller KG
•
58540 Meinerzhagen,
Germany •
Tel. +49(0)2354-915-6
•
[email protected] •
www.bumm.de
890082|0216
890082|0216
USB-Buchse
USB charging socket
Prise USB
USB-Buchse
USB charging socket
Prise USB
In:
5 V, max. 1 A
| Bedien-Taster
Indikator-LED
| push button
indicator LED
| Bouton de commande
LED indicator
2
1 1
1
2
Core
Typ | Type Nr. 180
Typ | Type Nr. 195
IXON Core
IXON Fyre
Instruction manual: DE | EN | FR | NL | IT | ES
Made in
Germany
Scheinwerfer aufsetzen/abnehmen
drücken
press
✗
22-27 mm27-32 mm
O Lenker
IXON Core
Battery-powered LED headlight with IQ2 light technology
HighPower: approx. 50 Lux, shines for more than 3 hrs. with
consistent brightness
LowPower: approx. 12 Lux, shines for approx. 15 hrs. with
consistent brightness
IXON Fyre
Battery-powered LED headlight with IQ light technology
HighPower: approx. 30 Lux, shines for more than 5 hrs. with
consistent brightness
LowPower: approx. 10 Lux, shines for approx. 15 hrs. with
consistent brightness
Push-button
1
ON/OFF Press button for approx. 1 sec.
Switch between Press button quickly
HighPower/LowPower (works also, when headlight is
switched off).
Indicator LEDs
1
Blue permanent HighPower light
Red permanent LowPower light
In both modes, the indicator LEDs show the remaining capacity
by flashing three times every two minutes. The exactness of this
indication depends on charging status, temperature and opera-
tional mode:
5 flashes – remaining capacity approx. 80-100 %
4 flashes – remaining capacity approx. 60-80 %
3 flashes – remaining capacity approx. 40-60 %
2 flashes – remaining capacity approx. 20-40 %
1 flash – remaining capacity approx. 0-20 %
To induce indication of the remaining capacity before two
minutes pass, either switch operating mode or turn headlight
OFF/ON.
As soon as capacity falls below a certain limit, the headlight
automatically switches into LowPower mode (blue indicator LED
extinguishes, red indicator LED shines).
About 45 minutes after the automatic switch into LowPower
mode (or when reaching the same charging status while operat-
ing in LowPower mode):
Indicator LEDs flash red/blue
The light output will fall below 10 Lux (mandatory minimum in
Germany) soon. Charge battery.
The light output now decreases continually. Before the head-
light switches off for good (to protect the battery against depth
charge) approx. one more hour passes.
Mounting
✗
O Handlebar
22-27 mm
IXON Core
Phare à LED et accu, équipé de la technologie IQ2
HighPower : 50 lux env., durée d‘éclairage : plus de 3 heures,
luminosité constante
LowPower : 12 lux env., durée d‘éclairage : 15 heures environ,
luminosité constante
IXON Fyre
Phare à LED et accu, équipé de la technologie IQ
HighPower : 30 lux env., durée d‘éclairage : plus de 5 heures,
luminosité constante
LowPower : 10 lux env., durée d‘éclairage : 15 heures environ,
luminosité constante
Boutons
1
MARCHE / ARRÊT Maintenir le bouton enfoncé pendant
env. 1 seconde
Commuter entre Presser brièvement le bouton
HighPower/LowPower (fonctionne aussi quand le phare
est éteint).
Affichage DEL témoin
1
Bleu permanent éclairage pleine puissance HighPower
Rouge permanent éclairage économe LowPower
Dans les deux modes, les DELs témoins indiquent le niveau de
charge restant par une séquence de clignotement triple toutes
les deux minutes. La précision de cette indication dépend de
l‘état de charge, de la température et du mode de fonctionne-
ment.
Clignotement 5 x – capacité restante env. 80-100 %
Clignotement 4 x – capacité restante env. 60-80 %
Clignotement 3 x – capacité restante env. 40-60 %
Clignotement 2 x – capacité restante env. 20-40 %
Clignotement 1 x – capacité restante env. 0-20 %
Pour afficher la capacité restante avant écoulement des
2 minutes, changer de mode ou bien éteindre puis rallumer
le phare.
Si la charge est inférieure à un certain seuil de capacité, le phare
commute automatiquement dans le mode LowPower (la DEL
témoin bleue s‘éteint, la DEL témoin rouge s‘allume).
Environ 45 minutes après la commutation automatique dans le
mode LowPower (ou lorsque le même état de charge est atteint
pendant le roulement dans le mode LowPower) :
Les DEL témoin clignotent en (rouge / bleu)
La luminosité minimum de 10 lux exigée par la législation va pas-
ser sous peu en-dessous du seuil prescrit. Charger l‘accu.
L’intensité lumineuse diminue ensuite continuellement. Après
encore 1 heure environ, le phare s‘éteint complètement (afin de
protéger l‘accu contre la décharge extrême).
Montage
27-32 mm
FR
Sous réserve de modifications techniques.
Réglages
Diriger le phare de façon à ne pas éblouir le trafic inverse. La
délimitation du clair-obscur doit être alignée parallèlement á la
chaussée.
À contrôler par ex. comme suit : placer la roue sur une surface
plane et éclairer un mur avec le phare. La délimitation visible du
clair-obscur ne doit pas être réglée plus haut que le bord supé-
rieur du phare.
Pivotement vertical : l’inclinaison du phare se règle par le biais
du positionnement de la fixation du guidon.
Pivotement horizontal : le phare pivote en continu vers la
gauche ou vers la droite (dans certaines limites), sur l‘attache
de guidon.
Pas de montage sous le guidon : en cas de montage suspendu du
phare, l‘image lumineuse est inversée. Ceci éblouit les conduc-
teurs arrivant en face, en infraction aux règles de circulation. En
plus, des dommages dus aux projections d’eau peuvent survenir,
dont les conséquences sont exclues de la prestation de garantie.
Charger l‘accumulateur
Le phare IXON Core/Fyre dispose d‘un accu au lithium intégré.
Avant la première utilisation, il faut tout d‘abord charger l‘accu.
Pour effectuer la recharge, ouvrir le capuchon situé sur l‘arrière
du phare. Raccorder le câble USB ci-joint à la prise micro USB du
phare
2
. Pour effectuer la recharge, relier le câble USB au bloc
d‘alimentation également fourni ou bien à un bloc d‘alimentation
USB d‘une autre marque (max. 2000 mA, 5 V), ou bien encore
à un ordinateur. Pendant la recharge, la DEL témoin dans le feu
arrière est bleue. Lorsque la DEL s‘éteint, l’opération de charge
est terminée. Une surcharge est absolument exclue, car l’alimen-
tation en courant est coupée automatiquement. Recharger l‘accu
uniquement à des températures supérieures à 0 °C.
Conseils pour préserver l‘accumulateur : En cas de non-utilisa-
tion prolongée du phare, conserver l‘accu si possible dans un
endroit frais et sec, avec au moins 30 % de capacité restante.
Nous n‘assumons aucune garantie en cas d‘utilisation de blocs
d‘alimentation d‘autres fabricants.
Temps de charge
• Avec le bloc d‘alimentation d‘origine Busch & Müller :
3,5 heures env. (IXON Core), 5 heures env. (IXON Fyre)
• Avec des blocs d‘alimentation USB d‘autres marques, avec une
prise USB sur l‘ordinateur : temps de charge davantage
Charger des accus avec l’énergie
emmagasinée pendant le roulement
Avec le dispositif E-WERK (modèle 361) ou le USB-WERK
(modèle 361BW)
de Busch & Müller, il est possible d‘utiliser le
courant d‘une dynamo dans le moyeu pour recharger le phare
IXON Core/Fyre pendant le roulement. À noter que pendant la
recharge, l‘étanchéité aux éclaboussures et à l‘eau de pluie n‘est
pas assurée. Pendant la charge, le phare peut être activé.
Garantie
Les dommages causés par un traitement inapproprié (p. ex. faire
tomber le phare, le plonger dans l‘eau, etc.) sont exclus de la
garantie. Par ailleurs, la garantie expire si le verre de fermeture
du phare maintenu par trois vis a été ouvert (IXON Core).
Mettre en place/enlever le phare
✗
O Guidon
presser
22-27 mm27-32 mm
Einstellen
Den Scheinwerfer so ausrichten, dass der Gegenverkehr nicht
geblendet wird. Die Hell/Dunkel-Grenze sollte parallel zur Fahr-
bahn ausgerichtet sein.
Überprüfen z. B. so: Rad auf eine waagrechte Fläche stellen und
Scheinwerfer gegen eine Wand leuchten lassen. Die sichtbare
Hell/Dunkel-Grenze sollte vom Boden aus gemessen nicht höher
eingestellt sein als die Oberkante des Scheinwerfers.
Vertikal schwenken: Die Neigung des Scheinwerfers wird über
die Stellung der Lenkerbefestigung geregelt.
Horizontal schwenken: Scheinwerfer auf der Lenkerbefestigung
stufenlos nach links oder rechts (in begrenztem Umfang)
schwenkbar.
Keine Unterlenkermontage: Bei hängender Montage des Schein-
werfers wird das Lichtbild auf den Kopf gestellt. Der Gegen-
verkehr wird somit verkehrswidrig geblendet. Außerdem kann es
zu Spritzwasserschäden kommen, deren Folgen dann von
der Gewährleistung ausgeschlossen sind.
Laden des Akkus
Der IXON Core/Fyre verfügt über einen fest eingebauten
Lithium-Akku. Vor dem ersten Gebrauch muss der Akku zunächst
geladen werden.
Zum Aufladen die rückseitige Kappe am Scheinwerfer öffnen.
Beiliegendes USB-Kabel an die Micro-USB-Buchse
2
des
Scheinwerfers anschließen. Zum Aufladen das USB-Kabel mit
dem gegebenenfalls beiliegenden Netzteil, mit einem anderen
USB-Standardnetzteil (max. 2000 mA, 5 V) oder mit einem
Computer verbinden. Während des Ladevorgangs leuchtet die
LED-Anzeige am Scheinwerfer blau. Wenn die LED erlischt, ist
der Ladevorgang abgeschlossen. Ein Überladen ist grundsätzlich
ausgeschlossen, da die Stromzufuhr automatisch abgeschaltet
wird. Akku nur bei Temperaturen über 0 °C laden.
Tipp zum Schonen des Akkus: Bei längerer Nichtbenutzung den
Scheinwerfer möglichst kühl und trocken sowie mit mindestens
30 % Restkapazität lagern.
Beim Einsatz fremder Netzteile wird keine Gewährleistung
übernommen.
Ladezeiten
• Mit Original-Netzteil von Busch & Müller:
ca. 3,5 Stunden (IXON Core), ca. 5 Stunden (IXON Fyre)
• Mit anderen USB-Netzteilen oder mit USB-Anschluss am
Computer: längere Ladezeiten
Akkus laden mit Fahr-Energie
Mit dem E-WERK (Typ 361) oder dem USB-WERK (Typ 361BW)
von Busch & Müller kann der Strom eines Nabendynamos genutzt
werden, um den IXON Core/Fyre während der Fahrt aufzuladen.
Bitte beachten Sie, dass während des Ladens keine Spritz- und
Regenwasserdichtigkeit gegeben ist. Während des Aufladens
kann der Scheinwerfer eingeschaltet sein.
Gewährleistung
Schäden, die durch unsachgemäße Behandlung auftreten (z. B.
Herunterfallen des Scheinwerfers, Eintauchen in Wasser usw.),
sind von der Gewährleistung ausgeschlossen. Die Gewährleistung
erlischt außerdem, wenn das durch drei Schrauben gehaltene
Abdeckglas des Scheinwerfers geöffnet wurde (IXON Core).
Core
Fyre
3.
2
3 4
A A B
B
28 mm
19 mm
1
je nach Lenkerdurchmesser
3.
2
3 4
A A B
B
28 mm
19 mm
1
depending on handlebar diameter
3.
2
3 4
A A B
B
28 mm
19 mm
1
dépendant de diamètre guidon
Anl_SW_IXON_Core_Fyre_BUMM_480x350_SA.indd 1 10.07.15 16:37


Únase a la conversación sobre este producto
Aquí puedes compartir lo que piensas sobre Busch and Müller IXON Fyre Faro bicicleta. Si tiene alguna pregunta, primero lea atentamente el manual. Puede solicitar un manual utilizando nuestro formulario de contacto.