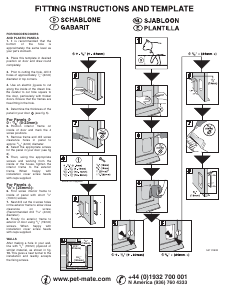
D F
1. Einführung
Diese elektromagnetische Katzenklappe ist so
gebaut, dass sie nur solchen Katzen Zutritt gewährt,
die den entsprechenden Halsbandmagneten tragen.
Das Öffnen der Klappe von außen wird durch eine
elektromagnetische Sperrvorrichtung verhindert, so
dass fremde Katzen nicht ins Haus gelangen können.
Wenn sich jedoch Ihre Katze mit dem Magneten am
Halsband der Klappe nähert, wird durch einen
Detektor im Außenrahmen der Klappe, der auf den
Magnet reagiert, die elektromagnetische Sperre
automatisch entriegelt. Ihre Katze kann dann die
Klappe mit der Nase aufstoßen und ins Haus
durchschlüpfen. Sobald die Katze die Klappe passiert
hat, kehrt die elektromagnetische Sperre in ihre
normale Verriegelungsposition zurück, wodurch der
Zutritt anderer Katzen verhindert wird. Beachten Sie
jedoch, dass andere Katzen, die einen
Halsbandmagneten tragen, ebenfalls diese Tür
passieren können. Katzen können durch die Klappe
auch ohne Magnethalsband nach außen gelangen.
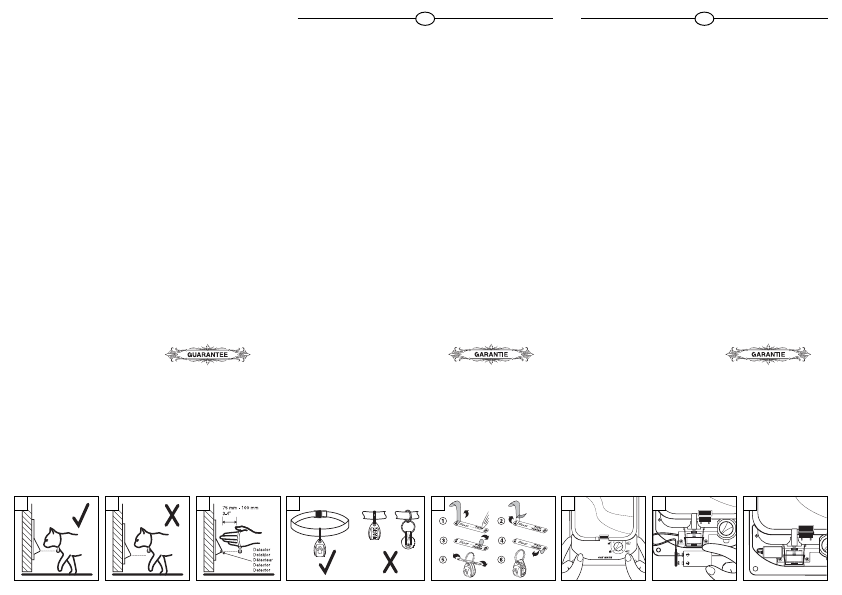
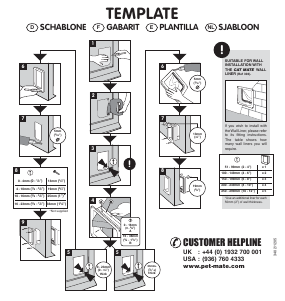
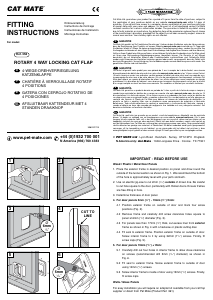
2. Einlegen und Testen der Batterie
Den Batteriedeckel durch Ziehen der Laschen öffnen,
die sich an beiden Seiten befinden (Abb. 6). Alternativ
einen kleinen Schraubenzieher in den mittleren Schlitz
im Batteriedeckel einstecken und den Deckel vom
Gehäuse weg abheben. Es wird empfohlen, 9 Volt
Alkaline-Batterien, Größe 6F22 zu verwenden. Solche
Batterien halten im Normalbetrieb ungefähr 12
Monate. Stattdessen kann auch eine aufladbare
Batterie verwendet werden. Den Batteriestecker an
die Batteriepole anschließen und die Batterie in ihre
vorgesehene Position links von der
elektromagnetischen Sperreinrichtung schieben
(7a/7b). (NB – zuerst die Batterie von ihrem Polende
aus einschieben.) Den Batteriedeckel wieder fest
aufsetzen.
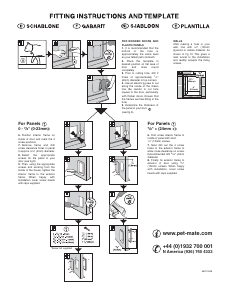
3. Halsband
Der Magnet muss direkt am Halsband
Ihrer Katze befestigt werden, wobei das
Katzenpfotensymbol nach vorn weist
(siehe Abb. 4). Ist dies nicht der Fall, wird
die Leistungsfähigkeit bzw. die Funktion
dieses Produkts beeinträchtigt.
Es wird empfohlen, den Identitätsaufkleber
auszufüllen – Katzen kommen zwar selten abhanden,
könnten jedoch eventuell ihr Halsband abzustreifen
versuchen! Das Identitätsschild wie in Abb. 5 gezeigt
vorbereiten und anbringen. Wir empfehlen die
Verwendung eines aus Gewebe bestehenden
Halsbandes ohne Metallanhänger (wie z. B.
Namensmarken). Sicherstellen, dass das Halsband
nicht zu eng oder zu weit geschlossen ist. (Es sollte
lose genug sein, um sich über den Kopf der Katze
streifen zu lassen.) Im Idealfall sollte bei der
Annäherung der Katze von außen das untere Ende
des Magnets auf gleicher Höhe mit dem Außenrand
der Klappe sein (siehe Abb. 1 und 2). Wenn dies nicht
der Fall ist, könnte Ihre Katze Schwierigkeiten haben,
die Klappe zu öffnen, da der Magnet dann nicht nahe
genug (40mm) an den Detektor herangebracht wird.
4. Abrichten der Katze
Wenn Ihre Katze noch nie eine Katzenklappe benutzt
hat, müssen Sie sie wahrscheinlich zunächst mit
Futter durch die Klappe locken. Manche Katzen
reagieren anfänglich etwas erschreckt, wenn sie das
Klicken hören, das durch den Betrieb der
elektromagnetischen Sperre ausgelöst wird.
Sollte dies der Fall sein, können Sie Ihre Katze vorerst
an die Benutzung der Klappe ohne Einsatz der
Sperrvorrichtung gewöhnen. Hierzu müssen Sie
lediglich die Batterie herausnehmen und den
Schließarm vorübergehend mit einem Klebeband
fixieren, bis Ihre Katze mit der Bedienung der Klappe
vertraut ist. Bei allen Katzen - insbesondere bei jungen
Tieren - wird empfohlen, erst sicherzustellen, dass sie
mit der Betätigung der Katzenklappe vertraut sind,
bevor sie damit allein gelassen werden.
5. Fehlersuche
Falls die elektromagnetische Sperre nicht richtig zu
funktionieren scheint, prüfen Sie bitte Folgendes:
a. Das Halsband muss in der richtigen Position
befestigt sein, d.h. mit dem Magnetpfeil und dem
Schild nach vorne weisend (siehe Abb. 4).
b. Folgendes versuchen: Das Katzenhalsband über
vier Finger Ihrer Hand (siehe Abb. 3) streifen, so dass
der Magnet ungefähr 75 bis 100mm von den
Fingerspitzen entfernt ist. Ihre Hand so an die Klappe
herannähern, dass das untere Ende des Magneten
auf gleicher Höhe mit dem Detektor ist. Bei einer
Entfernung von ca. 40mm vom Detektor sollte sich die
elektromagnetische Sperre dann automatisch
entriegeln, so dass Sie die Klappe mit den
Fingerspitzen öffnen können. Wenn die
elektromagnetische Sperreinrichtung richtig
funktioniert, nachdem Sie oben angeführte Tests
durchgeführt haben, Ihre Katze jedoch die Klappe
trotzdem nicht öffnen kann, prüfen Sie, ob das
Halsband Ihrer Katze richtig angelegt ist und ob die
Katzenklappe in der richtigen Höhe angebracht ist
usw. lm unwahrscheinlichen Fall, dass die
elektromagnetische Sperre einen Fehler aufweisen
sollte, kann die Sperren-Baugruppe separat entfernt
und zum Austauschen zurück gesandt werden. Es ist
also nicht nötig, die komplette Katzenklappe zu
entfernen. In diesem Fall den Batteriedeckel
abnehmen und die Steckverbindung von der Batterie
entfernen. Die zwei Befestigungsschrauben für die
Sperren-Baugruppe losschrauben, dann die Sperre
niederdrücken und nach vorn ziehen, bis die
Baugruppe völlig abgenommen ist.
Sollten Sie weitere Schwierigkeiten haben,
so setzen Sie sich bitte mit der PET MATE
Helpline in Verbindung.
1. Introduction
Cette chatière électromagnétique a été conçue pour
ne laisser entrer de manière sélective que les chats
portant un collier équipé d’un aimant. En situation
normale, un verrou électromagnétique prévient
l’ouverture de la chatière vers l’intérieur de la
maison, ce qui empêche les chats errants de
pénétrer à l’intérieur. Toutefois, lorsque votre chat
s’approche de la chatière avec l’aimant sur son
collier, un capteur situé sur le bord extérieur du
cadre détecte la présence de l’aimant et désactive
automatiquement le verrou électromagnétique. Il est
alors possible à votre chat de pousser la chatière du
museau pour entrer dans la maison. Dès le passage
de votre chat, le verrou électromagnétique retrouve
sa position normale et empêche ainsi les chats
suivants d’entrer. Notez toutefois que tout chat
portant un collier doté d’un aimant pourra également
entrer. Il n’est pas nécessaire que le chat porte un
aimant pour sortir de la maison.
2. Installation et test de la pile
Retirez le couvercle de la pile en tirant sur les
taquets placés de chaque côté. (Fig. 6.) Il est
également possible d’insérer un petit tournevis dans
la fente centrale située sur le couvercle de la pile et
de faire levier pour écarter ce dernier du
compartiment. Il est recommandé d’utiliser une pile
alcaline de 9 V, taille 6F22. Une pile alcaline devrait
vous donner une autonomie d’environ 12 mois en
situation normale. Il est également possible
d’employer une pile rechargeable. Branchez la pile
au connecteur libre et glissez l’ensemble en place
du côté gauche du bloc verrou électromagnétique,
comme illustré par les Fig. 7a/7b. (NB- faites glisser
la pile côté bornes en premier). Remettez le
couvercle fermement en place.
3. Le collier
Les aimants de collier devront être
attachés directement au collier de votre
chat, symbole de patte vers l'avant (voir la
Fig. 4). Tout montage différent affectera
l’efficacité du produit.
Il est recommandé de remplir l’étiquette d’identité,
même s’il est peu probable que votre chat se perde,
car il se peut bien qu’il décide de perdre son collier
! Pour appliquer l’étiquette d’identité, veuillez vous
référer à la Fig. 5. Nous recommandons l'utilisation
d'un collier en tissu sans éléments métalliques
(disques d'identité, etc.). Vérifiez que le collier du
chat ne soit ni trop serré ni trop lâche (le collier devra
pouvoir passer par-dessus la tête du chat). Dans
l’idéal, l’aimant devrait être suspendu de sorte que
sa partie inférieure soit au même niveau que le bord
extérieur de la chatière au moment où le chat s’en
approche depuis l’extérieur de la maison (voir les
Fig. 1 et 2.) Si l’aimant du chat n’est pas au niveau
du bord extérieur de la chatière, il se peut que cette
dernière ne s’ouvre pas correctement, car votre chat
ne sera pas à même d’approcher l’élément
suffisamment près du capteur (40mm ou moins).
4. Habituez votre chat
Si votre chat n’a jamais utilisé de chatière, il vous
sera probablement nécessaire de l’entraîner à y
passer en l’attirant, avec un repas par exemple.
Certains chats pourront être rendus anxieux par le «
clic » produit par le fonctionnement du verrou
électromagnétique.
Dans ce cas, il pourra être préférable de l’habituer
au fonctionnement de la chatière sans utiliser le
verrou. Pour cela, il vous suffit de retirer la pile et de
maintenir le bras de verrouillage en place avec du
ruban adhésif jusqu’à ce que votre chat se soit
habitué au fonctionnement du dispositif. Notez que
nous ne recommandons pas de laisser les chats, et
en particulier les chatons, se servir seuls d’une
chatière sans s’être assuré au préalable qu’ils
s’étaient parfaitement familiarisés avec son
fonctionnement.
5. Résolution des problèmes éventuels
En cas de mauvais fonctionnement du verrou
électromagnétique, veuillez procéder aux
vérifications suivantes:
a. Le collier est-il attaché dans le bon sens, la flèche
de l’aimant et l’étiquette sont-elles tournées vers
l’avant (voir la Fig. 4).
b. Placez le collier du chat autour de quatre doigts
de votre main, comme illustré par la Fig. 3, de sorte
que l’aimant se trouve à environ 75 - 100mm du bout
de vos doigts. Approchez la main de la chatière, le
bas de l’aimant étant au même niveau que le
capteur. Lorsque l’aimant se trouve à moins de
40mm du capteur, le verrou électronique devrait se
désactiver, ce qui vous permettra de pousser la
chatière du bout des doigts. Si le verrou
électromagnétique fonctionne correctement avec ce
test, surveillez votre chat pour voir pourquoi il ne
parvient pas à déclencher le mécanisme, par
exemple, porte-t-il le collier correctement? La
chatière est-elle installée à la bonne hauteur? Au
cas, improbable, où le verrou électromagnétique
serait défectueux, veuillez noter qu’il est possible de
le démonter et de le renvoyer pour remplacement,
ce qui évite d’avoir à démonter complètement la
chatière. Pour cela, retirez le couvercle de la pile et
débranchez cette dernière. Retirez les deux vis qui
fixent le bloc verrou, puis, enfoncez le verrou tout en
tirant vers l’avant jusqu’au retrait du bloc complet.
Pour tout autre problème, veuillez contacter le
numéro d’assistance PET MATE.
1. Introduction
This Electromagnetic Cat Flap is designed to
selectively admit only cats wearing a collar
carrying a magnet. Normally the flap is
prevented from opening into the house by an
electromagnetic catch, thus preventing stray
cats from entering your house. However, when
your cat approaches wearing the magnet, a
detector sited in the outer edge of the body
moulding senses the magnet and the
electromagnetic catch is automatically
depressed. Your cat may then push open the
flap with its nose to enter the house. As soon as
your cat has passed through the flap the
electromagnetic catch returns to its normal
position, so that following cats are prevented
from entering. However, other cats wearing a
magnet are not prevented from entry. Cats may
exit from the flap without wearing a magnet.
2. Battery Installation and Testing
Ease off the battery cover by pulling on the tabs
positioned at each side. (Fig. 6.) Alternatively,
insert a small screwdriver into the centre slot
located on battery cover and lever away from
body moulding.The recommended battery is a 9
volt alkaline, size 6F22. An alkaline battery
should give approximately 12 months normal
life. Alternatively a rechargeable battery may be
used. Connect the battery to the loose
connector and slide into position to the left hand
side of the electromagnetic catch assembly, as
shown in Figs. 7a/7b. (NB- slide in battery
terminal end first). Replace the battery cover
firmly.
3. Collar
The collar magnet should be attached
directly to the cat’s collar with the
paw print symbol facing forwards (see
fig 4). Not doing so will affect this
product’s performance.
It is recommended that you complete the
identity sticker as even if your cat is unlikely to
get lost, it may decide to lose its collar! To apply
Identity label, please refer to Fig 5. We
recommend the use of a fabric collar without
metal components (name discs etc.). Check that
the cat’s collar is not too tight nor too loose. (The
collar should be free to pass over the cat’s
head.) Ideally the magnet should hang so that
the bottom of the magnet is level with the
outside edge of the flap as the cat approaches
from the outside. (See Figs. 1 and 2.) If the cat’s
magnet is not level with the outside edge of the
flap your cat may experience difficulty gaining
entry as it will not readily be able to bring its
magnet sufficiently close (within 40mm (1
1
⁄2”)) to
the detector.
4. Training Your Cat
If your cat has never used a cat flap before, you
will probably need to entice it through with its
meals to begin with. Some cats may initially be
nervous of the ‘click’ produced on operation of
the electromagnetic catch.
In such cases you may prefer to get your cat
used to the operation of the flap without the
electromagnetic catch.To do this, simply remove
the battery and securely tape down the locking
arm, until your cat is familiar with its operation.
Please note that we do not recommend that cats
and particularly kittens are left alone to use a cat
flap without first ensuring that they are
completely familiar with its operation.
5. Troubleshooting
If the electromagnetic catch does not appear to
function correctly please check the following:
a.The collar is attached in the correct
orientation, with the magnet’s arrow and label
facing forwards (see fig 4).
b. Place the cat’s collar around four fingers of
your hand as shown in Fig. 3, so that the magnet
is approximately 75mm - 100mm (3 - 4”) back
from your fingertips.
Move towards the flap with the bottom of the
magnet level with the detector. When the
magnet is within about 40mm (1
1
⁄2”) of the
detector the electromagnetic catch should be
activated enabling you to push open the flap
with your fingertips.
If the electromagnetic catch operates correctly
when tested as above, try to observe why the
cat is not succeeding, e.g. is the cat not wearing
its collar correctly? Is the cat flap installed at the
correct height? etc.
In the unlikely event of the electromagnetic
catch assembly proving to be faulty please note
that the catch assembly may be removed and
returned for replacement, thus avoiding the
need to remove the cat flap entirely. To do
this, remove the battery cover and disconnect
battery. Unscrew the two retaining screws for the
catch assembly, then depress catch while
pulling forward until assembly is fully removed.
If you still have a problem, please
contact the PET MATE Helpline.
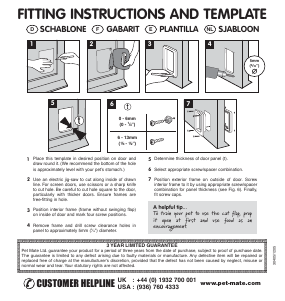
1 2 3 4
5
6
7a 7b
Pet Mate Ltd. guarantee your product for a
period of 3 years from the date of purchase,
subject to the registration of your purchase
details on our website www.pet-mate.com
within 14 days of purchase. (If you do not have
access to a computer, please send details of
your purchase with copy of receipt along with
your name and address.) In the event of a fault
developing contact Pet Mate customer services
for a returns authorisation number. The
guarantee is limited to any defect arising due to
faulty materials or manufacture. Any defective
item will be repaired or replaced free of charge
at the manufacturer’s discretion, provided that
the defect has not been caused by neglect,
misuse or normal wear and tear. Your statutory
rights are not affected.
Pet Mate Ltd. gewährt auf Ihr Produkt eine Garantie von
3 Jahren ab dem Kaufdatum, dass die Registrierung
Ihres Produkts auf unserer Website www.pet-mate.com
innerhalb von 14 Tagen des Kaufdatums erfolgt ist.
(Wenn Sie keinen entsprechenden Computerzugang
haben, senden Sie uns bitte Ihre Kaufangaben
zusammen mit einer Kopie Ihres Einkaufsbelegs und
Angabe Ihres Namens und Ihrer Adresse.) Sollte an
Ihrem Produkt eine Störung auftreten, so kontaktieren
Sie bitte den Kundendienst von Pet Mate, damit wir Ihnen
eine Rücksendungs-Genehmigungsnummer übermitteln
können. Die Garantie ist auf Mängel beschränkt, die auf
fehlerhaftes Material oder Produktionsfehler
zurückzuführen sind. Fehlerhafte Artikel werden nach
Ermessen des Herstellers kostenlos repariert oder
ersetzt, vorausgesetzt, dass der Defekt nicht durch ein
Missgeschick, Vernachlässigung, falsche Bedienung
oder normale Abnutzung verursacht wurde. Ihre
gesetzlichen Rechte sind nicht betroffen.
Pet Mate Ltd garantit votre produit pour une
période de 3 ans à compter de la date d'achat,
sous réserve d'enregistrement des détails de
votre achat sur notre site www.pet-mate.com
dans les 14 jours suivant l'achat. (Si vous n'avez
pas accès à un ordinateur, veuillez envoyer les
détails de votre achat avec une copie du reçu,
accompagnée de votre nom et de votre adresse.)
En cas de panne/mauvais fonctionnement,
contactez Pet Mate pour obtenir un numéro
d'autorisation de retour. Les articles défectueux
seront remplacés ou réparés gratuitement à la
discrétion du fabricant, sous réserve que le
mauvais fonctionnement ne soit pas le résultat
d’un usage inadapté ou abusif ou d’une usure
normale. Ces conditions n’affectent pas vos droits
statutaires.

Únase a la conversación sobre este producto
Aquí puedes compartir lo que piensas sobre Cat Mate 254 Electromagnetic Trampilla para gatos. Si tiene alguna pregunta, primero lea atentamente el manual. Puede solicitar un manual utilizando nuestro formulario de contacto.
responder | Ha sido de gran ayuda (9) (Traducido por Google)
responder | Ha sido de gran ayuda (1) (Traducido por Google)
responder | Ha sido de gran ayuda (0) (Traducido por Google)
responder | Ha sido de gran ayuda (0) (Traducido por Google)
responder | Ha sido de gran ayuda (0) (Traducido por Google)