
w
w
w
.
p
e
t
-
m
a
t
e
.
c
o
m
+
4
4
(
0
)
1
9
3
2
7
0
0
0
0
1
·
N
A
m
e
r
i
c
a
(
9
3
6
)
7
6
0
4
3
3
3
F
I
T
T
I
N
G
I
N
S
T
R
U
C
T
I
O
N
S
A
N
D
T
E
M
P
L
A
T
E
Pet Mate Ltd. guarantees your product for a period of 3 years from the date of purchase, subject to the registration of your purchase
details on our website www.pet-mate.com within 14 days of purchase. (If you do not have access to a computer, please send
details of your purchase with copy of receipt along with your name and address.) In the event of a fault developing
contact Pet Mate customer services for a returns authorisation number. The guarantee is limited to any defect
arising due to faulty materials or manufacture. Any defective item will be repaired or replaced free
of charge at the manufacturer’s discretion, provided that the defect has not been
caused by neglect, misuse or normal wear and tear.
Your statutory rights are not affected.
(A) GLAZEN PANELEN
U kunt het best uw glazenhandelaar
vragen een opening met een doorsnede
283mm op de gewenste plaats te snijden,
waarna u het kattendeur kunt monteren
volgens de details in 3 - 7 hieronder. Voor
reeds aanwezig gehard/dubbel/driedubbel
glas is een nieuw glaspaneel nodig. Indien
gewenst kunt u het glaspaneel ook vervangen
door doorzichtig plastic en monteren volgens
de details hieronder.
(B) HOUTEN, PLASTIC EN METALEN
PANELEN
1. Plaats deze mal in de gewenste positie op de
deur en teken hem rondom af zoals in afb. 1.
2. Zaag de opening uit. Dit kunt u doen door een
gat te boren en daarna een electrische
figuurzaag te gebruiken om de de binnenkant
van de afgetekende lijn uit te zagen. Het is
belangrijk zorgvuldig een opening uit te zagen
die recht op de deur staat, vooral als het een
dikke deur betreft.
3. Voor panelen 0 - 20mm dik: Snij het
binnenframe (frame zonder klappend luikje)
met een ijzerzaag of slijpschijf voor plastic
voorzichtig uit langs lijn X.
4. Zaag 3 bijgeleverde bouten op maat
(deurdikte) (t) + 10mm af en verwijder
eventuele bramen met een vijl van het
afgezaagde uiteinde.
5. Leg afdichtingsstrip en 3 moeren in de
juiste uitsparingen van het buitenframe.
6. Vraag iemand om te helpen bij het
plaatsen van het buitenframe tegen de
buitenkant van het paneel en schroef
het binnenframe met bouten eraan
vast. De bouten niet te vast
aandraaien. Dek de bevestigingen
af met de bijgeleverde kapjes.
7. Om uw kat te trainen het
kattendeur te gebruiken,
eerst open stutten en
voedsel als lokmiddel
gebruiken.
NL
(A) PANELES CRISTAL
Le recomendamos que llame a un cristalero
para que corte un orificio de 283mm de
diámetro en la posición requerida, y a
continuación instale la gatera como se
indica en el puntos
3 - 7 siguiente. Para acristalamiento
templado/doble/triple, se requerirá un
nuevo panel de cristal. Alternativamente, es
posible que prefiera cambiar el panel de
cristal por uno de plástico transparente y
realizar la instalación como se indica
siguiente.
(B) PANELES DE MADERA, PLÁSTICO
Y METAL
1. Coloque esta plantilla en la posición
deseada de la puerta y marque
alrededor de ella como en la Fig. 1.
2. Corte el agujero. Esto podrá hacerlo
perforando un agujero pequeño y
utilizando, a continuación, la sierra
eléctrica para cortar dentro de la línea
dibujada. Tenga cuidado de cortar el
agujero en escuadra con la puerta,
particularmente en puertas más
gruesas.
3. Para paneles de 0 - 20mm de grosor:
Con cuidado, utilice una sierra para
metales o disco de corte de plástico para
cortar el marco interior (marco sin la hoja
abatible) siguiendo la línea X.
4. Corte 3 pernos suministrados al grosor
de la puerta (t) + 10mm y elimine las
rebabas del extremo con una lima.
5. Instale el burlete y 3 tuercas en los
rebajes apropiados del marco exterior.
6. Con la ayuda de otra persona, coloque el
marco externo en la parte exterior del
panel y atorníllelo al marco interior
utilizando los pernos. No apriete los
pernos en exceso. Cubra los ajustes con
las cubiertas provistas.
7. Para entrenar a su gato en el uso de la
gatera, ábrala en primer lugar y utilice
comida para atraer a su mascota.
E
(A) PANNEAUX EN VERRE
Nous vous recommandons de demander à
votre vitrier de pratiquer une ouverture de
283mm de diamètre dans la position voulue,
puis d'installer la chatière selon les
instructions 3 - 7 ci-dessous. Pour le vitrage
trempé/double/triple existant, un nouveau
panneau de verre sera nécessaire. Vous
avez également la possibilité de remplacer
la vitre par un panneau de plexiglas et
d'installer le système en suivant les
instructions ci-dessous.
(B) PANNEAUX EN BOIS, PLASTIQUE
ET MÉTALLIQUES
1. Placez le gabarit dans la position désirée
et tracez tout autour comme sur la fig. 1.
2. Faites une découpe en perçant un petit
trou, puis en découpant à l'intérieur du
tracé au moyen d'une scie à découper
électrique.
3. Pour les panneaux de 0 - 20mm
d'épaisseur : Découpez soigneusement
le cadre intérieur (la cadre sans la trappe
basculante) jusqu’à la ligne X avec une
scie à métaux ou un disque à découper
le plastique.
4. Découpez les 3 boulons fournis à
l'épaisseur de la porte (t) + 10mm et
éliminez toutes les bavures de l'extrémité
coupée à l’aide d’une lime.
5. Montez le joint et les 3 écrous dans les
renfoncements prévus à cet effet sur le
cadre extérieur.
6. Avec l'aide d'un assistant, positionnez le
cadre extérieur sur l'extérieur du
panneau et vissez le cadre intérieur avec
les boulons. Ne serrez pas trop les
boulons. Couvrez les fixations avec les
caches fournis.
7. Pour habituer votre chat à utiliser la
chatière, maintenez-la ouverte au début
et encouragez-le à passer en lui offrant
de la nourriture.
F
(A) GLASSCHEIBEN
Wir empfehlen, dass Ihnen in diesem Fall ein
Glaser den Türeinschnitt ausschneidet, und
zwar an der gewünschten Stelle mit einem
Durchmesser von 283mm. Dann den Einbau
wie unten (Punkt 3 - 7) beschrieben
vornehmen. Bei bestehender Sicherheits-
bzw. Doppel- / Dreifachverglasung ist eine
neue Scheibe erforderlich. Andererseits kann
die Glasschiebe durch eine Kunststoffscheibe
ersetzt werden, damit der Einbau wie unten
beschrieben vorgenommen werden kann.
(B) TÜRFÜLLUNGEN AUS HOLZ,
KUNSTSTOFF UND METALL
1. Die Schablone an die gewünschte Stelle
legen (Türaußenseite) und die Umrisse wie
in Abb. 1 nachziehen.
2. Die Öffnung ausschneiden. In einer Ecke
ein kleines Loch bohren und dann die
Öffnung mit einer elektrischen Laubsäge
innerhalb der nachgezogenen Linie
aussägen. Darauf achten, dass die
Öffnung waagerecht zur Tür ausgesägt
wird; besonders bei stärkeren Türen.
3. Für Türfüllungen mit Dicke 0 - 20mm:
Den Innenrahmen (Rahmen ohne
Schwingklappe) vorsichtig mit einer
Metallsäge oder Kunststofftrennscheibe bis
nach Linie X zuschneiden.
4. Die 3 mitgelieferten Schrauben auf die
Türfüllungsdicke (t) + 10mm zuschneiden
und am Schnittende wie erforderlich mit
einer Feile entgraten.
5. Dichtungsband und 3 Muttern in den
entsprechenden Vertiefungen des
Außenrahmens anbringen.
6. Mit der Hilfe einer zweiten Person den
Außenrahmen außen auf der Türfüllung
positionieren und den Innenrahmen mit
Schrauben daran festschrauben. Die
Schrauben nicht zu fest anziehen. Die
Befestigungen mit den mitgelieferten
Deckeln abdecken.
7. Um Ihre Katze an die Benutzung der
Katzenklappe zu gewöhnen, die Klappe
zunächst mit einer Stütze offen halten
und die Katze mit dahinter befindlichem
Futter anlocken.
D
(A) GLASS PANELS
We recommend that you ask a glazier
to cut a hole of 283mm (11
1
/8")
diameter in the position required, and
then install the cat flap as detailed at 3 - 7
below. For existing toughened/double/triple
glazing, a new glass panel will be required.
Alternatively, you may prefer to replace the
glass panel with a clear plastic panel and
install as detailed below.
(B) WOODEN, PLASTIC AND METAL
PANELS
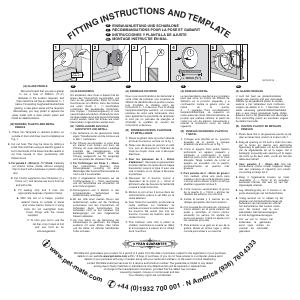
1. Place this Template in desired position on
outside of door and draw round completely as
Fig. 1.
2. Cut out hole. This may be done by drilling a
small hole and then using an electric jigsaw to
cut to the inside of the drawn line. Be careful to
cut hole square to door, particularly with
thicker doors.
3. For panels 0 - 20mm (0 -
3
/4") thick: Carefully
cut interior frame (frame without swinging
flap) to line X with a hacksaw or plastic cutting
disc.
4. Cut 3 bolts supplied to door thickness (t) +
10mm (
3
/8") and remove any burrs from cut
end with a file.
5. Fit sealing strip and 3 nuts into
appropriate recesses of exterior frame.
6. With the aid of a helper, position
exterior frame on outside of panel
and screw interior frame to it using
bolts. Do not overtighten bolts.
Cover fixings with the covers
supplied.
7. To train your cat to use the
cat flap, prop it open at first
and use food as an
encouragement.
35702/0215
5
+ 10mm (
3
/8")
t
t
4
X
3
2
approx.
125mm (5")
1
EINBAUANLEITUNG UND SCHABLONE
RECOMMANDATIONS POUR LA POSE ET GABARIT
INSTRUCCIONES Y PLANTILLA DE AJUSTE
MONTAGE INSTRUCTIE EN MAL
NL
E
F
D

Únase a la conversación sobre este producto
Aquí puedes compartir lo que piensas sobre Cat Mate 357W Large Trampilla para gatos. Si tiene alguna pregunta, primero lea atentamente el manual. Puede solicitar un manual utilizando nuestro formulario de contacto.