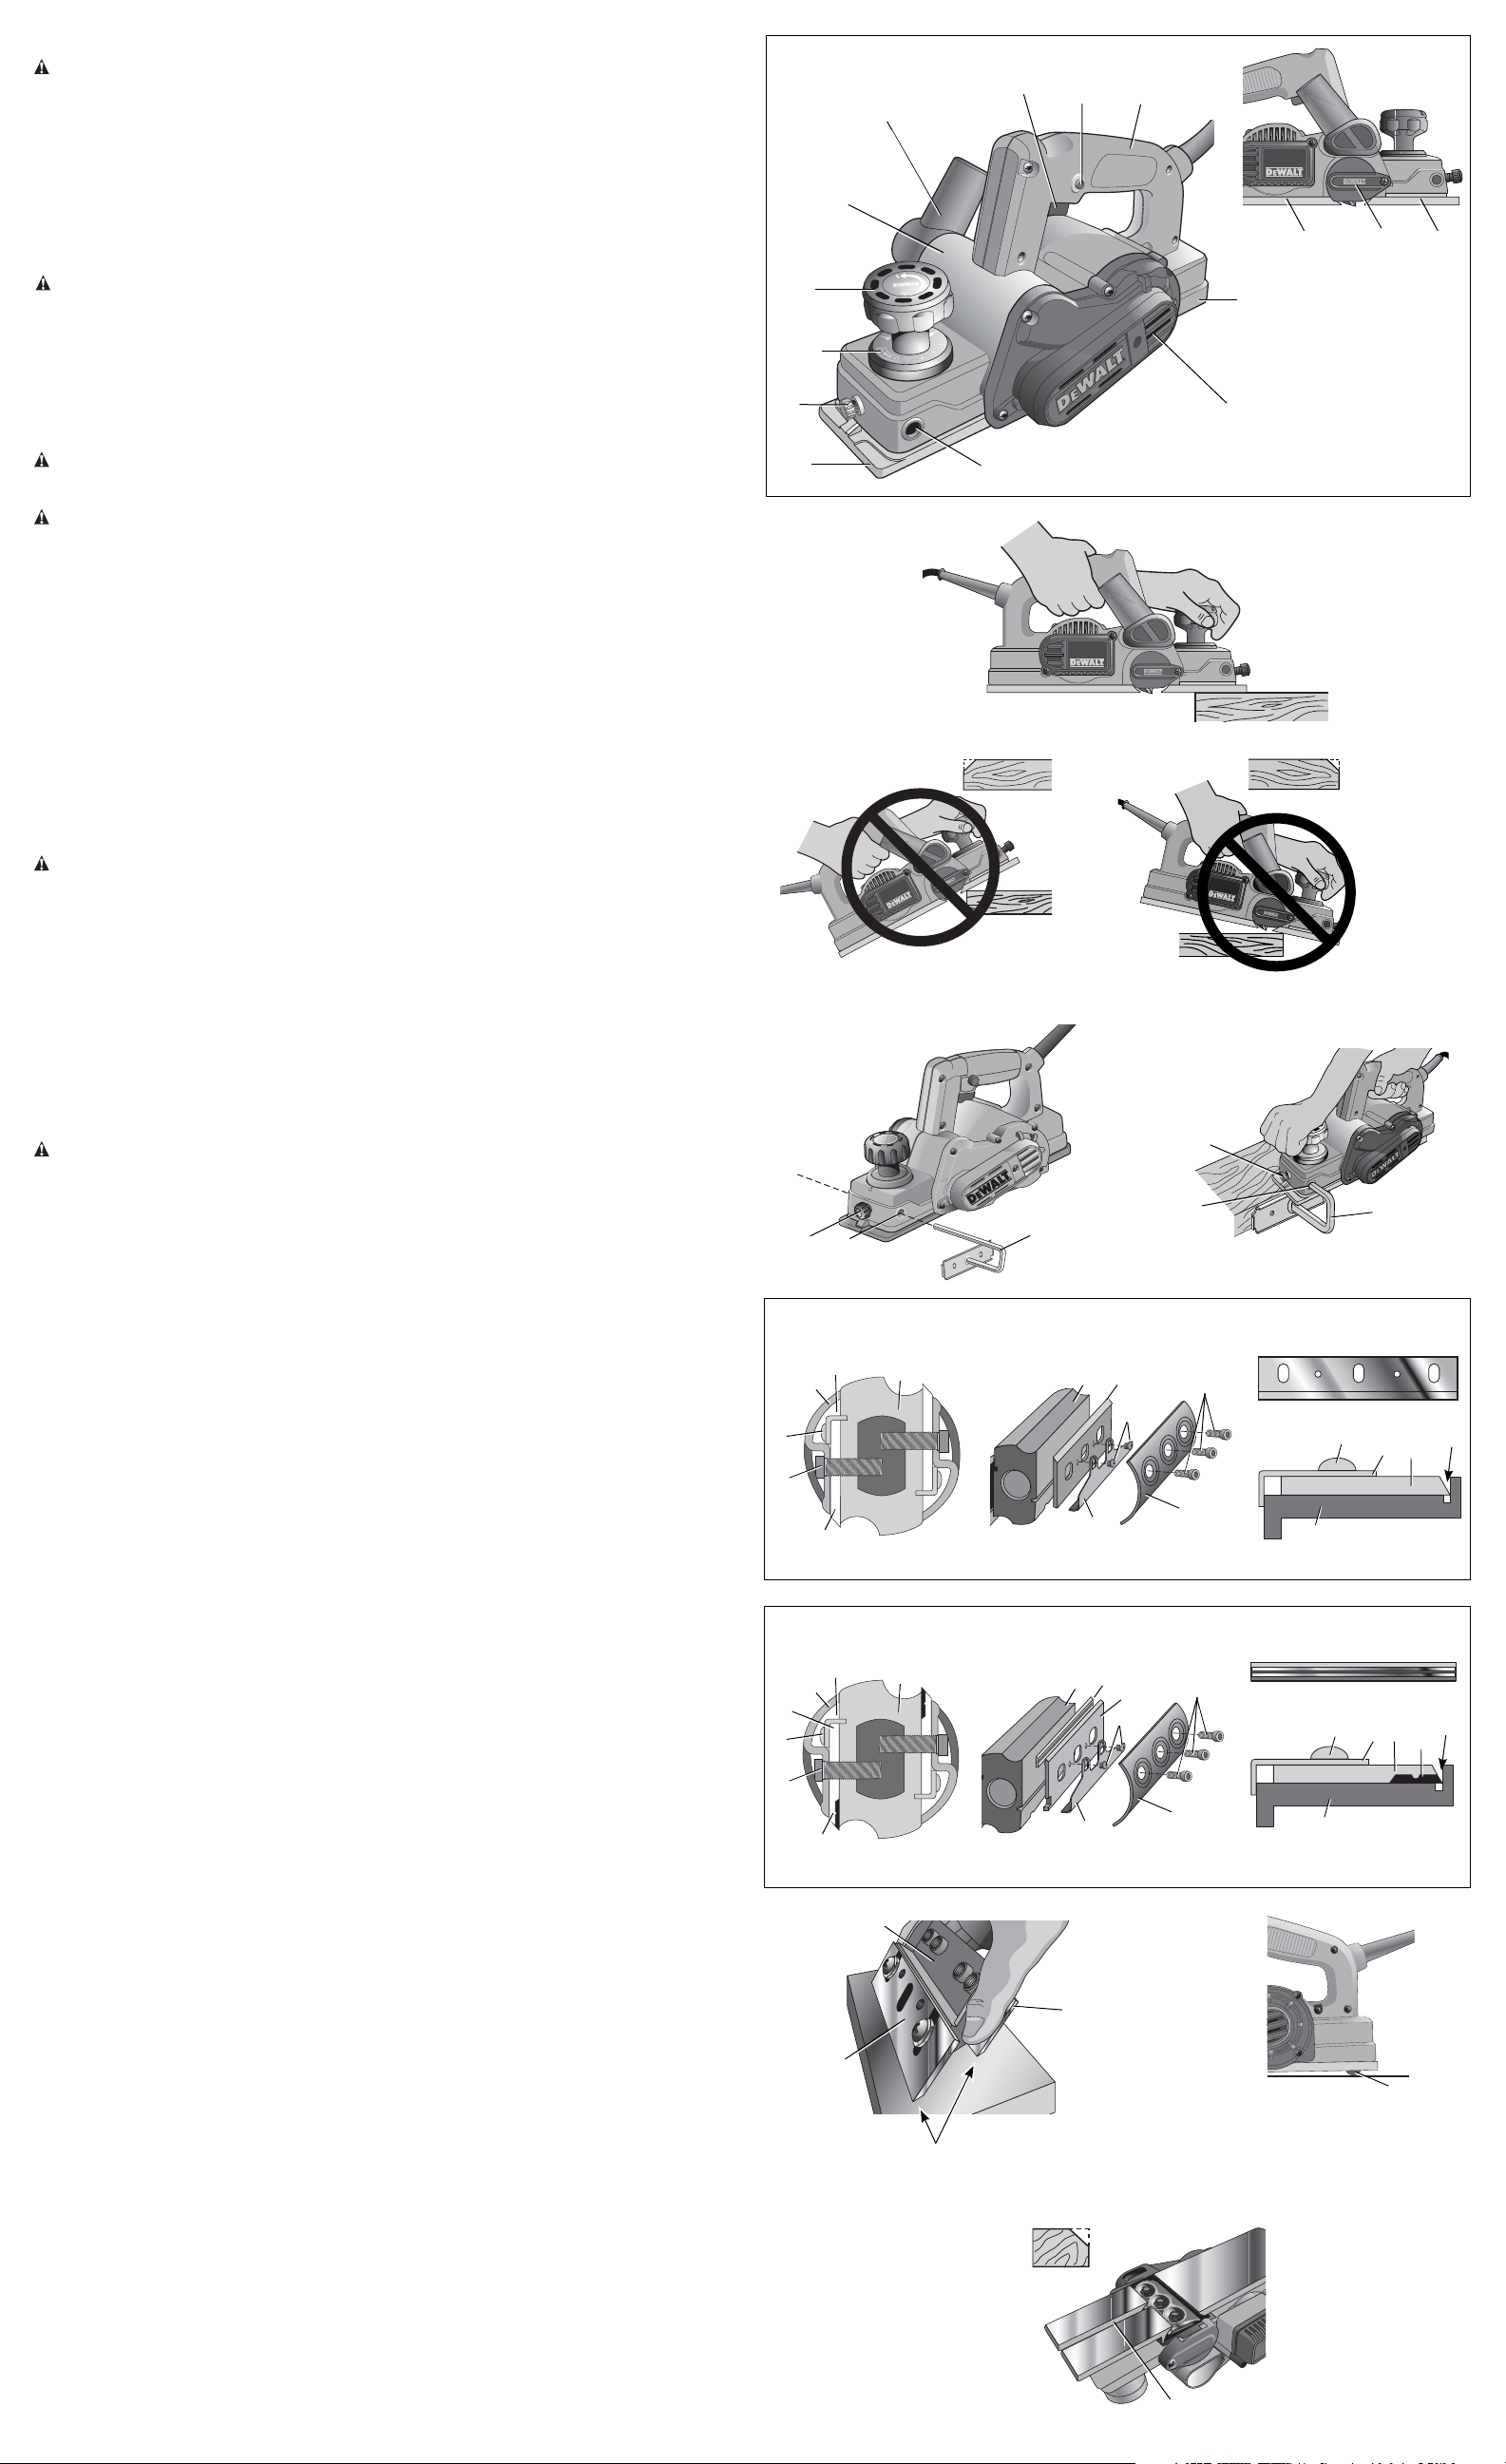
COMPONENTS (Fig. 1)
WARNING: Never modify the power tool or any part of it. Damage or personal injury could
result.
A. On/Off switch H. Rabbet fence tightening knob
B. Lock-on button I. Planing depth graduation
C. Main handle J. Planing depth adjustment knob/front handle
D. Rear shoe K. Chip discharge chute
E. Drive belt cover L. Dust adapter
F. Hole for rabbet fence M. Rabbetting cover
G. Front shoe
OPERATION
WARNING: To reduce the risk of serious personal injury, turn tool off and disconnect
tool from power source before making any adjustments or removing/installing attachments
or accessories.
Motor
Be sure your power supply agrees with the nameplate marking. Voltage decrease of more than
10% will cause loss of power and overheating. D
EWALT tools are factory tested; if this tool does
not operate, check power supply.
Switch (Fig. 1)
CAUTION: Check that the tool is not locked ON before connecting it to a power supply. If the
trigger switch is locked ON when the tool is connected to the power supply, it will start
immediately. Damage to your tool or personal injury may result.
CAUTION: Allow the tool to reach full speed before touching tool to the work surface. Lift the
tool from the work surface before turning the tool off.
To start the planer depress the on/off switch (A).
To turn the planer off, release the on/off switch.
LOCK-ON BUTTON
The tool can be locked on for continuous use. To lock the tool on, depress the trigger switch (A)
and push in the lock-on button (B). Hold the lock-on button in as you gently release the trigger
switch. The tool will continue to run.
To turn the tool off from a locked-on position, squeeze and release the trigger once.
Adjusting the Planing Depth (Fig. 1)
To adjust the depth of cut, turn the planing depth adjustment knob (J). Each click is equal to
0.1 mm of depth up to the maximum depth of cut of approximately 1/16" (1.6 mm).
It is recom mended that test cuts be made in scrap wood after each re-adjustment to make sure
that the desired amount of wood is being removed by the planer. Several shallow passes (rather
than one deep one) will produce a smoother finish.
Planing (Fig. 1–4)
CAUTION: Allow the tool to reach full speed before touching tool to the work surface. Lift the
tool from the work surface before turning the tool off.
Hold the planer in the correct position with one hand on the front handle (J) and the other hand
on the main handle (C) as shown in Figure 2. Place the front shoe (G) on the surface to be
planed, making certain that the cutting blades are not touching the surface. Push down firmly on
the front handle of the planer so that the front shoe is ABSOLUTELY FLAT on the work surface.
Squeeze the trigger switch and allow the motor to reach full speed before touching the planer
blades to the work surface.
Move the tool slowly into the work and maintain downward pressure to keep the planer flat. Be
particularly careful to keep the tool flat at the beginning and the end of the work surface.
Planing Tip: For a smoother appearance, fasten a piece of scrap wood to the end of the piece
you are planing. Don’t stop planing until the cutting blades of the planer are past your workpiece
and into the scrap material.
Rabbet Fence (Fig. 5, 6)
WARNING: Allow the tool to reach full speed before touching tool to the work surface. Lift the
tool from the work surface before turning the tool off.
The rabbet fence (N) is used for optimum tool control on narrow workpieces and can be installed
on either side of your planer. The planer makes rabbet cuts up to 23/64" (9 mm).
TO INSTALL RABBET FENCE
1. Loosen the rabbet fence tightening knob (H).
2. Slide the crossbar on the rabbet fence (N) into the hole (F) on the side of the planer as shown
in Figure 5.
3. Set the width of cut by adjusting the edge guide across the width of the shoe.
4. Securely tighten rabbet fence tightening knob.
NOTE: The rabbet fence should be below the planer when installed correctly as shown in
Figure 6
TO MAKE A RABBET CUT
1. Turn the rabbet fence tightening knob (H) to adjust the desired width of cut.
2. Make several cuts until the desired depth is reached.
NOTE: It will be necessary to make quite a few cuts for most rabbet applications.
To Change Blades (Fig. 7, 8)
The planer is capable of using high-speed steel and carbide blades. Be sure to check the planer
to verify which blade it is fitted with.
HIGH-SPEED STEEL BLADES (FIG. 7)
D26676
1. To Remove Blade from Planer (Fig. 7B)
a. Loosen and remove the three hex head screws (O) with the 9 mm hex wrench provided.
Remove the drum cover (P) from the drum (Q).
b. Cautiously remove the guide bar/high-speed steel blade assembly (V, U, T).
2. To Adjust Blade Using Gauge Plate (provided with tool) (Fig. 7C)
a. Place the guide bar/high-speed steel blade assembly on the gauge plate (R) with the
cutting edge of the high-speed steel blade flush against the gauge plate inside wall (S).
The heel of the guide bar (T) will overlap the end of the gauge plate (R).
b. Loosen the two cross-shaped screws (U) with the wrench provided.
c. Simultaneously push the high-speed steel blade (V) and the guide bar (T) into the gauge
plate inside wall (S), making sure that the blade is held firmly against the gauge plate
inside wall (S) and securely tighten cross-shaped screws (U).
3. To Reinstall Blade (Fig. 7A, 7B)
a. Cautiously remove the adjusted guide bar/high-speed steel blade assembly from the
gauge plate (R) and place the heel of the guide bar (T) into the groove in the drum (Q).
b. Set the drum cover (P) over the adjusted guide bar/high-speed steel blade assembly and
securely tighten the three hex screws (O) to the drum.
4. Repeat procedure for the other blade.
NOTE: If your planer is not fitted with high-steel blades, the sharpening holder (Y) required to
sharpen high-speed blades is available at additional cost from your local D
EWALT authorized
service center.
REVERSIBLE CARBIDE BLADES (FIG. 8)
D26677
1. To Remove Blade from Planer (Fig. 8B)
a. Loosen and remove the three hex head screws (O) with the 9 mm hex wrench provided.
Remove the drum cover (P) from the drum (Q).
b. Remove the blade carrier/guide bar assembly (T, U, X, W). Carefully remove the carbide
blade (W).
2. To Adjust Blade Using Gauge Plate (provided with tool) (Fig. 8C)
a. Cautiously place the carbide blade on the gauge plate (R) with the grooved side of the
carbide blade facing up. Either edge of the reversible carbide blade can be set flush
against the gauge plate inside wall (S).
b. Place the blade carrier/guide bar assembly on the blade so that the rib on the blade
carrier (X) fits into the groove on the carbide blade (W). The heel of the blade carrier (X)
will overlap the end of the gauge plate (R).
c. Loosen the two cross-shaped screws (U) with the wrench provided.
d. Simultaneously push the blade carrier (X) and the guide bar (T) into the gauge plate inside
wall (S), making sure that the carbide blade (W) is held firmly against the gauge plate
inside wall (S) and securely tighten the two cross-shaped screws (U).
3. To Reinstall Blade (Fig. 8A, 8B)
a. Remove the adjusted blade carrier/guide bar assembly from the gauge plate (R) and
place the heel of the guide bar (T) into the groove on the drum (Q).
FIG. 1
H
FIG. 5
F
N
J
B
A
D
E
G
I
L
F
M
C
D
H
K
G
FIG. 2
CORRECT
CORRECT
CORRECTO
FIG. 3
INCORRECT
INCORRECT
INCORRECTO
FIG. 4
INCORRECT
INCORRECT
INCORRECTO
FIG. 10
Z
FIG. 11
A1
Y
FIG. 9
V
BLADE EDGE
BORD DE LAME
BORDE DE LA HOJA
V
H
FIG. 6
F
N
HIGH-SPEED STEEL BLADE /
LAME EN ACIER À COUPE RAPIDE / HOJA DE ACERO DE ALTA VELOCIDAD
V
P
O
T
U
Q
V
O
P
T
U
Q
FIG. 7A FIG. 7B FIG. 7C
FIG. 7
V
S
T
R
U
CARBIDE BLADE / LAME AU CARBURE / HOJA DE CARBURO
FIG. 8A
W
O
P
X
T
U
Q
W
P
O
T
X
U
Q
FIG. 8B FIG. 8C
FIG. 8
W
X
S
T
R
U


Únase a la conversación sobre este producto
Aquí puedes compartir lo que piensas sobre DeWalt D26676 Cepillo. Si tiene alguna pregunta, primero lea atentamente el manual. Puede solicitar un manual utilizando nuestro formulario de contacto.