14
04 05
07
09
11
08
10
12
13
15
16
17
02
01
06
03
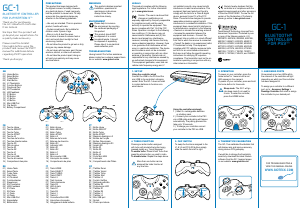
90˚
120° STEERING TO THE RIGHT
.
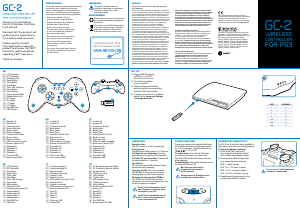
DE
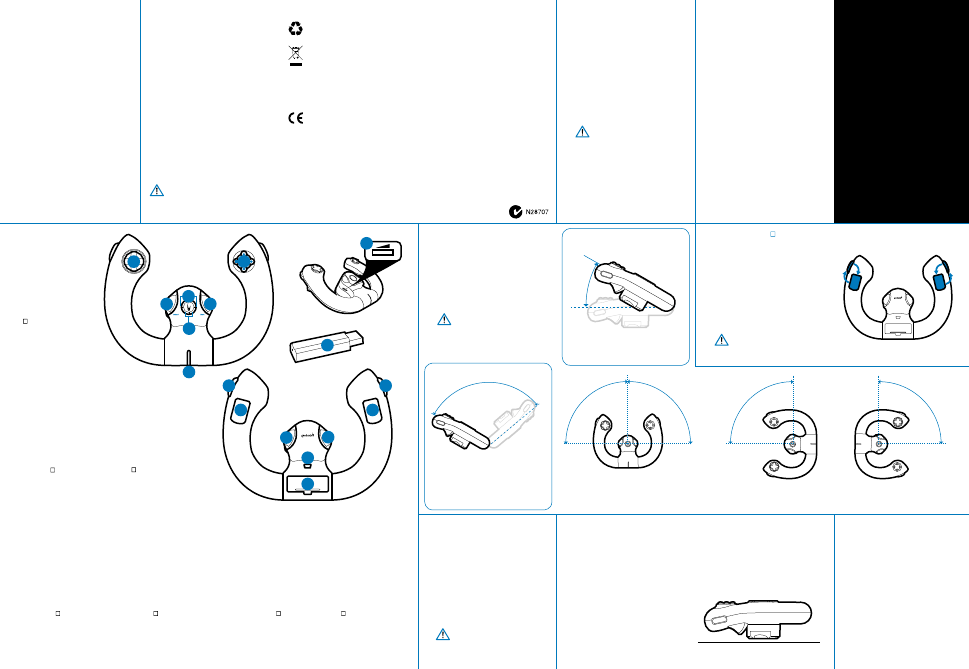
01 | Steuerkreuz
02 | Aktionstasten
03 | Home-Taste
04 | Select-Taste
05 | Starttaste
06 | Kanal-LED
07 | Stromversorgungs-LED
08 | Empndlichkeitsschalter
09 | R2-Taste
10 | L2-Taste
11 | X Trigger
12 | Trigger
13 | R1-Taste
14 | L1-Taste
15 | USB-Minianschluss
16 | Batteriefach
17 | USB-Dongle
prEcautions
This product has been designed with the
highest concern for safety. However, any
electrical device, if used improperly, has
the potential to cause harm. To help ensure
risk-free operation please pay attention to the
following guidelines.
• Use only as intended. This is a precision
product, handle with care.
• Contains small parts. Not suitable for
children under 3 years of age.
• Store in a dry & dust free area.
• Do not store in areas of extreme heat or
cold, and avoid direct sunlight or heat
sources eg. heaters.
• Do not allow the product to get wet or dirty;
doing so may cause damage.
• Do not clean with benzene, paint thinner,
acetone, alcohol, or other such solvents.
• Do not take the product apart; doing so will
void your warranty and may cause
electrical shock.
warnings
Always follow these instructions
closely. This symbol indicates
important installation, operational or
maintenance instructions.
any interference received, including interference
that may cause undesired operation. Note:
This equipment has been tested and found
to comply with the limits for a Class B digital
device, pursuant to part 15 of the FCC Rules.
These limits are designed to provide reasonable
protection against harmful interference in a
residential installation.
This equipment generates, uses and can
radiate radio frequency energy and, if not
installed and used in accordance with the
instructions, may cause harmful interference
to radio communications. However, there is no
guarantee that interference will not occur in a
particular installation. If this equipment does
cause harmful interference to radio or television
reception, which can be determined by turning
the equipment off and on, the user is encouraged
to try to correct the interference by one or more
of the following measures:
• Reorient or relocate the receiving antenna.
• Increase the separation between the
equipment and receiver.
• Connect the equipment into an outlet on a
circuit different from that to which the
receiver is connected.
• Consult the dealer or an experienced radio/TV
technician for help.
sEt up
1) Plug the USB Dongle into USB Port #1
on the PS3 console.
2) Turn on the console.
3) Open the battery compartment and
insert 2 x AA batteries.
4) Press the “Home” Button to power
on the Freedom Racing Wheel.
5) The FR-1 will automatically select a
channel and an LED will light.
6) Now you can enjoy all of your racing
games with a Gioteck Freedom Wheel!
Press & hold the “Home” button
for 5 seconds to activate pairing
at any time.
EnvironmEnt
Please help to conserve the
environment by recycling the
cardboard packaging of this product.
This product should NOT be disposed
of in normal household waste. It should
be disposed of separately. Please take
it to an electrical waste collection point.
lEgals
This product complies with the following legal
regulations. For further information go to
www.gioteck.com
Gioteck hereby declares that this
controller is in compliance with the
essential requirements and other provisions
of Directive 2004/108/EC. To view the full
version of the Declaration of Conformity
please go online to doc.gioteck.com
Caution: The user is cautioned that changes
or modications not expressly approved by the
party responsible for compliance could void
the user’s authority to operate the equipment.
This device complies with Part 15 of the FCC
Rules. Operation is subject to the following two
conditions: (1) this device may not cause harmful
interference, and (2) this device must accept
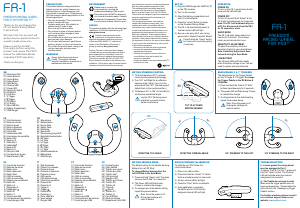
motion sEnsing calibration
To calibrate your FR1 follow the
instructions below:
1) Place it on a at surface.
2) Press and hold the “Select” & “Home”
buttons simultaneously for 5 seconds
3) All four channel LED's will light.
4) Press the “Start” button to calibrate.
5) Once calibration is complete,
the LED's will turn OFF and the
assigned channel LED will light.
motion stEEring control
1) Tilt the wheel above 30° to activate
motion sensing steering technology.
2) Turn 120° Left/Right for an effective
steering angle. (Note: If you turn the
wheel more than 120°, the steering will
default back to the neutral position.)
3) Tilt between 30° to 145° horizontally for
an effective operational angle.
Lay the FR-1 at during menu
operation to prevent motion
sensor interference.
opEration
POWER ON
To turn on the FR-1, press Home button
once and the LED will light.
POWER OFF
To turn off, press & hold “Select” & the
“O” button simultaneously for 5 seconds.
Note: The FR-1 will automatically turn
off if it is disconnected from the PS3
for 30 seconds or more.
SLEEP MODE
The FR-1 will enter sleep mode if it is
inactive for 5 minutes. To exit sleep
mode, press Home button once.
SENSITIVITY ADJUSTMENT
To adjust the sensitivity, slide the
Sensitivity Switch to your desired level.
Note: Sensitivity Adjustment does
not work during Six Axis Mode.
LOW BATTERY
The Channel LEDs will ash rapidly
when the battery charge is low. You will
need to replace with new batteries.
troublEshooting
i) In some games the racing wheel
must be assigned to Port 1.
To assign The FR-1 to Port 1, press and
hold the “Home” button. The Channel
LED will indicate when the channel
assignment is successful.
ii) The Pedals do not seem to work.
Make sure the trigger pedals have not
been reprogrammed – Please follow the
instructions in the “Reassigning Trigger
Pedals” section.
For further assistance please contact
our customer support team on our
website: www.gioteck.com
Thank you for purchasing the
FR-1 Freedom Racing Wheel
from Gioteck.
We hope that this product will
go beyond your expectations for
a quality made accessory.
Please read this booklet
thoroughly before using the
product and review the PS3™
manual for additional details
regarding PS3™ operation.
Thank you & enjoy!
FR-1
FREEDOM RACING WHEEL
FOR PLAYSTATION 3™
gb
01 | Directional Pad
02 | Action Buttons
03 | Home Button
04 | Select Button
05 | Start Button
06 | Channel LED
07 | Power LED
08 | Sensitivity Switch
09 | R2 Button
10 | L2 Button
11 | X Trigger
12 | Trigger
13 | R1 Button
14 | L1 Button
15 | Mini USB Port
16 | Battery Compartment
17 | USB Dongle
Fr
01 | Pad directionnel
02 | Boutons d'action
03 | Bouton Home
04 | Bouton Sélection
05 | Bouton Démarrer
06 | Canal DEL
07 | Alimentation DEL
08 | Interrupteur de sensibilité
09 | Bouton R2
10 | Bouton L2
11 | Gâchette X
12 | Gâchette
13 | Bouton R1
14 | Bouton L1
15 | Mini port USB
16 | Compartiment à piles
17 | Branchement USB
pt
01 | Control de dirección
02 | Botones de acción
03 | Botón Inicio
04 | Botón Selección
05 | Botón Start
06 | LED de canales
07 | LED de encendido
08 | Selector de sensibilidad
09 | Botón R2
10 | Botón L2
11 | Disparador X
12 | Disparador
13 | Botón R1
14 | Botón L1
15 | Puerto miniUSB
16 | Compartimento de baterías
17 | Llave (dongle) USB
Es
01 | Control de dirección
02 | Botones de acción
03 | Botón Inicio
04 | Botón Selección
05 | Botón Start
06 | LED de canales
07 | LED de encendido
08 | Selector de sensibilidad
09 | Botón R2
10 | Botón L2
11 | Disparador X
12 | Disparador
13 | Botón R1
14 | Botón L1
15 | Puerto miniUSB
16 | Compartimento de baterías
17 | Llave (dongle) USB
it
01 | Pad direzionale
02 | Pulsanti di comando
03 | Pulsante Home
04 | Pulsante di selezione
05 | Pulsante di avvio
06 | LED canale
07 | LED alimentazione
08 | Interruttore sensibilità
09 | Pulsante R2
10 | Pulsante L2
11 | Trigger X
12 | Trigger
13 | Pulsante R1
14 | Pulsante L1
15 | Porta USB Mini
16 | Vano batterie
17 | Dongle USB
cZ
01 | Ovladač směru
02 | Akční tlačítka
03 | Tlačítko pro návrat
04 | Tlačítko pro výběr
05 | Tlačítko start
06 | LED pro kanál
07 | Napájecí LED
08 | Tlačítko pro citlivost
09 | Tlačítko R2
10 | Tlačítko L2
11 | X Spoušť
12 | Spoušť
13 | Tlačítko R1
14 | Tlačítko L1
15 | Port USB Mini
16 | Oddíl pro baterie
17 | Bezpečnostní klíč USB
motion sEnsing moDE
The default setting for the Motion Sensing
Mode is the Left 3D Stick.
To change Motion Sensing from the
Left 3D Stick to Six Axis Mode:
1) Press and hold “Select” with “the down
arrow on the D-Pad” for 5 seconds.
2) The Power LED will ash slowly
3 times to indicate the change.
3) To change back to the default setting,
repeat the process above.
Note: Once the power is off,
all program settings will
reset to default.
rEassigning X & triggErs
The default keys for the Trigger Pedals
are the X Trigger &
□ Trigger. To change
the Trigger Pedals to the R2 Button &
L2 Button:
1) Press and hold the “Select” & “Start”
buttons simultaneously for 5 seconds.
2) The power LED will ash slowly 3 times
to indicate the change.
3) To change back to the default setting,
repeat the process above.
Note: Once the power is off,
all program settings will
reset to default.
30˚
115˚
EFFECTIVE TILT ANGLE
TILT TO ACTIVATE
MOTION SENSING
90˚
90˚
EFFECTIVE TURNING ANGLE 120° STEERING TO THE LEFT
FR-1
FREEDOM
RACING WHEEL
FOR PS3™


Únase a la conversación sobre este producto
Aquí puedes compartir lo que piensas sobre Gioteck FR-1 (PS3) Mando. Si tiene alguna pregunta, primero lea atentamente el manual. Puede solicitar un manual utilizando nuestro formulario de contacto.