
PARTS:
Runner Frame
Parts, Attack Ring,
Solid Metal Core,
Weight Disk, Blade
Base and Sticker
Sheets
Includes unassembled BEYBLADE top, launcher, and ripcord.
Assembly required. No tools needed.
• Before assembly and playing, please
read instructions. Please keep these
instructions for future reference.
• When removing parts from runner frame,
ask an adult to help you trim off any
excess plastic using scissors or other
suitable tool.
• The frame is numbered. Please follow the
numbers carefully and make sure you are
assembling the right parts.
• Discard plastic bags immediately.
BEYBLADE tops/BEYSTADIUM are intended to be used on the floor. Do not lean over the stadium
when BEYBLADE tops are in play. BEYBLADE tops may bounce up and hit eye or face.
WARNING: Do not use BEYBLADE®* tops or BEYSTADIUM
™
on tables or other elevated surfaces.
AGE 8+
82656/82653 Asst.
Metal Driger
™
HIGH PERFORMANCE TOPS
A-95
A-95
Defense Type
Defense Type
BEYSTADIUM sold separately.
®*
1
9
6
3
7
4
8
2
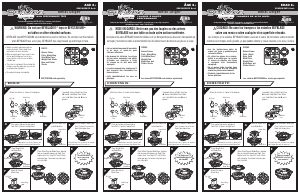
Attach the stickers as shown in the diagram.
Bit Chip
Attack Ring
Blade Base
Solid Metal
Core
Snap both halves of Right Spin Gear
é around Solid Metal Core. Make
sure Solid Metal Core and é are in
grooves.
Solid Metal
Core
Push in and press down Lock
Parts (2 places) to secure the
Right Spin Engine Gear.
* Opening the Lock Parts (2 places) will
enable you to attach Right Engine Gear.
5
Attach the Engine Gear
to the Blade Base.
Blade Base
Engine Gear
*Once the Lock Parts (2 places) are in place,
Right Engine Gear will not come out.
Place Weight Disk
on Blade Base.
Push up the tabs on the outside of
Lock Parts (2 places) and pull out.
Weight Disk
Completed
Blade Base
Attach Bit Chip to
Attack Ring.
Bit Chip
Attack Ring
Place Attack Ring on Blade Base, aligning
tabs on ring with grooves on Right Spin
Engine Gear. Turn ring LEFT until it locks
onto spin gear. To remove ring from gear,
turn ring right.
Your BEYBLADE
top is now ready
for battle!
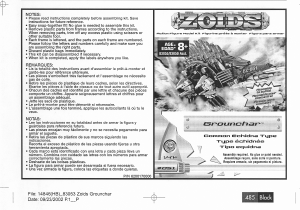
Les toupies et les arènes BEYBLADE doivent être utilisées sur le sol. Ne te penche pas au-dessus de l’arène pendant que
les toupies y tournoient, car celles-ci peuvent rebondir hors de l’arène et causer des blessures aux yeux ou au visage.
MISE EN GARDE: Ne te sers pas des toupies ou des arènes
BEYBLADE sur une table ou toute autre surface surélevée.
ÂGE 8+
82656/82653 Asst.
TOUPIES À HAUTE
PERFORMANCE
Type défense
Type défense
Contient une toupie BEYBLADE non assemblée, un propulseur et une tige cannelée.
Assemblage requis, sans l’aide d’outils.
PIÈCES:
Runner Frame
Parts, Attack Ring,
Solid Metal Core,
Weight Disk,
Blade Base and
Sticker Sheets
• Lis les instructions avant d’assembler
et de jouer, et garde-les pour
référence ultérieure.
• Au moment de détacher les pièces
de leur cadre, demande à un adulte
d’ébarber ces dernières à l’aide
de ciseaux ou de tout autre outil
approprié.
• Le cadre comporte des numéros qu’il
faut respecter afin d’assembler les
bonnes pièces.
• Jette immédiatement les sacs en
plastique.
Les arènes BEYSTADIUM sont vendues séparément.
A-95
A-95
®*
1
9
6
3
7
4
8
2
Attach the stickers as shown in the diagram.
Bit Chip
Attack Ring
Blade Base
Solid Metal
Core
Snap both halves of Right Spin Gear
é around Solid Metal Core. Make
sure Solid Metal Core and é are in
grooves.
Solid Metal
Core
Push in and press down Lock
Parts (2 places) to secure the
Right Spin Engine Gear.
* Opening the Lock Parts (2 places) will
enable you to attach Right Engine Gear.
5
Attach the Engine Gear
to the Blade Base.
Blade Base
Engine Gear
*Once the Lock Parts (2 places) are in place,
Right Engine Gear will not come out.
Place Weight Disk
on Blade Base.
Push up the tabs on the outside of
Lock Parts (2 places) and pull out.
Weight Disk
Completed
Blade Base
Attach Bit Chip to
Attack Ring.
Bit Chip
Attack Ring
Place Attack Ring on Blade Base, aligning
tabs on ring with grooves on Right Spin
Engine Gear. Turn ring LEFT until it locks
onto spin gear. To remove ring from gear,
turn ring right.
Ta toupie est
maintenant parée
au combat!
PIEZAS:
Runner Frame
Parts, Attack
Ring, Solid
Metal Core,
Weight Disk,
Blade Base and
Sticker Sheets
• Lee las instrucciones antes de
armar y de jugar, y guárdalas para
referencia futura.
• Al retirar las piezas de su marco,
pídele a un adulto que les recorte
el exceso de plástico con tijeras
o cualquier otra herramienta
apropiada.
• En el marco están inscritos unos
números. Fíjate bien en ellos para
armar las piezas correctamente.
• Deshazte inmediatamente de las
bolsas plásticas.
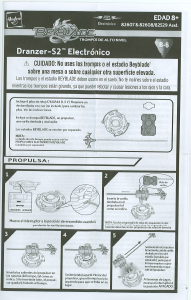
Los trompos y los estadios BEYBLADE deben usarse en el suelo. No te inclines sobre el estadio
mientras los trompos están girando, ya que pueden rebotar y causar lesiones a los ojos y la cara.
CUIDADO:
No uses los trompos o los estadios BEYBLADE
sobre una mesa o sobre cualquier otra superficie elevada.
EDAD 8+
82656/82653 Asst.
TROMPOS DE ALTO NIVEL
Tipo defensa
Tipo defensa
Los estadios BEYSTADIUM se venden por separado.
Incluye un trompo BEYBLADE desarmado, un propulsor y una varilla dentada.
Requiere armado, sin herramientas.
A-95
A-95
®*
1
9
6
3
7
4
8
2
Attach the stickers as shown in the diagram.
Bit Chip
Attack Ring
Blade Base
Solid Metal
Core
Snap both halves of Right Spin Gear
é around Solid Metal Core. Make
sure Solid Metal Core and é are in
grooves.
Solid Metal
Core
Push in and press down Lock
Parts (2 places) to secure the
Right Spin Engine Gear.
* Opening the Lock Parts (2 places) will
enable you to attach Right Engine Gear.
5
Attach the Engine Gear
to the Blade Base.
Blade Base
Engine Gear
*Once the Lock Parts (2 places) are in place,
Right Engine Gear will not come out.
Place Weight Disk
on Blade Base.
Push up the tabs on the outside of
Lock Parts (2 places) and pull out.
Weight Disk
Completed
Blade Base
Attach Bit Chip to
Attack Ring.
Bit Chip
Attack Ring
Place Attack Ring on Blade Base, aligning
tabs on ring with grooves on Right Spin
Engine Gear. Turn ring LEFT until it locks
onto spin gear. To remove ring from gear,
turn ring right.
¡Ahora tu trompo
BEYBLADE está listo
para combatir!
Metal Driger
™
®*
Metal Driger
™
®*


Únase a la conversación sobre este producto
Aquí puedes compartir lo que piensas sobre Hasbro Beyblade Metal Driger. Si tiene alguna pregunta, primero lea atentamente el manual. Puede solicitar un manual utilizando nuestro formulario de contacto.