Manual de uso Kichler 42167OZWH Everly Lámpara

¿Necesita un manual para su Kichler 42167OZWH Everly Lámpara? A continuación puedes ver y descargar el manual en PDF gratis en español. Este producto actualmente tiene 7 preguntas frecuentes, 0 comentarios y tiene 0 votos. Si este no es el manual que desea, , contáctenos.

¿Su producto tiene algún defecto y el manual no ofrece ninguna solución? Vaya a Repair Café para solicitar un servicio de reparación gratuito.

Manual de uso

Loading…

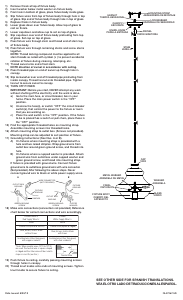
1) Remove finials at top of fixture body.
2) Insert washer below metal washer on fixture body.
3) From hole in bottom of glass, place fixture body inside glass.
4) Slip fixture wires from top of fixture body through hole in top
of glass. Slip end of fixture body through hole in top of glass.
5) Replace finials in fixture body.
6) Lower glass down over fixture body. Allow top of glass to
rest on finials.
7) Lower cap down and allow cup to set on top of glass.
8) Slip cap down over end of fixture body protruding from top
of glass. Set cap on top of glass.
9) Pass fixture wire through stem and thread end of stem top
of fixture body.
10) Pass fixture wire through remaining stems and screw stems
together.
NOTE: Thread locking compound must be applied to all
stem threads as noted with symbol (3) to prevent accidental
rotation of fixture during cleaning, relamping, etc.
11) Thread swivel onto end of last stem.
NOTE direction of swivel in accordance with ceiling.
12) Pass threaded pipe on end of swivel up through hole in
canopy.
13) Slip lockwasher over end of threaded pipe protruding from
inside canopy. Thread hexnut onto threaded pipe. Tighten
hexnut to secure swivel to canopy.
14) TURN OFF POWER.
IMPORTANT: Before you start, NEVER attempt any work
without shutting off the electricity until the work is done.
a) Go to the main fuse, or circuit breaker, box in your
home. Place the main power switch in the “OFF”
position.
b) Unscrew the fuse(s), or switch “OFF” the circuit breaker
switch(s), that control the power to the fixture or room
that you are working on.
c) Place the wall switch in the “OFF” position. If the fixture
to be re placed has a switch or pull chain, place those in
the “OFF” position.
15) Find the appropriate threaded holes on mounting strap.
Assemble mounting screws into threaded holes.
16) Attach mounting strap to outlet box. (Screws not provided).
Mounting strap can be adjusted to suit position of fixture.
17) Grounding instructions: (See Illus. A or B).
A) On fixtures where mounting strap is provided with a
hole and two raised dimples. Wrap ground wire from
outlet box around green ground screw, and thread into
hole.
B) On fixtures where a cupped washer is provided. Attach
ground wire from outlet box under cupped washer and
green ground screw, and thread into mounting strap.
If fixture is provided with ground wire. Connect fixture
ground wire to outlet box ground wire with wire connector.
(Not provided.) After following the above steps. Never
connect ground wire to black or white power supply wires.
18) Make wire connections (connectors not provided.) Reference
chart below for correct connections and wire accordingly.
19) Push fixture to ceiling, carefully passing mounting screws
through holes in canopy.
20) Thread knurl knobs onto ends of mounting scrwes. Tighten
knurl knobs to secure fixture to ceiling.
GREEN GROUND
SCREW
CUPPED
WASHER
A
B
OUTLET BOX
GROUND
FIXTURE
GROUND
DIMPLES
WIRE CONNECTOR
(NOT PROVIDED)
OUTLET BOX
GROUND
GREEN GROUND
SCREW
FIXTURE
GROUND
Connect Black or
Red Supply Wire to:
Connect
White Supply Wire to:
Black White
*Parallel cord (round & smooth) *Parallel cord (square & ridged)
Clear, Brown, Gold or Black
without tracer
Clear, Brown, Gold or Black
with tracer
Insulated wire (other than green)
with copper conductor
Insulated wire (other than green)
with silver conductor
*Note: When parallel wires (SPT I & SPT II)
are used. The neutral wire is square shaped
or ridged and the other wire will be round in
shape or smooth (see illus.)
Neutral Wire
Date Issued: 8/30/13
IS-42167-US
MOUNTING STRAP
ABRAZADERA DE MONTAJE
CANOPY
ESCUDETE
STEM
VARILLA
KNURL KNOB
PERILLA ESTRADA
SWIVEL
UNIÓN GIRATORIA
4
3
3
3
GLASS
VIDRIO
FIXTURE BODY
CUERPO DEL
ARTEFACTO
FINIAL
CAPUCHON
HEXNUT
TUERCA HEXAGONAL
LOCKWASHER
ARANDELA DE SEGURIDAD
CAP
TAPA
WASHER
ARANDELA
METAL WASHER
ARANDELA DE METAL
SEE OTHER SIDE FOR SPANISH TRANSLATIONS.
VEA EL OTRO LADO DE TRADUCCIONES AL ESPAÑOL.
Descargue el manual en Español (PDF, 0.11 MB)
(Piense en el medioambiente y solo imprima este manual si es de verdad necesario)

Loading…

Puntuación

Dé su opinión de la Kichler 42167OZWH Everly Lámpara calificando el producto. ¿Quiere compartir su experiencia con este producto o hacer una pregunta? Deje un comentario en la parte inferior de la página.
¿Estás satisfecho con elKichler 42167OZWH Everly Lámpara?
No
Sea el primero en calificar este producto
0 votos

Únase a la conversación sobre este producto

Aquí puedes compartir lo que piensas sobre Kichler 42167OZWH Everly Lámpara. Si tiene alguna pregunta, primero lea atentamente el manual. Puede solicitar un manual utilizando nuestro formulario de contacto.

Más sobre este manual

Entendemos que es bueno tener un manual en papel para tus Kichler 42167OZWH Everly Lámpara. Siempre puedes descargar el manual desde nuestro sitio web e imprimirlo tú mismo. Si deseas tener un manual original te recomendamos contactar con Kichler. Es posible que puedan proporcionar un manual original. ¿Estás buscando el manual de tu Kichler 42167OZWH Everly Lámpara en otro idioma? Elija su idioma preferido en nuestra página de inicio y busque el número de modelo para ver si lo tenemos disponible.

Especificaciones

Marca Kichler
Modelo 42167OZWH Everly
Categoría Lámparas
Tipo de archivo PDF
Tamaño del archivo 0.11 MB

Todos los manuales para Kichler Lámparas
Más manuales de Lámparas

Preguntas frecuentes sobre Kichler 42167OZWH Everly Lámpara

Nuestro equipo de atención al cliente busca información útil sobre los productos y responde a las preguntas frecuentes. Si encuentra inexactitudes en las preguntas frecuentes, indíquenoslo usando nuestro formulario de contacto.

¿Es regulable toda la iluminación led? Verificado

No, no todas las bombillas led son regulables. Esto se indica en el embalaje o en la propia bombilla.

Ha sido de gran ayuda (462) Leer más

Puse una nueva luz en mi lámpara pero no se enciende, ¿por qué? Verificado

Algunas lámparas están hechas para fuentes de luz de un vataje específico. Cuando se inserta una fuente de luz que requiere una potencia superior a la que puede proporcionar la lámpara, es posible que la luz no se encienda. Si la lámpara entrega un vataje mucho más alto de lo que está hecha la fuente de luz, la fuente de luz puede quemarse.

Ha sido de gran ayuda (315) Leer más

¿Por qué es importante el color de la luz? Verificado

Ha sido de gran ayuda (255) Leer más

¿Qué significa lumen? Verificado

Lumen es una unidad de medida para la cantidad total de luz visible emitida por una fuente.

Ha sido de gran ayuda (190) Leer más

¿Cuáles son las bases de tornillo que existen? Verificado

Hay muchos tipos de bases de tornillo en el mundo, pero la mayor parte está basada en la rosca Edison, indicada por la letra E. En la mayor parte de los países las bases de tornillo E27 y E14 son las más comunes. En los Estados Unidos las E26, E17, E12 y E10 son estándar.

Ha sido de gran ayuda (142) Leer más

¿Qué dicen los vatios acerca de mi lámpara? Verificado

El vatio es una unidad de medida para el consumo de electricidad. Las lámparas que emiten más luz suelen consumir más vatios, pero para comparar la potencia luminosa siempre debe usar los lúmenes.

Ha sido de gran ayuda (113) Leer más

¿Qué significa led? Verificado

Led significa diodo emisor de luz. Al guiar la electricidad en la dirección correcta a través de un semiconductor, se emite la luz.

Ha sido de gran ayuda (98) Leer más
Manual de uso Kichler 42167OZWH Everly Lámpara