Utilisation conforme
Ce produit s‘assure d‘apporter un climat agréable dans une pièce,
et a été conçu afin de décorer les fenêtres. Le matériel de fixation
murale fourni est uniquement conçu pour le béton, les tuiles ou les
parois en bois. Toute autre utilisation que celle décrite ci-dessus ou
toute modification du produit est interdite et peut mener à des blessures
et / ou à un endommagement du produit. Le fabricant décline toute
responsabilité pour les dommages résultant d’une utilisation non
conforme. Le produit n’est pas destiné à une utilisation commerciale.
Caractéristiques techniques
Tissu : 100 % polyester
Dimensions :
largeur 60, 80 ou 100 x hauteur 150 cm ou 80 x 210 cm
Descriptif des éléments
1
Entraînement latéral à
cordon / traction par chaîne
(déjà prémonté)
2
Clip de sécurité de la
traction par chaîne
3
Barre de lestage
4
Embouts
5
Support de volet roulant
(déjà prémonté)
6
Crochet de fixation
7
Support de serrage
8
Profil de montage
(déjà prémonté)
9
Support mural
Contenu de la livraison
1 entraînement latéral à
cordon / traction par chaîne
(déjà prémonté)
1 profil de montage
(déjà prémonté)
2 supports de volet roulant
(gauche et droite - déjà
prémonté)
2 supports de serrage
2 crochets de fixation
1 barre de lestage
2 embouts
1 clip de sécurité de la traction
par chaîne
2 supports muraux
3 chevilles
3 vis
1 notice de montage
strangulation and entangle-
ment. A child‘s neck may be
tangled in ropes.
Position beds, cots and
furniture away from ropes
for window coverings.
Do not knot ropes. Ensure
the ropes do not tangle,
forming a loop.
WARNING!
DANGER TO LIFE!
Always keep children away
from the product (strangu-
lation hazard, small parts
which could be swallowed).
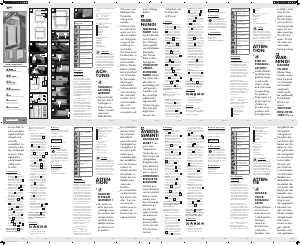
Légende des pictogrammes utilisés
Respecter les avertissements et consignes
de sécurité !
Risque d'étranglement !
Ne pas laver
Ne pas blanchir
Ne pas sécher au sèche-linge
Ne pas repasser
Ne pas nettoyer à sec
Assurer une mise au rebut écologique de
l’emballage et du produit !
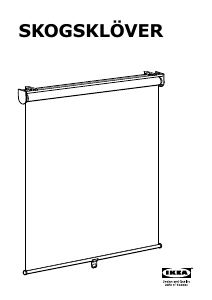
Store enrouleur Duo
Introduction
Félicitations ! Vous avez opté pour un produit de grande qualité.
Avant la première mise en service, vous devez vous familiariser avec
toutes les fonctions du produit. Veuillez lire attentivement cette notice
de montage et le mode d‘emploi ainsi que les consignes de sécurité
importantes. Utilisez ce produit uniquement conformément aux
instructions et dans les domaines d’application spécifiés. Veuillez
conserver soigneusement cette notice. Lorsque vous remettez l‘ap-
pareil à d‘autres utilisateurs, veuillez également leur transmettre tous
les documents liés à celui-ci.
Cleaning
Not washable.
Dust this product with a duster or a vacuum cleaner set on low.
Service
If you have any questions or complaints, please e-mail us at the
following address:
IAN 302128
IAN 302024
Please quote your IAN number.
Disposal
Do not dispose of the product with household rubbish. Contact your
local or municipal administration for information on how to dispose
of the product in an environmentally friendly and appropriate m
anner.
The packaging material can be disposed of through local recycling.
Information
Distributor
Goldner GmbH
Ringstrasse 24
AT-6830 Rankweil
AUSTRIA
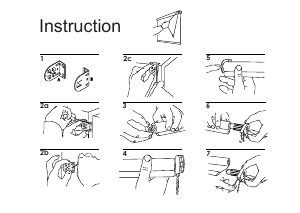
Assembling the top fix brackets:
Attention, important! So that the window can be fully opened
(90 °) the distance between the casement and the embrasure must be
min. 5 cm (see Fig. 1). Therefore, you should check this distance first.
Step 1: Push the top fix brackets
7
approx. 4 cm left and
right into the side of the mounting bracket
8
(see Fig. A).
Slide the hooks
6
into the top fix brackets
7
and allow only
max. 1 x to snap into place (see Fig. B). Remove the protective
film on the glue pads on the top fix brackets
7
(never attach
the blind only using the adhesive strips). Hook the blind into the
casement in the desired position and press on firmly. Secure
the hooks
6
by also pressing them on firmly or snapping them
into place (see Fig. C). The hook
6
can be removed once
more by lifting the unlocking tab.
Step 2: Slide the weight rod
3
into the slightly unrolled blind.
Push the end caps
4
into the sides of the weight rod
3
(see
Fig. D).
Step 3: Screw the pull chain safety clip
2
into the wall. Se-
cure the chain in the pull chain safety clip
2
. The cord must be
secured to the wall using the pull chain safety clip so that it is
taut
2
(see Fig. E).
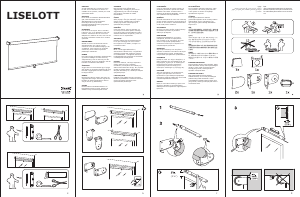
Screw assembly (assembly on a wall, ceiling or recess):
Step 1: Measure the position of the blind. Drill the fastening
bores, insert wall plugs into the bores and secure the wall
brackets
9
(see Fig. F). Clip the blind into the top of the wall
bracket
8
on the mounting bracket
9
and press on firmly or
snap into the bottom (see Fig. F). Then carry out Step 2 and 3
in the same way as you would assemble the top fix brackets.
This product is not a toy!
CAUTION! RISK OF
INJURY! Please ensure
that no parts are damaged
and that all parts are in-
stalled correctly. Incorrect
installation could result in
injury. Damaged parts could
impact safety and function.
Assembly
Note: The side pulley / pull chain
1
(pre-installed) may be
assembled on the right or the left.
To do so firmly pull both of the blind brackets
5
out of the
mounting bracket
8
and blind and reinsert or assemble on
the opposite side.
Decide whether you want to assemble the blind with the top
fix brackets or using screws to the wall / ceiling/ recess.
Important safety instructions
Damages due to failure to observe these instructions for installation
and use will void the warranty!
We assume no liability for consequential damage! We assume no
liability for property damage or personal injury due to improper
handling or failure to observe the safety instructions!
Note: For personal safety it‘s important to observe these safety
instructions.
ATTENTION
RISK OF STRAN-
GULATION!
Small children could be
strangled by loops in pull
cords, chains, straps and
inner cords for operating
the product.
Keep ropes out of the reach
of children to prevent
Intended use
The product creates a pleasant room temperature and is intended
as a window decoration. The included wall mounting material is
only suitable for concrete, brick or wood walls. Any use other than
previously mentioned or any product modification is prohibited and
can lead to injuries and / or product damage. The manufacturer is
not liable for any damages caused by improper use. This product
is not intended for commercial use.
Technical data
Material: 100 % polyester
Dimensions:
Width 60, 80 or 100 x height 150 cm or 80 x 210 cm
Parts description
1
Side pulley / pull chain
(pre-installed)
2
Pull chain safety clip
3
Weight rod
4
End caps
5
Blind bracket (pre-installed)
6
Hook
7
Top fix bracket
8
Mounting bracket
(pre-installed)
9
Wall bracket
Delivery contents
1 Side pulley / pull chain
(pre-installed)
1 Mounting bracket
(pre-installed)
2 Blind brackets
(left and right - pre-installed)
2 Top fix brackets
2 Hooks
1 Weight rod
2 End caps
1 Pull chain safety clip
2 Wall brackets
3 Wall plugs
3 Screws
1 Set of assembly instructions
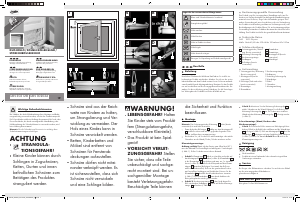
List of pictograms used
Observe the warnings and safety notices!
Risk of strangulation!
Do not wash
Do not use bleach
Do not tumble dry
Do not iron
Do not dry clean
Dispose of the packaging and product in an
environmentally-friendly manner!
Double roller blind
Introduction
Congratulations! You have purchased a high-quality product. Familia
r-
ise yourself with the product before using it for the first time. Please
carefully read the following instructions for installation and use and
important safety instructions. Only use the product as described
and for the indicated purpose. Keep these instructions in a safe
place. If passing this product on to a third party also include all
documents.
Entsorgung
Werfen Sie das Produkt nicht in den Hausmüll. Erkundigen Sie sich
in Ihrer Stadt oder Gemeinde nach einer entsprechend umwelt- und
sachgerechten Entsorgung. Das Verpackungsmaterial kann in den
örtlichen Recyclingbehälter gegeben werden.
Informationen
Inverkehrbringer
Goldner GmbH
Ringstrasse 24
AT-6830 Rankweil
ÖSTERREICH
302128_302024_Duo-Rollo_450x296mm_OS.indd 2 01.02.18 12:31


Únase a la conversación sobre este producto
Aquí puedes compartir lo que piensas sobre Meradiso IAN 302024 Estor enrollable. Si tiene alguna pregunta, primero lea atentamente el manual. Puede solicitar un manual utilizando nuestro formulario de contacto.