7
The anti-drip valve È will prevent
any remaining coffee dripping onto
t
he hot plate during serving. Ensure
t
hat the jug is replaced on the hot
p
late after serving.
We suggest consuming your coffee
w
ithin two hours, after this time we
suggest brewing another jug of
fresh coffee.
W
ARNING: The coffee maker
and hot plates are hot and
r
emain hot for some time after
switching off.
NOTE:
• Remember to turn off the machine
when you have finished.
• Allow the unit to cool.
• Remove the permanent filter and
empty the used coffee grounds.
Wash the filter immediately and dry
thoroughly.
•
Thermal Carafe Variants
• When the brewing process is
complete the product remains on,
we recommend you switch off your
coffee maker as soon as brewing is
complete.
• The thermal carafe will keep the
coffee warm in the jug for up to
‡/· four hours.
• The anti drip valve
È will prevent
any remaining coffee dripping onto
the base recess during serving.
• We suggest consuming your coffee
within two hours, after this time we
suggest brewing another jug of
fresh coffee.
•
WARNING: The coffee maker
and hot plates are hot and
remain hot for some time after
switching off.
NOTE:
• Remember to turn off the machine
when you have finished.
•
Allow the unit to cool.
• Remove the permanent filter and
empty the used cof
fee gr
ounds.
Wash the filter immediately and dry
thoroughly.
DIGITAL INTERFACE
VERSIONS
„
Set the clock
• When the machine is plugged in,
the display will flash 12:00 dimly.
• To set the time press the hour
button
ˆ and minute buttons ˜ to
reach the desired time.
NOTE:
T
he clock is a 24 hour clock.
The clock will be reset, each time
the product is unplugged at the
wall.
Making coffee
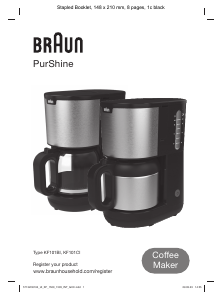
1 Press the push button fi to open
the hinged lid. The lid will
automatically rise
G.
2 Using the jug, fill the water reservoir
¤ with the required amount of
water using the level indicator
Ê as
a guide. Both the jug and water level
indicator are marked in cups
H.
3 Spoon ‹ the required amount of
ground filter coffee into the mesh
filter
› spreading evenly. We
suggest one level measuring spoon
for every cup. Ensure the filter is
sitting properly in the filter holder
I.
4 Close the lid. Ensure the lid is
closed and latched properly,
J
otherwise the machine will not
function correctly.
5 Slide the jug ‡/· into the coffee
maker ensuring it sits correctly on
the hot plate
K. The jug lid must be
in place during the brewing process;
otherwise the non drip valve will not
open, causing the filter to flood.
• T
hermal Carafe Variant
NOTE:
Thermal carafe versions have no hot
plate. Please ensure the jug sits
correctly on the base recess.
•
Ensure the jug
· lid is fully closed
by turning the lid clockwise, this
ensur
es the maximum temperatur
e
is maintained in the jug. To ensure
the coffee is kept as warm as
possible we advise you rinse your
thermal carafe in hot water before
use.
g
6
OPERATING THE
APPLIANCE
Before use
Before using your coffee maker for
the first time or if you have not used
i
t for some time, rinse the machine
by running water through. Follow
the procedure for making coffee,
without coffee in the filter holder.
The product that you have
p
urchased is available in four
different versions:
• Manual version - Glass carafe
• Manual version - Thermal carafe
• 24 hour automatic timer version -
Glass carafe
• 24 hour automatic timer version -
Thermal carafe
For the complete understanding of
how to use your machine please
refer to the specific section related
to your version.
Please note not all variants are
available in all countries, please
contact your retailer for more
information.
MANUAL INTERFACE
VERSIONS
‚
Making coffee
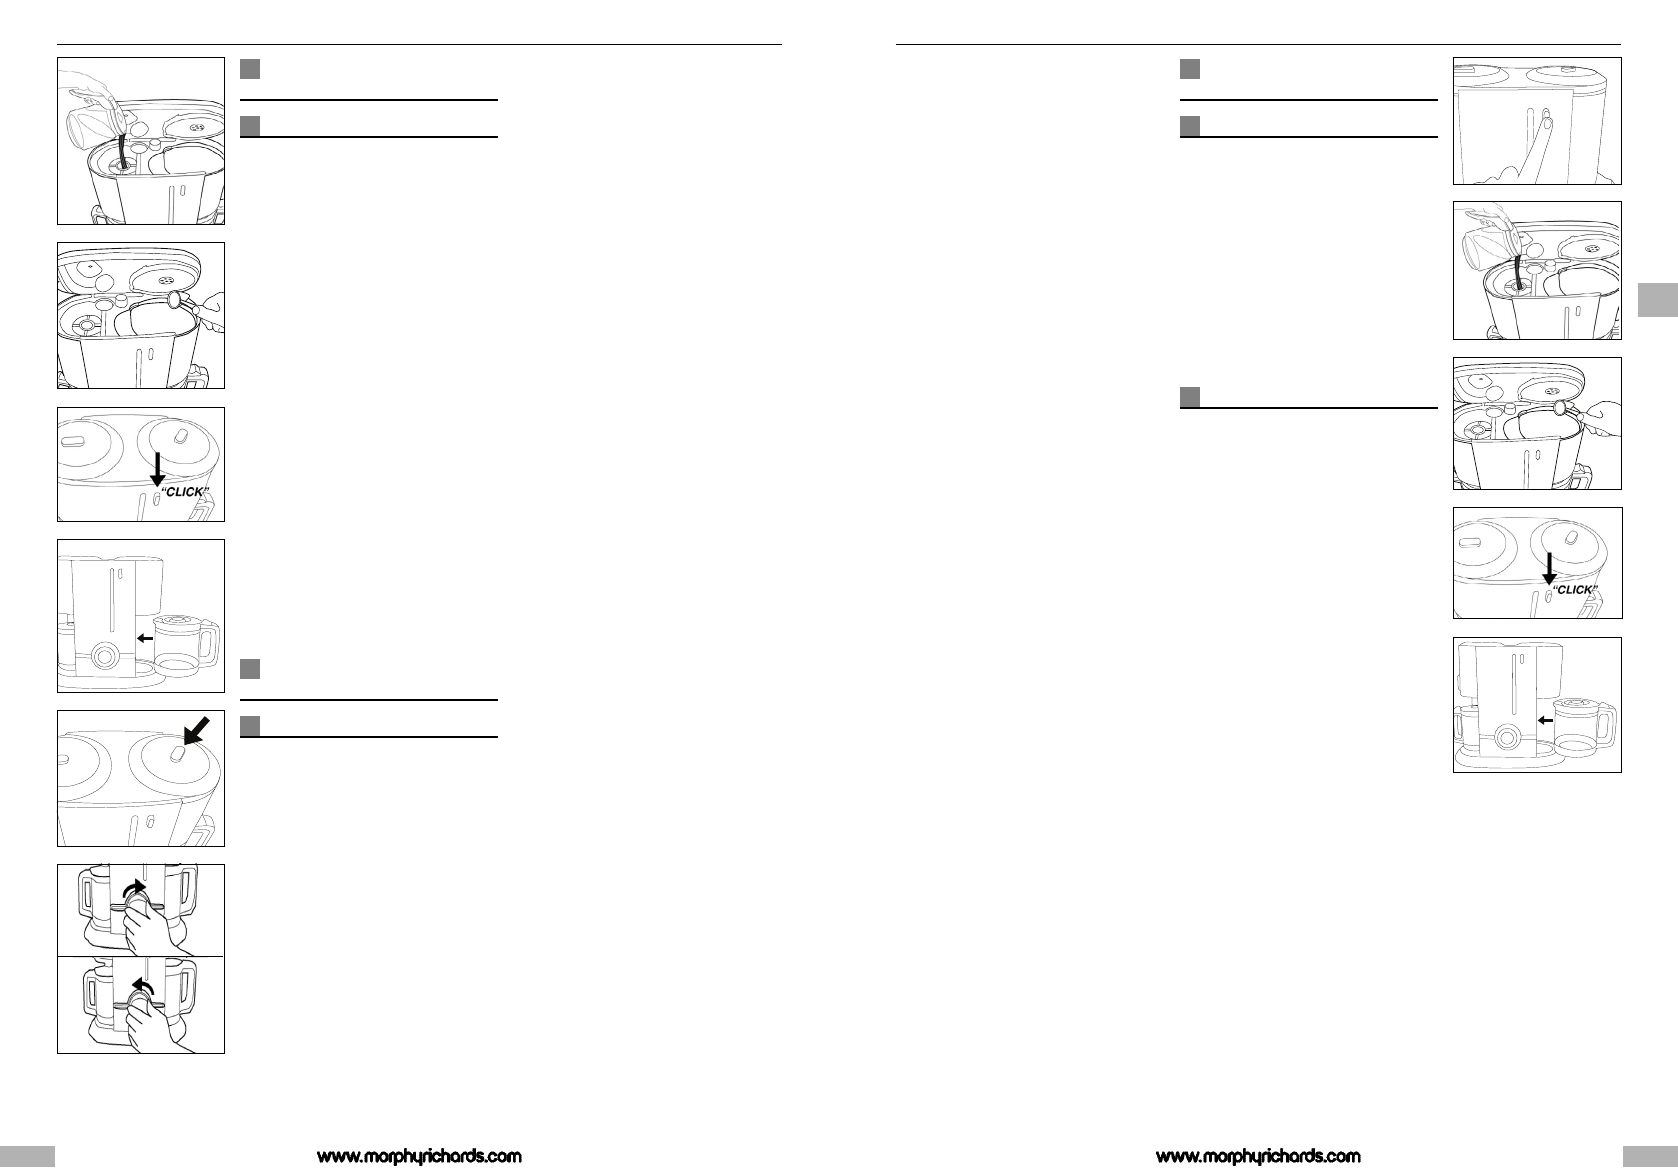
1 Press the push button fi to open
the hinged lid. The lid will
automatically rise.
2 Using a jug, fill the water reservoir
¤ with the required amount of
water using the level indicator
Ê as
a guide. Both the jug and water level
indicator are marked in cups
A.
3 Spoon ‹ the required amount of
ground filter coffee into the mesh
filter
› spreading evenly. We
suggest one level measuring spoon
for every cup. Ensure the filter is
sitting pr
operly in the filter holder
B.
4 Close the lid. Ensure the lid is
closed and latched pr
operly
C,
otherwise the machine will not
function correctly.
5 Slide the jug ‡/· into the coffee
maker ensuring it sits correctly on
t
he hot plate
D.
The jug lid must be
i
n place during the brewing process;
o
therwise the non drip valve will not
open, causing the filter to flood.
•
T
hermal Carafe Variant
NOTE:
Thermal carafe versions have no hot
p
late. Please ensure the jug sits
correctly on the base recess.
• Ensure the jug
· lid is fully closed
by turning the lid clockwise, this
ensures the maximum temperature
is maintained in the jug. To ensure
the coffee is kept as warm as
possible we advise you rinse your
thermal carafe in hot water before
use.
• Please note the jug lid must be in
place during the brewing process;
otherwise the non-drip valve will not
open, causing the filter to flood.
6 Select the required strength of
coffee using the strength selector
on the lid
E.
7 Plug the filter coffee maker in at the
wall socket and switch on. Rotate
the dial
Ï to select one of the two
on positions available: 1/2 carafe or
a full carafe,
F depending on the
number of cups required. Refer to
‘Cup selection function’ page 10 for
further information.
8 The cup selection indicator and the
power on indicator
Ô will light up.
The hot water will start to flow
through the coffee grounds and into
the jug as coffee for you to enjoy.
•
Glass Carafe Variant
When the brewing process is
complete the product will
automatically switch to keep warm;
the auto keep warm indicator will
light up.
The automatic keep warm function
will keep the coffee warm in the
carafe until the pr
oduct is switched
of
f.
For safety r
easons the cof
fee maker
will automatically switch off after
two hours.
A
B
C
D
E
G
H
I
J
K
F


Únase a la conversación sobre este producto
Aquí puedes compartir lo que piensas sobre Morphy Richards 47067 Máquina de café. Si tiene alguna pregunta, primero lea atentamente el manual. Puede solicitar un manual utilizando nuestro formulario de contacto.