
Lumina Micro 220
User Guide
DISCOVER THE NIGHT
Thank you for choosing the Lumina
Micro 220 from NiteRider, the
innovator in technical lighting systems.
The Lumina Micro 220 combines a
self contained, high-powered, white
LED headlamp with a rechargeable,
replaceable Lithium Ion battery. To get
the most from your NiteRider light, we
urge you to familiarize yourself with
the following safety and operating
instructions.
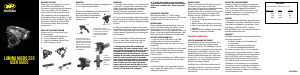
PARTS LIST AND IDENTIFICATION
Please verify the contents of your
Lumina system:
A. Lumina Micro 220 Headlamp
B. Lumina Handlebar Mount
C. Lumina Handlebar Mount Shim
D. USB Charging Cable
OPERATION
1. The light has 5 modes - low, medium and
high beam - daylight ash mode and walk
mode. Press and release the headlamp
power button to turn the light on. Cycle
through the three brightness levels by
pressing and releasing the power button.
2. To access the daylight visible ash mode,
press and hold the power button for greater
than 3 seconds or until the headlamp begins
to ash.
3. With the headlamp in ash mode, press
and release the power button to access walk
mode. From walk mode you can return to
normal mode by pressing and releasing the
power button.
4. To turn the light o from either normal,
ash, or walk mode, press and hold the
power button until the light turns o.
5. Like the other Lumina Series models, the
Lumina Micro 220 comes equipped with a “lock”
mode. Always put the light into lock mode during
transport of the headlamp in order to prevent
accidentally turning the headlamp on. To put the
headlamp in lock mode, press and hold the power
button for several seconds until the headlamp
turns off and continue holding the power button
down through ash mode until the power button
turns or ashes red. Then let go of the Power
button and test to make sure the light is in lock
mode by tapping the power button. The light will
not turn on if the lock mode is engaged.
RIDING AT NIGHT
While a Lumina Micro 220 lighting system
will improve your view, control and
enjoyment of night riding, please remember
that cycling at night is an inherently
dangerous activity. In addition to using your
lighting system properly and riding with
extreme caution, NiteRider urges you to:
• Never ride alone.
• Always let someone know where you
are going.
• Wear a helmet and reective clothing.
• Carry an auxiliary light and emergency
supplies.
• Make sure the headlamp & mounting
bracket is securely fastened.
IMPORTANT INFORMATION!
LOCK THE HEADLAMP FOR TRANSIT
It is important to lock the headlamp and
protect the switch from being pressed
while it is in transit. The headlamp can be
easily turned on if placed in something like
a backpack, duel bag or suitcase. The
headlamp gets hot while in operation. To
prevent potential damage from high heat
or even re, it is very important to put the
headlamp in lock mode and protect the
switch from being pressed.
NiteRider will not be held responsible for
damages to person or property resulting
from a failure to follow the ‘lock’ mode
instructions.
6. To unlock the headlamp, press and hold the
power button for several seconds until the power
button turns, or ashes blue. Release the power
button.
A. B.
C.
D.
Release Lever
Hinge
Knob
Turn the knob counter-
clockwise, allowing the hinge
to swing open. Place the
mount on the handlebar
on the either side of the
stem.
150-23220
Swing the hinge down
to make contact with the
handlebar. Swing the hex
bolt up, seating the knob
into its recess. Turn the
knob clockwise to tighten
and secure the mount to
the handlebar.
Aim the
headlamp by
swiveling the
headlamp
back
and forth.
MOUNTING
The Lumina Handlebar Mount is designed to
t on virtually any handlebar.
Remove the headlamp from the mount by
pressing down on the release
lever and sliding the headlamp
o of the mount towards the
release lever.
LOW BATTERY INDICATOR
With approximately 15 - 20% battery
capacity remaining, the indicator LED on the
headlamp will turn from blue to red.
RESERVE MODE
Reserve Mode will automatically shift your
light to low beam when the battery is very
low and about to cut o. Once reserve
mode starts you will only be able to use Low
Beam, Flash Mode and Walking Mode. High
Beam and Medium Beam will be disabled.
BATTERY CHARGING AND CARE
1. Plug the micro USB side of the USB
charging cable into the Lumina Micro
220 charging port and the other into your
computer.
2. The LED charging indicator on the Lumina
Micro 220 will remain red until the battery
is fully charged; once charged it will then
switch to blue.
3. Leaving the headlamp and USB charging
cable connected indenitely will not harm
the battery.
4. When storing for an extended period of
time, charge the battery every 4-6 weeks to
maximize battery life.
PROTECTING YOUR INVESTMENT
Properly charge your battery to maximize
its lifespan. (See the “Battery Charging and
Care” section for detailed information)
The Lumina Micro 220 will perform in wet
weather conditions, but submerging it in
water will damage the system.
SUPPORT
If you experience diculties during product
installation or operation, NiteRider provides
free telephone support on weekdays from
8:00 AM to 4:30 PM (Pacic Time) at
800.466.8366, ext 4. You may also e-mail us
at support@niterider.com.
WARRANTY
NiteRider stands behind its products with the
following warranties:
•Lifetime warranty on all mechanical
components
•2 years on electrical components
•1 year on rechargeable batteries
To obtain warranty service, it is preferable
to have your original sales receipt. Contact
the NiteRider customer service department
at 800.466.8366, ext 4 to obtain a Return
Merchandise Authorization (RMA) number.
The RMA number must be prominently
displayed on the outside of your package.
The product must be properly packaged to
prevent damage in transit. For complete
warranty information, please visit our website
at www.niterider.com.
The Lumina Micro 220 will run up to:
RUN TIMES
Light Level
High
Med
Low
Walk
Time*
1:30
2:45
4:00
14:00
Lumens
220
120
80
15
*Run times are approximations and will vary.

Únase a la conversación sobre este producto
Aquí puedes compartir lo que piensas sobre NiteRider Lumina Micro 220 Faro bicicleta. Si tiene alguna pregunta, primero lea atentamente el manual. Puede solicitar un manual utilizando nuestro formulario de contacto.