EN
FR
Radio-Controlled Projection Clock
with Color Weather Forecast
Model: BAR339PA
USER MANUAL
INTRODUCTION
Thank you for selecting this Oregon
™
Radio-Controlled Projection Clock with Color Weather
Forecast. Please keep this manual for instructions and
information you should know about.
CLOCK OVERVIEW
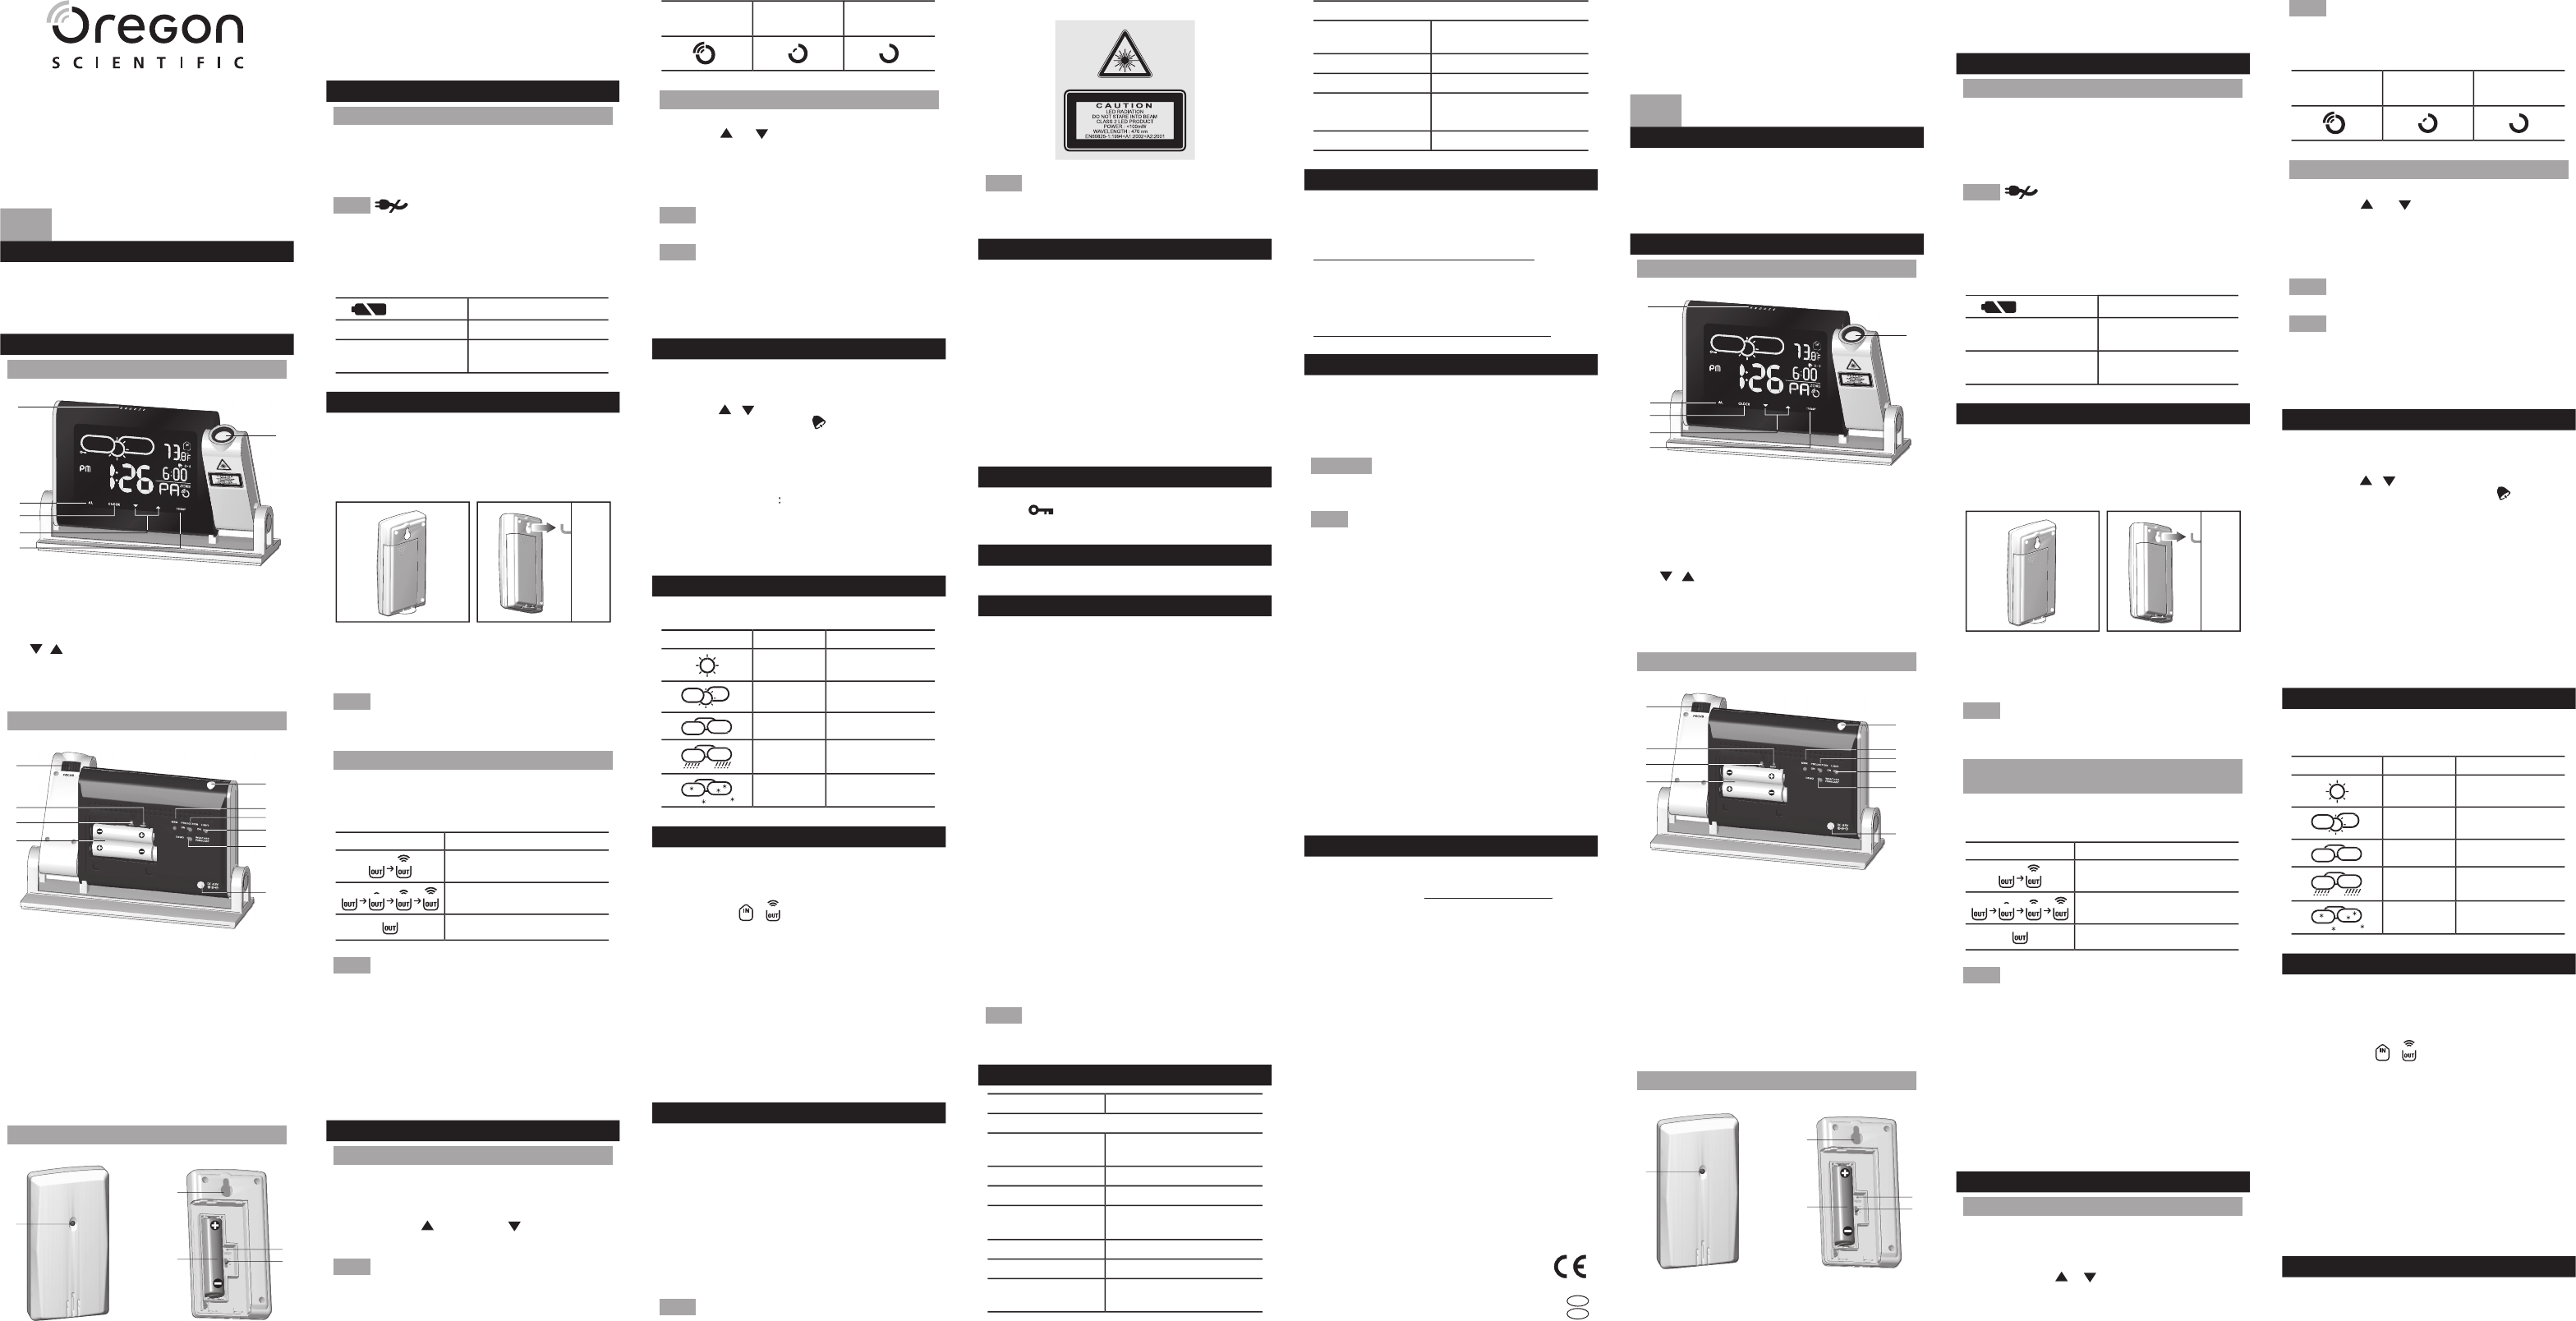
FRONT VIEW
1. SNOOZE: Snooze alarm; activate backlight; rotate
dual line projection display by 180°
2. ALARM: View alarm status; set alarm
3. CLOCK: Change display; set clock
4. / : Toggle setting options; activate / deactivate
clock reception
5. TEMP: Toggle in / out temperature display
6. Projector
BACK VIEW
: Focus the projected image
: Reset settings to default
: Select temperature unit
6. MEM: View current, maximum and minimum
temperature
7. PROJECTION: ON / OFF switch
8. LIGHT: Backlight ON / OFF switch
9. DEMO WEATHER FORECAST: Select between
demo mode and weather forecast mode
10. Adapter socket
REMOTE SENSOR
1. LED status indicator
2. Wall mount hole
3. Battery compartment
4. RESET hole: Reset unit to default settings
5. CHANNEL button: Select channel 1
GETTING STARTED
POWER SUPPLY
Batteries serve as a back-up power supply. For
continuous use of projector and backlight, install
adapter. The socket-outlet shall be installed near the
equipment and shall be easily accessible.
NOTE will appear when power supply is not
connected.
To insert batteries:
1.
Remove the battery compartment and insert
batteries, matching polarities.
2. Press
RESET after each battery change.
LOCATION
MEANING
Clock / alarm area Main unit batteries low
Outdoor / indoor
temperature area
Sensor batteries low
REMOTE SENSOR
To set up the sensor:
1. Open the battery compartment, and insert batteries,
matching polarities.
2. Place the sensor within 30 m (98 ft) of the mai
n unit
using the table stand or wall mount.
The transmission range may vary depending on many
factors. You may need to experiment with various
locations to get the best results.
NOTE We recommend that you use alkaline batteries
with this product for longer usage and consumer grade
lithium batteries in temperatures below freezing.
SENSOR DATA TRANSMISSION
Outdoor sensor
The main unit will automatically search for the outdoor
sensor. The sensor reception icon in the remote sensor
area shows the status:
ICON DESCRIPTION
Main unit is searching for
sensor(s)
A channel has been found
The sensor cannot be found.
NOTE If the sensor is not found, check the batteries,
obstructions, and remote unit location.
• P
out of direct sunlight and moisture.
• Position the sensor facing main unit, minimizing
obstructions.
• Place the sensor in a location with a clear view to
the sky, away from metallic or electronic objects.
• Position the sensor close to the main unit during
cold
winter months.
CLOCK
CLOCK RECEPTION
This product is designed to synchronize its clock
automatically with a clock signal.
To enable / disable signal reception:
Touch and hold to enable, or to disable signal
signal reception.
NOTE Reception takes 2-10 minutes. If the signal is
weak, it can take up to 24 hours to get a valid signal.
Clock signal reception indicator:
STRONG
SIGNAL
WEAK
SIGNAL
NO
SIGNAL
MANUALLY SET CLOCK
1. Touch and hold CLOCK for 2 seconds.
2. Touch or to change the settings.
3. Touch CLOCK to confi rm.
4. The setting order is: time zone offset, 12/24-hr
format, hour, minute, year, day / month format,
month, day and language.
NOTE Time zone offset sets the clock +/- 23 hours
from the received clock signal time.
NOTE The language options are (E) English, (D) German
,
(F) French, (I) Italian, and (S) Spanish.
To select display mode:
Touch CLOCK to choose between clock with seconds
and clock with weekday.
ALARM
To set the alarm:
1. Touch and hold ALARM for 2 seconds to enter
alarm-setting mode.
2. Touch / to set hour / minute.
3. Touch
ALARM to confi rm. indicates alarm is ON.
To toggle alarms ON / OFF:
1. Touch ALARM to display alarm time.
2. Touch
ALARM again to turn alarm ON / OFF.
To silence the alarms
• Touch SNOOZE to silence it for 8 minutes
OR
• Touch any other key to turn the alarm off and activate
it again after 24 hours.
WEATHER FORCAST
It will forecast the next 12 to 24 hours of weather within a
30-50 km (19-31 mile) radius using different color icons.
ICON COLOR DESCRIPTION
Red /
Orange
SunnyS
Pink Partially Cloudy
Turquoise Cloudy
Purple Rainy
Green Snowy
TEMPERATURE
To toggle temperature unit
Press °C / °F.
To toggle between outdoor / indoor sensor readings
Touch TEMP. / indicates indoor and outdoor
temperature.
To
auto-scan between sensors
Touch and hold TEMP for 2 seconds to display the
sensor’s data for 5 seconds.
To deactivate auto-scan function touch TEMP.
To toggle between current, minimum and maximum
temperature records for outdoor / indoor:
Press MEM repeatedly.
To clear the records:
Press and hold MEM for 2 seconds.
PROJECTOR AND BACKLIGHT
To activate Projection function
• Slide PROJECTION switch to ON to illuminate
projection continuously.
To activate Backlight function:
• Slide LIGHT switch to ON to illuminate backlight
continuously.
OR
• Touch
SNOOZE to turn on projector and backlight
for 5 seconds.
• Touch repeatedly to fl ip dual line projection image
by 180 degrees.
NOTE If projection is illuminated, do not look directly
into the projector.
NOTE To save battery life, the projector and backlight
will only operate continuously when adapter is installed.
The light sensor will turn off the projector automatically
when it detects external light sources.
COLOR
The color function lights up the LCD screen. There are
2 different types of display:
• WEATHER FORECAST: The color changes
according to the different weather forecast. (As
shown in Weather forecast).
• DEMO: The color gradually changes between the
colors (rainbow display).
To activate / deactivate the weather forecast or rainbow
display, slide the relevant switch to one of the following
options:
• WEATHER FORECAST: Color changing weather
forecast.
• DEMO: For gradual changes between the colors.
KEY LOCK
Auto key lock will activate if no key is pressed for 1
minute. indicates key lock is engaged, touch any
key to unlock.
RESET
Press RESET to return to the default settings.
PRECAUTIONS
• Do not subject the unit to excessive force, shock,
dust, temperature or humidity.
• Do not cover the ventilation holes with any items
such as newspapers, curtains etc.
• Do not immerse the unit in water. If you spill liquid
over it, dry it immediately with a soft, lint-free cloth.
• Do not clean the unit with abrasive or corrosive
materials.
• Do not tamper with the unit’s internal components.
This invalidates the warranty.
• Only use fresh batteries. Do not mix new and old
batteries.
• Images shown in this manual may differ from the
actual display.
• When disposing of this product, ensure it is collected
separately for special treatment.
•
Placement of this product on certain types of wood
may result in damage to its fi nish for which Oregon
Scientifi c will not be responsible. Consult the furniture
manufacture’s care instructions for information.
• The contents of this manual may not be reproduced
without the permission of the manufacturer.
• Do not dispose old batteries as unsorted municipal
waste. Collection of such waste separately for special
treatment is necessary.
• Please note that some units are
equipped with a
battery safety strip. Remove the strip from the battery
compartment before fi rst use.
NOTE The technical specifi cations for this product and
the contents of the user manual are subject to change
without notice.
SPECIFICATIONS
TYPE DESCRIPTION
MAIN UNIT
L x W x H
177 x 56 x 112 mm
(6.97 x 2.21 x 4.41 in)
Weight 340 g (12.0 oz)
without battery
Temperature Unit °C / °F
Temperature range -5°C to 50°C
(23°F to 122°F)
Resolution 0.1°C (0.2°F)
Signal frequency 433 MHz
Power 3 x UM-3 (AA) 1.5 V batteries /
4.5V AC / DC adapt
er
REMOTE UNIT (THN132N / THN132NH)
L x W x H
92 x 60 x 20 mm
(3.6 x 2.4 x 0.8 in)
Weight
62 g (2.2 oz)
Transmission range 30 m (98 ft) unobstructed
Temperature range
-30°C to 60°C
(-22°F to 140°F)
Power 1 x UM-3 (AA) 1.5 V battery
ABOUT OREGON SCIENTIFIC
Visit our website (www.oregonscientifi c.com) to learn
more about Oregon Scientifi c products. If you’re in
the US and would like to contact our Customer Care
department directly, please visit:
www2.oregonscientifi c.com/service/support
OR
Call 1-800-853-8883.
For international inquiries, please visit:
www2.oregonscientifi c.com/about/international
FCC STATEMENT
This device complies with Part 15 of the FCC Rules.
Operation is subject to the following two conditions:
(1) This device may not cause harmful interference, and
(2) This device must accept any interference received,
including interference that may cause undesired operation
.
WARNING
C
hanges or modifications not expressly
approved by the party responsible for compliance could
void the user’s authority to operate the equipment.
NOTE This equipment has been tested and found
to comply with the limits for a Class B digital device,
pursuant to Part 15 of the FCC Rules. These limits
are designed to provide reasonable protection against
harmful interference in a residential installation
This equipment generates, uses and can radiate radio
frequency energy and, if not installed and used in
accordance with the instructions, may cause harmful
interference to radio communications. However, there
is no guarantee that interference will not occur in a
particular installation. If this equipment does cause
harmful interference to radio or television reception,
which can be determined by turning the equipment
off and on, the user is encouraged to try to correct
interference by one or more of the following measures:
• Reorient or relocate the receiving antenna.
• Increase the separation between the equipment
Connect the equipment into an outlet on a circuit
from that to which the receiver is connected.
different from that to which the receiver is connected.different
• Consult the dealer or an experienced radio / TV
DECLARATION OF CONFORMITY
The following information is not to be used as contact for
support or sales. Please call our customer service number
the warranty card for this product) for all inquiries instead
.
Name: Oregon Scientifi c, Inc.
Address: 19861 SW 95th Ave.,
Telephone No.: 1-800-853-8883
Radio-Controlled Projection Clock
with Color Weather Forecast
Manufacturer: IDT Technology Limited
Address: Block C, 9/F, Kaiser Estate,
is in conformity with Part 15 of the FCC Rules.
Operation is subject to the following two conditions:
1) This device may not cause harmful interference.
2) This device must accept any interference received,
including interference that may cause undesired operation
Horloge à projection téléguidée
Modèle
INTRODUCTION
Merci d’avoir choisi cette Horloge à Projection
Téléguidée avec Prévisions de la Météo en Couleur,
un produit de O
regon
™. Veuillez garder ce
manuel de l’usager pour toutes les informations dont
vous aurez besoin pour le fonctionnement.
VUE D’ENSEMBLE DE L’HORLOGE
VUE DE FACE
1. SOMMEILLER: activer la lumière arrière, faire
pivoter
l’affi chage de projection de la ligne double
de 180 degrés
2.
ALARME: examiner la position de l’alarme, engager
l’alarme
3. HORLOGE: changer l’écran; engager l’horloge
4. / : Options du bouton à levier; engager /
désengager la réception de l’horloge
5. TEMP: Le bouton à levier à l’intérieur / à l’extérieur
affi chage de la température
6. Projecteur
VUE DE L’ARRIERE
: Mettre l’image projetée au point
: remettre la monture à default
4. Compartiment de la pile
6. MEM: Vue courante, maximum, minimum,
températures
7. PROJECTION: Bouton Commande ON / OFF
8. Lumière: ON Lumière arrière / bouton commande OFF
9. Prédiction de la météo démo: Choisir entre mode
démo ou mode prévision de la météo
10. Prise de courant de la douille
DETECTEUR A DISTANCE
1. LED indicateur de position
2. Trou pour support au mur
3. Compartiment de la pile
4. Remise: remettre l’unité à default
5. Canal: choisissez le canal 1
INDICATIONS DE MISE EN MARCHE
APPROVISIONNEMENT ELECTRIQUE
Les piles sont un système d’approvisionnement
électrique de backup.Pour l’usage continuel du
projecteur et de la lumière arrière, installez la douille.
La prise de courant doit être installée à proximité de
l’équipement et facilement accessible.
NOTE apparaitra si l’approvisionnement
électrique n’est pas branché.
Pour insérer les piles:
1. Enlever le compartiment à piles et insérer les piles
en portant attention aux polarités
.
2. Appuyer sur RESET à chaque fois que vous
changez
les piles.
LOCATION
SIGNIFICATION
Région horloge /
alarme
Piles sont faibles dans
l’unité principale
Extérieur / intérieur
Piles du détecteur à
piles sont faibles
DETECTEUR A DISTANCE
Pour installer le détecteur:
1. Ouvrir le compartiment à piles, insérer les piles, en
portant attention aux polarités.
2. Placer le détecteur à 30 m (98ft) de l’unité principale
en le plaçant sur une table ou au mur.
La distance de transmission peut varier dépendant de
plusieurs facteurs. Différentes locations peuvent être
plus avantageuses.
NOTE Nous recommandons des piles à l’alcali pour
un usage prolongé et des piles au lithium pour les
températures sous zéro.
INFORMATION DE TRANSMISSION DU
DETECTEUR
L’unité principale recherchera automatiquement le
détecteur extérieur. L’Icône de détection de réception
dans le détecteur à distance démontre le statut:
ICON DESCRIPTION
L’unité principale recherche
les détecteurs
Un canal est retracé
Le détecteur in introuvable.
NOTE S’il est impossible de retrouver le détecteur,
vérifi er les piles, obstructions ou la location de l’unité à
distance.
POUR DE MEILLEURS RESULTATS:
• Placer le détecteur à l’écart des rayons de soleil
directs, et de l’humidité
.
• Placer le détecteur faisant face à l’unité principale
en minimisant les obstructions
.
• Placer le détecteur dans un endroit avec pleine
vue sur le ciel, à l’écart d’objets de métal ou d’objets
électroniques
.
• Placer le détecteur près de l’unité principale durant
les mois d’hiver.
HORLOGE
RECEPTION DE L’HORLOGE
Ce produit est conçu pour synchroniser son horloge
automatiquement avec un signal d’horloge.
Pour confi rmer/infi rmer le signal de reception:
Engager et tenir / pour confi rmer / infi rmer le
signal de réception
.
NOTE La réception demande de 2-10 minutes. Si le
signal est faible il faudra jusqu’à 24 heures pour valider
le signal.
Indicateur de signal de réception:
SIGNAL
FORT
SIGNAL
FAIBLE
PAS DE
SIGNAL
AJUSTER MANUELLEMENT L’HORLOGE
1. Toucher et tenir CLOCK pendant 2 secondes.
2. Toucher ou pour changer les montures.
3. Toucher CLOCK pour confi rmer.
4. L’ordre des montures sont: zone de temps offset,
format 12/24 heure. heure, minute, année, jour /
format mois, mois, jour et langage
.
NOTE Zone de temps offset ajuste l’horloge +/- 23
heures du moment où le signal de l’horloge est perçu.
NOTE Les options langages sont (E) Anglais, (D)
Allemand, (F) Français, (I) Italien, et (S) Espagnol.
Pour sélectionner le mode de visualisation:
Toucher CLOCK pour choisir entre horloge avec
secondes et horloge avec journée de semaine
.
ALARME
Pour engager l’alarme:
1. Toucher et tenir ALARME pendant 2 secondes
pour le mode de réglage de l’alarme
.
2. Toucher / pour engager heure / minute.
3. Toucher ALARME pour confi rmer. indiquera
que
l’alarme est engagée.
Bouton à levier ON / OFF:
1. Toucher ALARME pour affi cher le temps de l’alarme
.
2. Toucher ALARME pour engager ou désengager
l’alarme ON / OFF.
Pour arrêter l’alarme
• Toucher SOMMEILLER (SNOOZE) pour obtenir le
silence pour 8 minutes
OU
• Toucher une autre clef pour désactiver l’alarme et la
réactiver 24 heures plus tard
.
PREVISIONS DE LA MÉTÉO
Les prévisions de la météo se font aux 12 à 24 heures
dans un parcours de 30-50km (19-31 milles) de rayon en
utilisant des icônes de couleur différentes
.
Couleur DESCRIPTION
EnsoleilléS
Rose
Partiellement
nuageux
Turquoise Nuageux
Mauve Pluie
Vert Neige
TEMPERATURE
Pour le bouton levier de l’unité de température
Pesez °C / °F.
Pour passer de extérieur / intérieur des données du
détecteur
Toucher TEMP. / ceci indique les températures
intérieures et extérieures.
Pour balayer automatiquement entre détecteurs
Toucher et tenir TEMP pendant 2 secondes pour affi cher
l’information du détecteur pendant 5 secondes.
Pour désactiver le balayage automatique toucher
TEMP
.
Pour passer entre courant, minimum et maximum
de températures pour extérieur et intérieur:
Appuyez MEM plusieurs fois.
Pour dégager les articles
Appuyez et tenir MEM pendant 2 secondes.
PROJECTEUR ET LUMIERE ARRIERE
Pour activer la fonction projection
• Glisser le bouton PROJECTION a ON pour illuminer
la projection continuellement.
COUNTRIES RTTE APPROVAL COMPLIED
All EU countries, Switzerland
BAR339PA_MANUAL_R1.indd 1 5/31/07 4:16:32 PM


Únase a la conversación sobre este producto
Aquí puedes compartir lo que piensas sobre Oregon BAR 339PA Estación meteorológica. Si tiene alguna pregunta, primero lea atentamente el manual. Puede solicitar un manual utilizando nuestro formulario de contacto.