Important
• Vérifiez que la tension indiquée sur l’appareil est bien
conforme à la tension de votre réseau d’alimentation.
• Attention : Le côté extérieur de l’appareil devient chaud.
• N’obturez pas le dessus des deux compartiments de grillage
pendant l’utilisation.
• N’enroulez pas le cordon autour de l’appareil tant qu’il est
chaud.
• Ne plongez pas l’appareil dans l’eau ou dans un autre liquide.
• Certaines pièces de l’appareil ont été graissées. Lors de la
première utilisation l’appareil peut produire un peu de fumée.
Ceci est normal, mettez donc en marche l’appareil sans toast
lors de la première utilisation.
• Enlevez la couche en plastic qui protège l’appareil avant
l’utilisation pour la première fois.
• Si le cordon secteur de votre appareil est endommagé, il doit
impérativement être remplacé par un réparateur indépendant
agréé Philips car des équipements et des composants
spécifiques sont exigés.
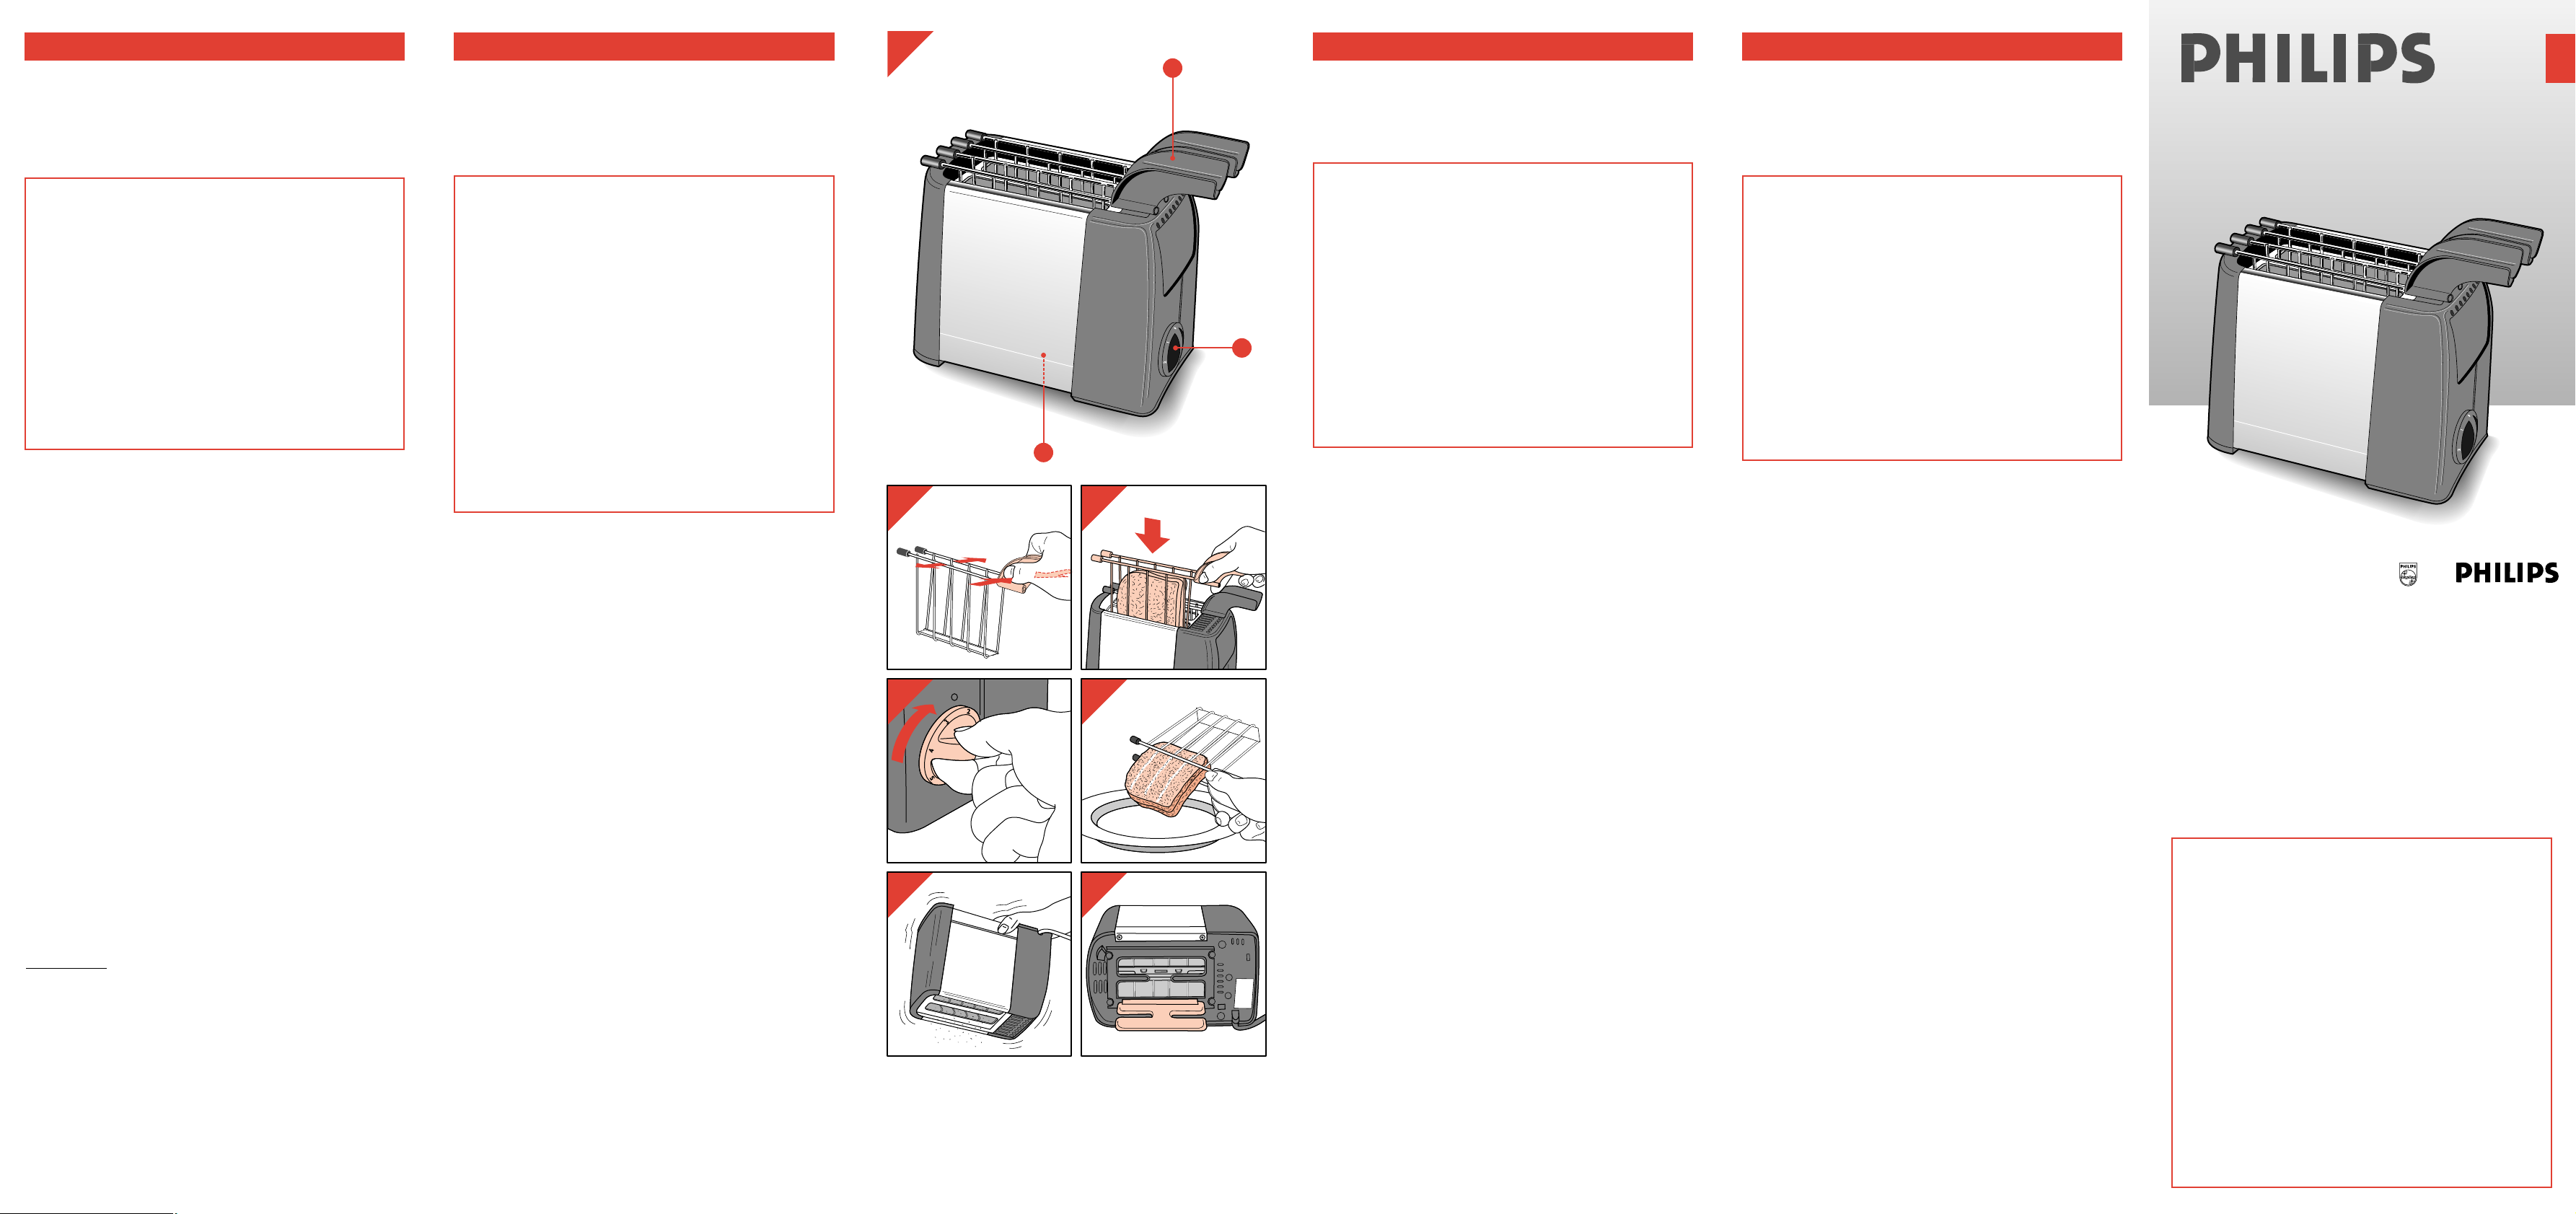
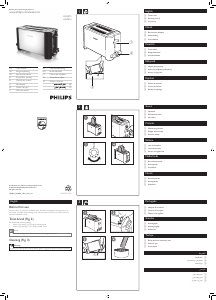
Description générale (fig. 1)
A Porte-toasts
B Bouton de temporisation
C Vis de verrouillage
Utilisation
- Enlevez le porte-toasts de l’appareil. Comprimez les deux sections de
la poignée. Le porte-toasts s’ouvre maintenant (fig. 2).
- Placez un toast dans le porte-toast, lâchez la poignée et mettez le
porte-toast dans l’appareil (fig. 3).
- Introduisez la fiche dans la prise de courant.
- Réglez le bouton de temporisation sur la position désirée. (Voir
recette).
L’appareil s’arrête automatiquement après l’écoulement du temps
choisi (fig. 4).
- Enlevez le porte-toast de l’appareil. Retournez le porte-toast au-
dessus d’une assiette, et libérez les toasts en comprimant les deux
sections de la poignée (fig. 5).
Nettoyage
- Retirez la fiche de la prise de courant et laissez l’appareil refroidir.
- Vous pouvez éliminer les miettes en retournant l’appareil puis en le
secouant légèrement (fig. 6).
- Pour enlever les dernières miettes restantes il faut ouvrir le fond de
l’appareil en dévissant la vis prévue à cet effet (fig. 7).
Recette pour un “tosti”
2 tranches minces de pain de mie, 1/2 tranche de jambon, 1 tranche de
fromage émincée.
- Beurrez les tranches de pain de mie. Garnissez ensuite à l’aide du
jamboun et du fromage.
- Placez le (les) croque(s) dans le porte-toast et intoduisez-le dans
l’appareil.
- Pour un grillage normal, mettez le bouton de temporisation sur la
position 4 ou 5. La position 6 correspondant à un degré de grillage
plus élevé.
Pain à la coupe
• Coupez les tranches de pain en tenant compte de la capacité du
porte-toasts.
For U.K. only:
This appliance is supplied with a non-rewirable 13 Amp. plug.
The plug must never be used without the fuse cover being in place.
If a replacement fuse cover is required, it must be of the same type or colour as the
coloured insert around the fuse cover.
Replacement fuse covers are available from Electrical Retailers or direct from
Philips, tel. 0181 - 689 - 2166, ext. 8014.
Replacement 13 Amp. fuses must be BSI or ASTA BS 1362 approved.
Important safety information
If the non-rewirable plug is not suitable for the socket outlets in your home, it can
be removed and replaced by a plug of the correct type.
The non-rewirable plug must be cut from the mains cord, the fuse removed, and the
plug safely discarded to prevent further use.
The removed plug can be hazardous if inserted into a live mains socket.
Avec cet appareil vous pouvez préparer un ou deux tostis à la fois.
“Tosti” est une spécialité italienne : double sandwich fromage et/ou
jambon, grillé avec sa garniture.
Avec cet appareil on peut aussi préparer des toasts de votre
composition.
Dans ce cas, expérimentez-vous pour déterminer le temps de grillage
correspondant au résultat attendu.
English
With this appliance you can prepare one tosti, or two tosti’s at the same
time.
Tosti is an Italian toast speciality: sandwiches of cheese and/or ham
which are toasted together with their fillings.
You can also toast slices of bread with this appliance. When doing so,
experiment to find the appropriate timer setting for the browning degree
you require.
Important
• Ensure that the voltage indicated on the appliance
corresponds with the mains voltage in your home.
Connect the appliance to an earthed mains socket.
• Warning: The metal parts of the appliance get hot.
• To prevent damage and electrical shock: never put any sharp
and/or metal objects into the appliance.
• Do not obstruct the toast slots during use.
• Do not wind the mains lead around the appliance whilst it is
warm.
• Do not immerse the appliance in water or in any other liquid.
• The elements have been lightly greased. During the first use,
some smoke will come from the appliance.
Therefore, when first in operation, use the appliance without
tosti’s.
• Remove the protective plastic sheet from the appliance before
using for the first time.
• If the mains cord of this appliance is damaged, it must only be
replaced by Philips or their service representative, as special
tools and/or parts are required.
Fitting a plug
Connections - Applicable to U.K. only
Important
WARNING - THIS APPLIANCE MUST BE EARTHED
The wires in this mains lead are coloured in accordance with the following
code:
GREEN AND YELLOW - EARTH
BLUE - NEUTRAL
BROWN - LIVE
As the colours of the wires in the mains lead of this appliance may not
correspond with the markings identifying the terminals in your plug, proceed as
follows:
The wire which is coloured GREEN AND YELLOW must be connected to the
terminal which is marked with the letter “E” or by the earth symbol E or
coloured GREEN or GREEN AND YELLOW.
The wire which is coloured BLUE must be connected to the terminal which is
marked with a letter “N” or coloured BLACK.
The wire which is coloured BROWN must be connected to the terminal which
is marked with the letter “L” or coloured RED.
Note: If the terminals of the plug are unmarked or if you are in any doubt,
consult a qualified electrician.
If a 13 Amp. 3-pin plug is fitted, it must be an “approved” plug, conforming to
BS 1363-1986.
If a (BS 1363) 13 Amp. plug is used, this must be fitted with a 13 Amp. fuse.
;
Deutsch
Wichtig
• Prüfen Sie vor Inbetriebnahme, ob die Spannungsangabe auf
dem Gerät mit der örtlichen Netzspannung übereinstimmt.
• Schließen Sie das Gerät nur an eine Schuko-Steckdose an.
• Vorsicht: Die Metallteile am Gerät werden heiß!
• Um Beschädigungen, Kurzschluß und Stromschlag zu
vermeiden: Stecken Sie niemals ein Messer oder einen
anderen Gegenstand aus Metall in das Gerät.
• Verdecken Sie die Öffnungen des Toasters nicht während Sie
ihn benutzen.
• Wickeln Sie niemals das Kabel um das Gerät, solange es heiß
ist.
• Tauchen Sie das Gerät niemals in Wasser oder andere
Flüssigkeiten.
• Entfernen Sie die Schutzfolie, bevor Sie das Gerät
anschließen.
• Die Heizelemente sind leicht eingefettet. Beim ihren ersten
Gebrauch entwickelt sich etwas Rauch. Schalten Sie darum
zuerst den Zeitschalter auf die höchste Position, und warten
Sie dann einige Minuten, bevor Sie die ersten Tosti zubereiten.
• Wenn das Netzkabel defekt oder beschädigt ist, muß es von
einer durch Philips autorisierten Werkstatt ersetzt werden, da
für die Reparatur Spezial-Werkzeug und/oder spezielle Teile
benötigt werden.
Mit diesem Gerät können Sie in einem Arbeitsgang ein oder zwei Tostis
zubereiten. Tosti ist eine italienische Toast-Spezialität: ein Sandwich, das,
mit Käse oder Schinken belegt, in einem Toasthalter getoastet wird.
Sie können auch Brotscheiben ohne Belag in diesem Gerät toasten.
Ermitteln Sie in diesem Fall, bei welcher Zeiteinstellung Sie das
gewünschte Resultat erzielen.
Allgemeine Beschreibung (Abb. 1)
A Toasthalter
B Zeitschalter
C Schraube
Der Gebrauch des Geräts
- Nehmen Sie den Toasthalter aus dem Gerät. Drücken Sie die beiden
Teile des Griffes zusammen. Der Toasthalter öffnet sich (Abb. 2).
- Geben Sie ein Tosti in den Toasthalter, und lockern Sie Ihren Griff, so
daß sich der Toasthalter schließt.
- Stecken Sie den Toasthalter in das Gerät (Abb. 3).
- Stecken Sie dann den Stecker in die Steckdose.
- Stellen Sie den Zeitschalter auf die gewünschte Position (siehe
Rezept).
Nach Ablauf der eingestellten Zeit schaltet sich das Gerät automatisch
aus (Abb. 4).
- Nehmen Sie den Toasthalter aus dem Gerät. Halten Sie den
Toasthalter umgekehrt über einen Teller, drücken Sie den Griff
zusammen. Der Tosti gleitet heraus (Abb. 5).
Reinigung
- Ziehen Sie den Stecker aus der Steckdose, und lassen Sie das Gerät
abkühlen.
- Halten Sie das Gerät umgekehrt z.B. über eine alte Zeitung, und
schütteln Sie vorsichtig die Krümel heraus.
- Sie können die Außenwände mit einem feuchten Tuch reinigen, auf das
Sie bei Bedarf ein wenig Spülmittel aufgetragen haben. Tauchen Sie
das Gerät nicht ins Wasser.
- Um das Innere des Geräts zu reinigen, vergewissern Sie sich, das der
Stecker nicht in der Steckdose steckt, lockern die Schraube am Boden
des Geräts und nehmen den Deckel ab (Abb. 7).
- Schließen Sie den Deckel sofort nach der Reinigung, und ziehen Sie
die Schraube an.
Rezept für ein Tosti
2 Scheiben weißes Toastbrot, je dünner, um so besser
Butter, Käse und/oder Schinken
- Das Brot mit Butter bestreichen. So mit Käse und/oder Schinken
belegen, daß der Belag nicht über den Toastrand hinausragt.
- Den/die so vorbereiteten Tosti in den Toasthalter geben. Den
Toasthalter in das Gerät stecken.
- Den Zeitschalter einstellen: Position 4 oder 5 für einen mittleren
Bräunungsgrad. Je höher die Position, desto stärker die Bräunung.
• Die Bräunungszeit ist auch von der Art des verwendeten Brotes
abhängig.
• Schneiden Sie bei Bedarf die Brotscheiben so zurecht, daß sie in den
Toasthalter passen.
Nederlands
Met dit apparaat kunt u één tosti of twee tosti’s tegelijk klaar maken.
Tosti’s zijn een Italiaanse specialiteit: dubbele boterhammen met kaas
en/of ham ertussen, die samen met het beleg worden geroosterd.
Ook kunt u met dit apparaat gewone boterhammen roosteren.
Probeer zelf uit welke instelling van de tijdschakelaar de door u
gewenste bruiningsgraad oplevert.
Algemene beschrijving (fig. 1)
A Tostihouder
B Instelknop (tijdschakelaar)
C Schroef
Gebruik
- Neem een tostihouder uit het apparaat. Druk de beide helften van de
handgreep naar elkaar toe. De tostihouder gaat nu open (fig. 2).
- Doe een tosti in de tostihouder en laat de handgreep wat los zodat
deze zich sluit.
- Plaats de tostihouder in het apparaat (fig. 3).
- Steek de stekker in het stopcontact.
- Zet de instelknop in de gewenste stand. (Zie recept.)
Als de ingestelde tijd verstreken is, schakelt het apparaat automatisch
uit (fig. 4).
- Neem de tostihouder uit het apparaat. Draai de tostihouder om boven
een bord, knijp de handgreep in en laat de tosti op het bord glijden
(fig. 5).
Schoonmaken
- Haal de steker uit het stopcontact en laat het apparaat afkoelen.
- Kruimels kunt u verwijderen door het apparaat om te draaien en
voorzichtig te schudden (fig. 6).
- U kunt het apparaat schoonmaken met een vochtige doek. Dompel het
nooit in water.
- Om de binnenkant van het apparaat schoon te maken, draait u de
schroef aan de onderzijde los. Open dan het luikje (fig. 7).
Zorg ervoor dat de stekker uit het stopcontact is wanneer u het
apparaat openmaakt!
- Direct na het schoonmaken de onderzijde weer sluiten en de schroef
vastdraaien.
Recept voor een tosti
2 sneetjes witbrood (hoe dunner gesneden, hoe beter het resultaat),
kaas en/of ham
- Besmeer het brood met boter of margarine en beleg het met kaas en
ham. Zorg ervoor dat geen kaas of ham uit de tosti steekt.
- Doe de tosti in de tostihouder en plaats de tostihouder(s) in het
apparaat.
- Zet de instelknop op de gewenste stand. Voor een gemiddeld resultaat
kiest u stand 4 of 5. Hoe hoger de stand, hoe donkerder de tosti.
• De bruiningsgraad is ook afhankelijk van het type brood.
• De sneetjes brood eventueel op maat snijden, zodat ze in de
tostihouder passen.
Belangrijk
• Controleer of de netspanning van het apparaat overeenkomt
met de netspanning in uw woning.
Sluit het apparaat altijd aan op een geaard stopcontact.
• Waarschuwing: De metalen delen van het apparaat worden
heet.
• Om elektrische schok en beschadiging te voorkomen: steek
nooit scherpe en m.n. metalen voorwerpen in het apparaat.
• Sluit tijdens het gebruik de beide toastgleuven niet af.
• Wikkel het snoer niet om het apparaat als het warm is.
• Dompel het apparaat nooit in water of een andere vloeistof.
• De elementen zijn ingevet. Tijdens het eerste gebruik komt er
wat rook uit het apparaat. Zet daarom het apparaat de eerste
keer aan zonder tosti’s.
• Verwijder vóór het eerste gebruik de plastic beschermfolie van
het apparaat.
• Indien het snoer van dit apparaat is beschadigd, dient het
uitsluitend te worden vervangen door een door Philips daartoe
aangewezen reparateur, omdat voor de reparatie speciale
gereedschappen en/of onderdelen vereist zijn.


Únase a la conversación sobre este producto
Aquí puedes compartir lo que piensas sobre Philips HL5135 Tostador. Si tiene alguna pregunta, primero lea atentamente el manual. Puede solicitar un manual utilizando nuestro formulario de contacto.