
ENGLISH
Introduction
Congratulations on your purchase and welcome to Philips! To
fully benet from the support that Philips oers, register your
product at www.philips.com/welcome.
This Philips Viva slow juicer helps you to get fruits and vegetables
into your glass easily, so that you can enjoy tasty and healthy
juices every day. The innovative juicer with the large feeding tube
allows you to juice your ingredients as a whole and gives great
end results. The unique design makes cleaning afterwards
possible in 90 seconds.
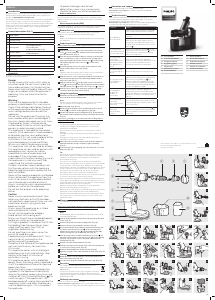
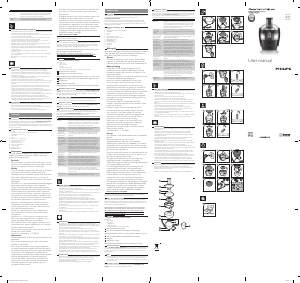
General description (Fig. 1)
a Pulp outlet
b Squeezing chamber (with lter)
c Juicing screw
d Pusher
e Juicing unit
A: Feeding tube lid
B: Feeding tube
C: Spout (with drip stop)
f Control panel
D: Reverse button
E: On/o button
g Release button
h Main unit
i Cord storage wrap
j Power cord
k Pulp container
l Juice jug
Important
Read this user manual carefully before you use the appliance
and save it for future reference.
Danger
- Do not immerse the main unit in water or
any other liquid. Do not rinse it under the
tap and do not clean it in the dishwasher.
- Never reach into the feeding tube with your
ngers or an object while the appliance is
operating. Only use the pusher for this
purpose.
Warning
- Only use the appliance for its intended
purpose as described in this user manual.
- Check if the voltage indicated on the base
of the appliance corresponds to the local
mains voltage before you connect the
appliance.
- Do not use the appliance if the plug, the
mains cord or other parts are damaged. If
the mains cord is damaged, you must have
it replaced by Philips, a service centre
authorised by Philips or similarly qualied
persons in order to avoid a hazard.
- This appliance is intended for household
use only. If the appliance is used improperly
or for professional or semi-professional
purposes or if it is not used according to the
instructions in the user manual, the
guarantee becomes invalid and Philips
refuses any liability for damage caused.
- This appliance shall not be used by children.
- This appliance can be used by persons with
reduced physical, sensory or mental
capabilities or lack of experience and
knowledge if they have been given
supervision or instruction concerning use of
the appliance in a safe way and if they
understand the hazards involved.
- Children should be supervised to ensure
that they do not play with the appliance.
- Keep the appliance and its cord out of the
reach of children.
- Never let the appliance operate unattended.
- Always disconnect the appliance from the
mains if you leave it unattended or before
you assemble, disassemble or clean it.
- Always unwind the mains cord completely
before you switch on the appliance.
- Do not eat the pulp or use for preparing
dishes.
Caution
- Never use any accessories or parts from
other manufacturers or that Philips does
not specically recommend. If you use such
accessories or parts, your guarantee
becomes invalid.
- Always place the appliance on a stable,
level and horizontal surface.
- Do not use the appliance outdoors.
- Avoid contact with moving parts.
- Make sure all parts are assembled properly
before you switch on the appliance.
- Cut large ingredients into pieces that t into
the feeding tube. Remove stones, cores,
seeds and thick peels from fruits or
vegetables before juicing.
- Do not exert too much pressure on the
pusher to avoid damage.
- Food colouring can discolour parts. This is
normal and has no impact on the
performance of the appliance.
- To optimise the lifetime of the appliance, do
not use it continuously for more than
20 minutes.
- This appliance comes with an intelligent
protection chip, it will automatically stop
working after about 20 minutes of
continuous running.
- This appliance comes with a protected
design. When the juicing screw is blocked or
stuck, the appliance will come to stop and
beep a few times.
- When the juicing screw is blocked by the
ingredients, the appliance automatically
reverses to unblock, beeps a few times and
switches o. Press the on/o button ( ) to
switch on again. If the appliance is still
blocked, power o, unplug, disassemble the
squeezing system and clean it before you
use the appliance again. This is to protect
the appliance.
- To prevent damages due to heat
deformation, never use a microwave or
sterilizer to clean any of the components.
Built-in safety lock
The appliance is equipped with a built-in safety lock. The safety
pin on the main unit ensures that you can only switch on the
appliance when you have placed the juicing unit on the main
unit correctly.
Electromagnetic elds (EMF)
This Philips appliance complies with all applicable standards and
regulations regarding exposure to electromagnetic elds.
Before first use
Thoroughly clean all detachable parts before you use the
appliance for the rst time (see chapter ‘Cleaning’).
Note:
- Make sure all parts are completely dry before you start using
the appliance.
Preparing for use
Always unwind the mains cord completely before you switch on
the appliance.
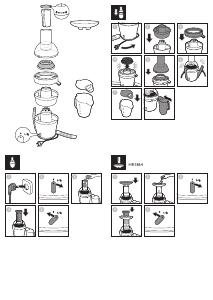
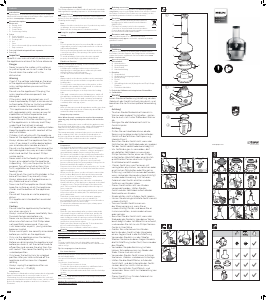
1 Align the arrow icon ( ) on the juicing unit to the unlock
icon ( ) on the main unit, and then insert the juicing unit
into the main unit. (Fig. 2)
2 Turn the juicing unit anticlockwise to fasten it on the main
unit. You will hear a “click” sound when the juicing unit is
properly assembled, and the arrow icon ( ) on the juicing
unit will be aligned to the lock icon ( ) on the main
unit. (Fig. 3)
3 Point the juicing screw to the hole in the main unit, and
insert it all the way to the end. (Fig. 4)
Note:
- Slightly rotate the juicing screw so that you can easily point
the juicing screw to the hole in the main unit.
4 Align the groove on the squeezing chamber to the knob on
the juicing unit and insert the squeezing chamber all the
way to the end. (Fig. 5)
5 Align the arrow icon ( ) on the pulp outlet to the unlock
icon ( ) on the juicing unit (Fig. 6) and turn it anticlockwise
until the arrow icon ( ) points to the lock icon ( ). (Fig. 7)
6 Slide the juice jug into the main unit, and place the pulp
container under the pulp outlet. (Fig. 8)
Using the appliance
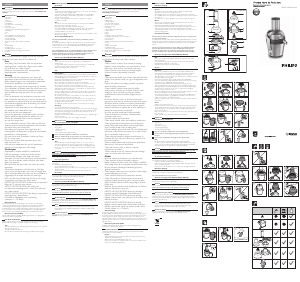
1 Wash the fruit and/or vegetables. If necessary, cut them into
pieces that t into the feeding tube.
Note:
- Remove stones and thick peels of the fruits you would not
eat, for example from oranges, pomegranates etc.
2 Open the drip stop. (Fig. 9)
3 Put the plug in the wall outlet, and then press the on/o
button ( ) to switch on the appliance. (Fig. 10)
4 Put the ingredients in the feeding tube (Fig. 11) and gently
press them down towards the juicing screw with the pusher.
(Fig. 12)
Never insert your ngers or an object into the feeding tube or
juicing unit. (Fig. 13/14)
Note:
- Feed small ingredients directly through the hole on the
feeding lid. For bigger sized ingredients, feed them by
opening the feeding lid.
- Do not exert too much pressure on the pusher to avoid
damage.
- During processing, the juicing unit may vibrate slightly. This is
normal.
- During processing, some of the ingredients may cause
squeaking sound. This is normal.
5 When the juice ow has stopped, switch o the appliance
and wait until the juicing screw has stopped rotating.
(Fig. 15)
6 To prevent juice from dripping onto the main unit, close the
drip stop. (Fig. 16)
Tip:
- Use fresh fruit and vegetables, as they contain more juice.
Celery stalks, apples, cucumbers, carrots, spinach, melons,
tomatoes, pomegranates and oranges are suitable for
processing in the juicer.
- The juicer is not suitable for processing very hard and/or
brous fruits or vegetables such as sugar cane. Very soft and/
or starchy fruits, such as bananas, papayas, avocados, gs
and mangoes are also not suitable for processing in the juicer.
- You do not have to remove thin peels or skins. Only remove
peels which you would not eat, e.g. those of oranges,
pineapples, kiwis, melons and uncooked beetroots.
- If you want to juice fruits with stones, such as peaches, plums
or cherries, remove the stones before juicing.
- When you prepare apple juice, remember that the thickness
of the apple juice depends on the kind of apple you use. The
juicier the apple, the thinner the juice. Choose a kind of apple
that produces the type of juice you prefer.
- Apple juice turns brown very quickly. To slow down this
process, add a few drops of lemon juice.
- Citrus fruits can also be processed with the juicer, remove the
white pith of citrus fruits because it has a bitter taste.
- Drink the juice immediately after you have extracted it. If it is
exposed to air for some time, the juice loses its taste and
nutritional value.
Cleaning
- The appliance is easier to clean if you do so immediately after
use.
Never use scouring pads, abrasive cleaning agents or aggressive
liquids such as alcohol, petrol or acetone to clean the
appliance.
Note:
- All detachable parts are dishwasher-safe and can be safely
cleaned under the tap.
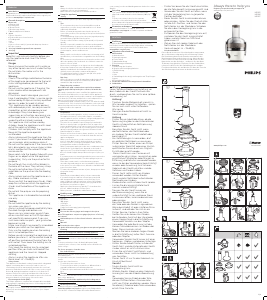
1 Switch o the appliance and remove the plug from the wall
outlet. (Fig. 17)
2 Remove the pusher from the feeding tube. (Fig. 18)
3 Remove the juice jug and pulp container. (Fig. 19)
4 Press and hold the release button and turn the juicing unit
clockwise until the arrow icon ( ) on the juicing unit is
aligned to the unlock icon ( ) on the main unit (Fig. 20).
Pull the juicing unit out of the main unit. (Fig. 21)
5 Turn the pulp outlet clockwise until the arrow icon ( ) on
the pulp outlet points to the unlock icon ( ) on the juicing
unit (Fig. 22), and then remove the pulp outlet from the
juicing unit (Fig. 23).
6 Remove the squeezing chamber. (Fig. 24)
7 Push the juicing screw from the other end of the juicing unit
to remove the juicing screw. (Fig. 25)
8 Clean all detachable parts under the tap. (Fig. 26)
9 Wipe the outside of the main unit with a clean cloth. (Fig. 27)
Storage
1 Wind the mains cord around the cord storage wrap in the
base of the main unit. (Fig. 28)
2 You can store the pulp container in the juice jug. (Fig. 29)
Recycling
- This symbol means that this product shall not be
disposed of with normal household waste
(2012/19/EU).
- Follow your country’s rules for the separate collection
of electrical and electronic products. Correct disposal
helps prevent negative consequences for the environment
and human health.
Ordering accessories
To buy accessories or spare parts, visit
www.shop.philips.com/service or go to your Philips dealer. You
can also contact the Philips Consumer Care Centre in your country.
Guarantee and support
If you need information or support, please visit
www.philips.com/support or read the separate worldwide
guarantee leaet.
Troubleshooting
This chapter summarises the most common problems you could
encounter with the appliance. If you are unable to solve the
problem with the information below, visit
www.philips.com/support for a list of frequently asked questions
or contact the Consumer Care Centre in your country.
Problem Solution
The appliance
does not work.
Make sure the local voltage corresponds
to the voltage indicated on the product.
Make sure the power plug is plugged in
correctly.
The appliance is equipped with a built-in
safety lock in the base. Make sure the
juicing unit is assembled properly onto
the main unit, and then press the on/o
button ( ).
The juicing unit
cannot be inserted
into the main unit.
Make sure to align the arrow ( ) on the
juicing unit to the unlock icon ( ) on the
main unit before you insert the juicing
unit into the main unit.
The main unit
gives o an
unpleasant smell
the rst few times
the appliance is
used.
This is not unusual. If the appliance
continues to give o this smell after a few
times, check the quantities you are
processing and the processing time.
The juice cannot
go out through the
spout.
Open the drip stop to let the juice out.
The juicing screw is
blocked by the
ingredients.
The appliance automatically reverses to
unblock, beeps a few times and switches
o. Press the on/o button ( ) to
switch on again. If the appliance is still
blocked, power o, unplug, disassemble
the squeezing system and clean it before
you use the appliance again.
The appliance
stops in the
middle of
processing.
You have been using the appliance
continuously for more than 20 minutes.
Unplug the appliance and wait for around
30 minutes or until it cools down before
next use.
The juicing unit
cannot be
removed from the
main unit.
Press and hold the release button, and
turn the juicing unit clockwise at the same
time to remove it.
The pulp outlet
cannot be
removed after
juicing.
Press and hold the reverse button ( )
for a few seconds and then turn the pulp
outlet clockwise to remove it from the
juicing unit.
1/5
HR1886, HR1887
HR1888, HR1889
EN User manual
DE Benutzerhandbuch
DA Brugervejledning
EL Εγχειρίδιο χρήσης
FI Käyttöopas
ES Manual del usuario
NO Brukerhåndbok
FR Mode d’emploi
SV Användarhandbok
NL Gebruiksaanwijzing
IT Manuale utente
PT Manual do utilizador
TR Kullanım kılavuzu
Specifications are subject to change without notice
© 2017 Koninklijke Philips N.V.
All rights reserved.
4241 210 49451 A
2
A
d
e
h
g
f
k
b
i
j
B
C
D
E
a
c
l
1
5
1
2
8
11
13
1
2
19
3
6
9
12
4
7
10
26 27 28 29
1614 1715
18 232220
2524
21

Únase a la conversación sobre este producto
Aquí puedes compartir lo que piensas sobre Philips HR1886 Licuadora. Si tiene alguna pregunta, primero lea atentamente el manual. Puede solicitar un manual utilizando nuestro formulario de contacto.