
GS8015K INSTRUCTIONS &
GUARANTEE REGISTRATION
GS8015K ISTRUZIONI & REGISTRAZIONE
GARANZIA
GS8015K BEDIENUNGSANLEITUNG UND
GARANTIEREGISTRIERUNG
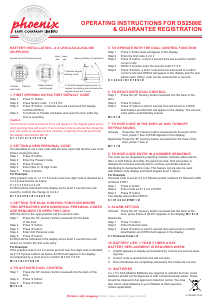
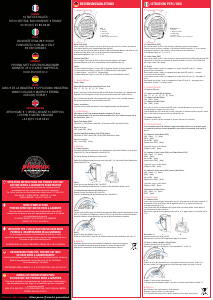
1. An electric drill
2. 1 masonry drill bit -12mm
3. Adhesive tape
4. A pencil
5. A ruler
6. A 13mm socket
HOW TO BOLT YOUR SAFE DOWN
YOU WILL REQUIRE
CHOOSING A PLACE TO INSTALL YOUR SAFE
1. Look for a place that does not restrict access and the swing of the door.
2. Ensure that the floor is level.
3. For best results a concrete floor is preferable.
DRILLING & BOLTING
1. Manoeuvre the safe into the required position. Now with the pencil mark the floor around the safe
(If the safe is against a wall then just the front and sides needs to be marked)
2. Open the safe door.
3. Using the pencil, mark the positions on the floor for drilling through the base fixing holes in the base
of the safe.
4. Now move the safe to one side, giving you access to the markings on the floor.
5. Before using the drill bit. With the ruler measure 100mm from the tip of the bit and put a piece of
adhesive tape around the bit to ensure you do not drill too deep.
6. Drill the 12mm holes in the floor until you reach your 100mm marker.
7. Clean the floor around the holes.
8. There are three parts to your bolts
a. A coach screw
b. A plastic expanding sleeve
c. A steel washer
9. Insert the plastic expanding sleeves into the drilled holes.
10. Place the safe back into position, insert the coach screws, including the washers, through the base
of the safe, into the floor and tighten until you can not tighten them any further.
YOUR SAFE IS NOW BASE FIXED.
Thank you for purchasing a Phoenix Safe.
OPENING SAFE
Please insert one of the two keys supplied into the key hole and turn clockwise.
Then pull the door to open.
Your safe is ready prepared for base fixing. To base fix your safe, follow the instructions below.
Version 1/PB/JAN 18
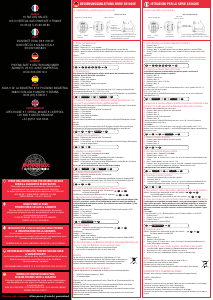
1. 1 trapano elettrico
2. 1 punta da trapano per edilizia -12mm
3. Nastro adesivo
4. Una matita
5. Un righello
6. Una chiave da 13mm
COME ANCORARE LA CASSAFORTE
MATERIALE NECESSARIO
SCELTA DEL LUOGO PER INSTALLARE LA CASSAFORTE
1. Scegliere un luogo che non causi restrizioni di accesso e permetta l’apertura dello sportello.
2. Assicurarsi che il pavimento sia piano.
3. Un pavimento in cemento è ottimale.
FORARE & ANCORARE
1. Collocare la cassaforte nella posizione desiderata. Con la matita tratteggiarne la sagoma sul
pavimento. (Se la cassaforte è appoggiata ad una parete basterà tracciare la parte laterale e
frontale).
2. Aprire lo sportello della cassaforte.
3. Con la matita contrassegnare sul pavimento la posizione dei fori da praticare attraverso la base di
della cassaforte.
4. Spostare la cassaforte in modo da avere accesso ai contrassegni sul pavimento.
5. Prima di usare la punta da trapano: con il righello misurare 100mm dall’apice della punta ed
applicare un pezzo di nastro adesivo attorno alla punta in modo da non praticare fori troppo
profondi.
6. Praticare fori da 12mm nel pavimento fino a raggiungere i 100mm indicati.
7. Pulire il pavimento intorno ai fori.
8. I bulloni sono composti da tre parti
a. Una vite
b. Un tassello in plastica ad espansione
c. Una rondella in acciaio
9. Inserire i tasselli in plastica nei fori praticati.
10. Riposizionare la cassaforte, inserire le viti, comprese le rondelle, attraverso i fori nella base della
cassaforte, nel pavimento e stringere saldamente.
LA CASSAFORTE E’ ORA ANCORATA AL PAVIMENTO.
Grazie per aver acquistato una Cassaforte Phoenix.
APRIRE LA CASSAFORTE
Inserire nella serratura una delle due chiavi in dotazione e girare in senso orario.
Quindi tirare lo sportello per aprire.
La cassaforte è pronta per essere fissata alla base. Per fissare la cassaforte alla base seguire le istruzioni
sotto indicate.
1. 1 Bohrmaschine
2. 1 x 12mm Bohrer
3. Klebeband
4. 1 Bleistift
5. 1 Lineal
6. 1 x 13mm Schraubenschlüssel
-BODENVERANKERUNG DES TRESORS-
SIE BENÖTIGEN:
DIE AUSWAHL DES STANDORTES FÜR IHREN TRESOR
1. Suchen Sie sich einen Platz aus, an dem das Öffnen der Tresortür durch nichts beeinträchtigt wird
(Türradius).
2. Vergewissern Sie sich, dass der Boden gerade / eben ist.
3. Am besten ist ein Betonboden.
DRILLING & BOLTING
1. Stellen Sie den Tresor auf die gewünschte Position. Nun markieren Sie mit einem Bleistift die
äußeren Abmessungen des Tresors auf dem Boden (wenn der Tresor an der Wand steht, markieren
Sie bitte nur die Front und die beiden Seiten)
2. Öffnen Sie die Tresortür.
3. Markieren Sie die Bohrlöcher auf dem Fußboden. Benutzen Sie hierfür den Bleistift.
4. Entfernen Sie nun den Tresor, sodass die Markierungen auf dem Fußboden zu sehen sind.
5. Bevor Sie den 12mm Bohrer benutzen, messen Sie mit einem Lineal 100mm von der Bohrerspitze
ab und markieren Sie diese Stelle mit Klebeband, um sicher zu stellen, dass Sie nicht zu tief bohren.
6. Bohren Sie die 12mm Löcher in den Fußboden und achten Sie darauf, dass Sie nicht tiefer als 46mm
bohren.
7. Entfernen Sie jetzt die Bohrspäne und reinigen Sie den Fußboden
8. Ein Befestigungsset besteht aus 2 Teilen:
a. einer Sechskantschraube
b. einem Plastikdübel
9. Stecken Sie die Dübel in die Bohrlöcher
10. Positionieren Sie den Tresor erneut, stecken Sie die Schrauben vom Tresorinneren durch die
Bohrungen in die Dübel und ziehen diese dann mit dem Schraubenschlüssel fest.
IHR TRESOR IST NUN IM BODEN VERANKERT.
Vielen Dank, dass Sie sich für einen Tresor aus dem Hause Phoenix entschieden haben.
ÖFFNEN DES SAFES
Einen der beiden mitgelieferten Schlüssel in das Schlüsselloch stecken und im Uhrzeigersinn drehen.
Dann am Türgriff ziehen um den Tresor zu öffnen.
Ihr Tresor ist bereits für die Bodenmontage vorbereitet. Bitte folgen Sie den unten stehenden
Anleitungen.
REGISTRAZIONE DELLA GARANZIA
Per una maggiore sicurezza vi raccomandiamo di inoltrare la vostra
registrazione della garanzia visitando il nostro sito web: www.phoenixsafe.com
e cliccando su registrazione della garanzia.
VIA MONTE ROSA 28, 20049, CONCOREZZO, MILAN, ITALY | 39 039 5965844
GUARANTEE REGISTRATION
Please submit your guarantee registration by visiting our website
www.phoenixsafe.com and clicking on guarantee registration.
For further assistance or information please contact us on 0151 944 6444.
APEX HOUSE, 1 ORRELL MOUNT, LIVERPOOL, L20 6NS,
UNITED KINGDOM | +44 (0)151 944 6444
GARANTIEKARTE
Aus Sicherheitsgründen empfehlen wir Ihnen, Ihre Garantiekarte online auf
unserer Website www.phoenixsafe.com per Mausklick auf der Schaltfläche
„Garantieanmeldung“ auszufüllen.
DEUTSCHLAND GMBH, BAHNSTR. 23, D-42327 WUPPERTAL
0049-202-69519-0


Únase a la conversación sobre este producto
Aquí puedes compartir lo que piensas sobre Phoenix GS8017K Caja fuerte. Si tiene alguna pregunta, primero lea atentamente el manual. Puede solicitar un manual utilizando nuestro formulario de contacto.