
FR/BE FR/BE FR/BE
Cuisinière avec lumière et son
(voir Fig. Y)
Deux commutateurs rotatifs
12a
(jaune et rouge) ainsi
qu‘un minuteur de cuisine
35
à trois touches sont pré-
sents.
Pressez l‘une des trois touches du minuteur de cui-
sine
35
afin d‘activer le son pendant env. 5, 15 ou
30 secondes.
Ouvrez la porte du four
13
et la LED
35a
s‘allume.
Refermez la porte du four
13
et la LED
35a
s‘éteint.
Remarque : Lorsque la porte du four
13
est ou-
verte, la LED
35a
s‘éteint automatiquement.
Hotte aspirante avec lumière et
son (voir Fig. W)
Trois touches (
37a
,
37b
,
37c
) se trouvent sur la hotte
aspirante
37
:
Appuyez sur la touche Marche / Arrêt
37a
pour
activer / désactiver la lumière et le son.
Appuyez sur la touche de lumière
37b
pour allumer
voire éteindre la lumière.
Remarque : La lumière s‘éteint automatiquement.
Appuyez sur la touche de son
37c
pour allumer
voire éteindre le son.
Remarque : Le son s‘éteint automatiquement.
Four à micron-ondes avec lumière
et son (voir Fig. Z)
Ouvrez la porte du four à micro-ondes
19
et la
lumière s‘allume.
Remarque : La lumière s‘éteint automatiquement.
Fermez la porte du four à micro-ondes
19
et la
lumière s‘éteint également.
Appuyez sur la touche Start
34a
pour activer la
lumière et le son. Appuyez sur la touche Stop
34b
pour désactiver la lumière et le son.
Remarque : La lumière et le son ne peuvent être
allumés voire éteints que lorsque la porte du four à
micro-ondes
19
est fermée.
Insérer / remplacer les piles
Pour insérer et retirer les piles, veuillez procéder
comme le montre les Fig. C‒E.
Entretien et stockage
N‘utilisez pas de produits nettoyants abrasifs ou
agressifs.
Nettoyez uniquement le produit à l‘aide d‘un chif-
fon sec.
Rangez toujours le produit dans un endroit sec et à
température ambiante.
Mise au rebut
L’emballage se compose de matières recyclables pou-
vant être mises au rebut dans les déchetteries locales.
b
a
Veuillez respecter l‘identification des maté-
riaux d‘emballage pour le tri sélectif, ils sont
identifiés avec des abbréviations (a) et des
chiffres (b) ayant la signification suivante :
1–7 : plastiques / 20–22 : papiers et car-
tons / 80–98 : matériaux composite.
Le produit et les matériaux d’emballage sont
recyclables, mettez-les au rebut séparément
pour un meilleur traitement des déchets. Le
logo Triman n’est valable qu’en France.
Votre mairie ou votre municipalité vous ren-
seigneront sur les possibilités de mise au
rebut des produits usagés.
Afin de contribuer à la protection de l’envi-
ronnement, veuillez ne pas jeter votre produit
usagé dans les ordures ménagères, mais éli-
minez-le de manière appropriée. Pour obte-
nir des renseignements concernant les points
de collecte et leurs horaires d’ouverture, vous
pouvez contacter votre municipalité.
Les piles / piles rechargeables défectueuses ou usagées
doivent être recyclées conformément à la directive
2006/66/CE et ses modifications. Les piles et / ou piles
En raison des éléments de petite taille, le montage /
démontage doit uniquement être effectué par un
adulte.
ATTENTION ! Ne convient pas aux enfants de
moins de 36 mois! Longue corde. Danger de stran-
gulation.
ATTENTION ! Ne convient pas aux enfants de
moins de 36 mois! Petits éléments. Danger d’étouf-
fement.
Indications pour la manipulation
des piles
Pour insérer et retirer les piles , veuillez procéder
comme le montre la Fig. C à E.
Les piles non rechargeables ne peuvent pas
être rechargées.
Les piles rechargeables peuvent uniquement
être rechargées sous la surveillance d‘un adulte.
Les piles rechargeables doivent être retirées du
jouet avant d‘être rechargées.
Veillez à ne pas utiliser en même temps différents
types de piles ou des piles neuves avec des piles
usagées.
Veuillez respecter la polarité lorsque vous insérez
les piles.
Les piles usagées doivent être retirées du jouet.
Ne jamais court-circuiter les contacts.
Seul un adulte peut insérer et retirer les piles.
Montage
Remarque : Veuillez retirer l‘ensemble des matériaux
composant l‘emballage du produit.
Remarque : Vous avez besoin d‘un tournevis supplé-
mentaire afin de monter le produit.
Respectez les différentes étapes lors du montage du
produit, comme indiqué sur les Fig. B à V.
Remarque : Lors de l‘insertion de plaque de cuisson
avec logement à piles
33
, veillez à d‘abord accrocher
un côté latéralement dans l‘ouverture de la cuisine (Fig. U).
Régler la hauteur
Vous pouvez régler la hauteur du produit de trois ma-
nières différentes. Les pieds possèdent différentes hau-
teurs. En fonction du côté (A ou B) du pied sur lequel
vous posez le produit, il va s‘élever:
Produit Hauteur de la cuisine en
mm
sans pied env. 560
avec côté A du
pied
env. 600
avec côté B du
pied
env. 620
Fixation au mur (voir Fig. V)
Le matériel de fixation fourni est uniquement destiné
à une structure de maçonnerie normale et massive.
Renseignez-vous avant le montage pour savoir quel
matériel de montage est adapté à votre mur.
Avant de percer, vérifiez qu’aucune conduite ni au-
cun câble électrique n’est encastré dans le mur.
Le montage du produit au mur doit être uniquement
effectué par des adultes.
Fonctionnalités
Allumer et éteindre les plaques
de cuisson (voir Fig. X)
Deux touches
33a
se trouvent sur la plaque de cuisson
33
.
Appuyez sur la touche gauche ou droite
33a
pour
allumer voire éteindre la lumière/le son de la plaque
de cuisson correspondante.
Remarque : La lumière et le son s‘éteignent auto-
matiquement.
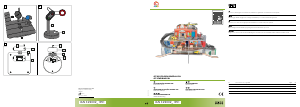
Cuisine pour enfant
Introduction
Nous vous félicitons pour l‘achat de votre
nouveau produit. Vous avez opté pour un
produit de grande qualité. Le mode d‘emploi
fait partie intégrante de ce produit. Il contient des indi-
cations importantes pour la sécurité, l’utilisation et la mise
au rebut. Veuillez lire consciencieusement toutes les in-
dications d‘utilisation et de sécurité du produit. Ce produit
doit uniquement être utilisé conformément aux instructions
et dans les domaines d‘application spécifiés. Lors d‘une
cession à tiers, veuillez également remettre tous les do-
cuments.
Utilisation conforme
Le produit stimule de manière ludique l‘imagination
et la créativité et est uniquement destiné à un usage
domestique. Le produit n‘est pas destiné à une utilisa-
tion commerciale.
Contenu de la livraison
22 Pièces individuelles (
1
–
20
)
1 Casserole avec couvercle
21
1 Poêle à frire
22
1 Fourchette à viande
23
1 Spatule
24
1 Fouet
25
1 Gant à four
26
1 Torchon
27
1 Tablier
28
4 Poignée
29
4 Pieds
30
1 Robinet
31
1 Bac d‘évier
32
1 Plaque de cuisson avec logement à piles
33
1 Plaque en plastique de four à micro-ondes avec
logement à piles
34
1 Minuteur de cuisine
35
3 Crochets
36
1 Hotte aspirante avec logement à piles
37
4 Piles AAA
38
2 Piles AA
39
28 Vis ø 3,2 x 35 mm
A
8 Vis ø 4 x 35 mm
B
1 Vis ø 5 x 28 mm
C
13 Vis ø 3,2 x 20 mm
D
6 Vis ø 4 x 16 mm
E
3 Vis ø 2,5 x 9 mm
F
1 Rondelle ø 14 mm
G
1 Vis ø 4 x 40 mm
H
1 Cheville ø 8 x 35 mm
I
2 Rondelles ø 12 mm
J
2 Vis ø 4 x 12 mm
K
1 Suspension murale 49 x 16 x 27 mm
L
1 Notice de montage et d‘utilisation
Caractéristiques techniques
Dimensions : env. 70 x 97 x 30 cm
(L x h x l)
Alimentation électrique : 1,5 V
AA / LR6 x 2
1,5 V
AAA / LR03 x 4
Consignes de sécurité
CONSERVEZ TOUTES LES CONSIGNES DE SÉCURITÉ
ET INSTRUCTIONS EN VUE D‘UNE CONSULTATION
ULTÉRIEURE !
DANGER
DE MORT ET RISQUE D‘ACCIDENT
POUR LES ENFANTS EN BAS ÂGE
ET LES ENFANTS ! Ne jamais laisser les enfants
sans surveillance jouer avec le matériel d‘embal-
lage. Il existe un risque d‘étouffement à cause du
matériel d‘emballage. Les enfants sous-estiment
souvent le danger. Les enfants doivent toujours être
tenus à l‘écart du matériel d‘emballage. L‘embal-
lage doit être retiré par un adulte.
ATTENTION ! Tous les matériaux d‘emballage et
de fixation ne font pas partie du produit et doivent
toujours être jetés pour des raisons de sécurité,
avant de remettre le produit aux enfants afin qu‘ils
puissent jouer avec.
ATTENTION ! À utiliser sous la surveillance d’un
adulte.
Le produit convient aux enfants de 3–8 ans.
GB/IE GB/IE GB/IE
GB/IE
Warranty
The product has been manufactured to strict quality
guidelines and meticulously examined before delivery.
In the event of product defects you have legal rights
against the retailer of this product. Your legal rights are
not limited in any way by our warranty detailed below.
The warranty for this product is 3 years from the date
of purchase. Should this product show any fault in ma-
terials or manufacture within 3 years from the date of
purchase, we will repair or replace it – at our choice –
free of charge to you.
The warranty period begins on the date of purchase.
Please keep the original sales receipt in a safe location.
This document is required as your proof of purchase.
This warranty becomes void if the product has been
damaged, or used or maintained improperly.
The warranty applies to defects in material or manufac-
ture. This warranty does not cover product parts subject
to normal wear, thus possibly considered consumables
(e.g. batteries) or for damage to fragile parts, e.g. swit-
ches, rechargeable batteries or glass parts.
Range hood with light and sound
(see Fig. W)
There are three buttons (
37a
,
37b
,
37c
) on the range
hood
37
:
Press the on / off button
37a
to activate / deactivate
the light and sound.
Press the light button
37b
to switch the light on and
off.
Note: The light will automatically switch off.
Press the sound button
37c
to switch the sound on
and off.
Note: The sound will switch off automatically.
Microwave with light and sound
(see Fig. Z)
Open the microwave door
19
and the light will
switch on.
Note: The light will automatically switch off.
Close the microwave door
19
and the light will
also switch off.
Press the start button
34a
to switch on the light and
sound. Press the stop button
34b
to switch off the
light and sound.
Note: The light and sound can only be switched
on and off when the microwave door
19
is closed.
Inserting / replacing batteries
To insert and replace the batteries, proceed as
shown in Fig. C‒E.
Care and storage
Do not use harsh or aggressive cleanin agents.
Clean the product only with a dry cloth.
Always store the product clean and dry and at
room temperature.
Disposal
The packaging is made entirely of recyclable materials,
which you may dispose of at local recycling facilities.
b
a
Observe the marking of the packaging mate-
rials for waste separation, which are marked
with abbreviations (a) and numbers (b) with
following meaning: 1–7: plastics / 20–22:
paper and fibreboard / 80–98: composite
materials.
The product and packaging materials are re-
cyclable, dispose of it separately for better
waste treatment. The Triman logo is valid in
France only.
Contact your local refuse disposal authority
for more details of how to dispose of your
worn-out product.
To help protect the environment, please dis-
pose of the product properly when it has
reached the end of its useful life and not in
the household waste. Information on collec-
tion points and their opening hours can be
obtained from your local authority.
Faulty or used batteries / rechargeable batteries must
be recycled in accordance with Directive 2006/66/EC
and its amendments. Please return the batteries / re-
chargeable batteries and / or the product to the availa-
ble collection points.
Environmental damage through
incorrect disposal of the batteries /
rechargeable batteries!
Batteries / rechargeable batteries may not be disposed
of with the usual domestic waste. They may contain
toxic heavy metals and are subject to hazardous waste
treatment rules and regulations. The chemical symbols
for heavy metals are as follows: Cd = cadmium, Hg =
mercury, Pb = lead. That is why you should dispose of
used batteries / rechargeable batteries at a local collec-
tion point.
WARNING! Not suitable for children under 36
months. Small parts. Choking hazard.
Instructions for handling batteries
How to remove and insert the batteries (see fig. C ‒ E).
Non-rechargeable batteries are not to be recharged.
Rechargeable batteries are only to be charged
under adult supervision.
Rechargeable batteries are to be removed from the
toy before being charged.
Different types of batteries or new and used
batteries are not to be mixed.
Batteries are to be inserted with the correct polarity.
Exhausted batteries are to be removed from the toy.
The supply terminals are not to be short-circuited.
Battery insert and remove can only done by an
adult.
Assembly
Note: Remove all packaging materials from the product.
Note: You will need an additional screwdriver in order
to assemble the product.
Follow the steps shown in figures B–V for the
assemble of the product.
Note: When inserting the cooking surface
33
please
ensure that you first hook one side of them into the slot
on the kitchen unit (fig. U).
Adjusting the height
The product can be assembled at three different
heights. The feet have different heights. The product
becomes higher depending on which side of the feet
you insert into the legs on the product (side A or B):
Product Kitchen unit height in mm
Without feet approx. 560
With feet side A approx. 600
With feet side B approx. 620
Attach to the wall (see Fig. V)
The fastening material provided is only suitable for
normal, solid walls. Before attaching the product to
the wall, check which fastening materials are suita-
ble for your wall.
Before starting to drill, make sure that there are no
pipes or electrical cables in the place where you
wish to drill.
This product may only be assembled on the wall by
adults.
Functions
Switching the cooking surfaces
on and off (see Fig. X)
There are two buttons
33a
on the cooking surface
33
.
Press the left or right button
33a
to switch the light
function of the respective cooking surface and the
sound function on and off.
Note: The light and sound function will switch off
automatically.
Stove with light and sound (see
Fig. Y)
There are two rotary switches
12a
(yellow and red)
and a timer
35
with three buttons.
Press one of the three buttons on the timer
35
to
switch on the sound for approx. 5, 15 or 30 se-
conds.
Open the oven door
13
and the LED
35a
will light
up.
Close the oven door
13
and the LED
35a
will
switch off.
Note: When the oven door
13
is open the LED
35a
will switch off automatically.
Play Kitchen
Introduction
We congratulate you on the purchase of your
new product. You have chosen a high quality
product. The instructions for use are part of the
product. They contain important information concerning
safety, use and disposal. Before using the product, please
familiarise yourself with all of the safety information and
instructions for use. Only use the product as described
and for the specified applications. If you pass the prod-
uct on to anyone else, please ensure that you also pass
on all the documentation with it.
Intended Use
The product playfully promotes imagination and
creativity and is only intended for private household use.
This product is not intended for commercial use.
Scope of delivery
22 Individual parts (
1
–
20
)
1 Pot with lid
21
1 Frying pan
22
1 Meat fork
23
1 Spatula
24
1 Whisk
25
1 Oven glove
26
1 Tea towel
27
1 Apron
28
4 Handles
29
4 Feet
30
1 Tap
31
1 Sink
32
1 Cooking surface with battery compartment
33
1 Microwave plastic panel with battery compartment
34
1 Timer
35
3 Hooks
36
1 Range hood with battery compartment
37
4 AAA Batteries
38
2 AA Batteries
39
28 Screws ø 3.2 x 35 mm
A
8 Screws ø 4 x 35 mm
B
1 Screw ø 5 x 28 mm
C
13 Screws ø 3.2 x 20 mm
D
6 Screws ø 4 x 16 mm
E
3 Screws ø 2.5 x 9 mm
F
1 Washer ø 14 mm
G
1 Screw ø 4 x 40 mm
H
1 Dowel ø 8 x 35 mm
I
2 Washers ø 12 mm
J
2 Screws ø 4 x 12 mm
K
1 Wall hanger 49 x 16 x 27 mm
L
1 Set of assembly instructions and instructions for use
Technical data
Dimension: approx. 70 x 97 x 30 cm (L x H x W)
Power supply: 1.5 V
AA / LR6 x 2
1.5 V
AAA / LR03 x 4
Safety Notices
KEEP ALL SAFETY NOTICES AND INSTRUCTIONS
AS WELL AS THE PACKAGING FOR FUTURE
REFERENCE!
RISK OF FATAL
INJURY AND ACCIDENT HAZARD
FOR TODDLERS AND SMALL
CHILDREN! Never allow children to play with the
packaging materials unattended. The packaging
material poses a suffocation hazard. Children often
underestimate dangers. Always keep children
away from the packaging material. The packaging
has to be removed by an adult.
ATTENTION! All packaging and fastening materi-
als are not part of the product and should always
be removed for safety reasons before the product
is given to children to play with.
WARNING: To be used under the direct supervi-
sion of an adult.
The product is suitable for children aged between
3 and 8 years old.
Mounting / Dismantling only by adults due to small
parts which can be swallowed.
WARNING! Not suitable for children under 36
months! Long cord. Strangulation hazard.
DE/AT/CH DE/AT/CH DE/AT/CH DE/AT/CH
Defekte oder verbrauchte Batterien / Akkus müssen gemäß
Richtlinie 2006/66/EG und deren Änderungen recycelt
werden. Geben Sie Batterien / Akkus und / oder das Pro-
dukt über die angebotenen Sammeleinrichtungen zurück.
Umweltschäden durch falsche
Entsorgung der Batterien / Akkus!
Batterien / Akkus dürfen nicht über den Hausmüll entsorgt
werden. Sie können giftige Schwermetalle enthalten und
unterliegen der Sondermüllbehandlung. Die chemischen
Symbole der Schwermetalle sind wie folgt: Cd = Cadmium,
Hg = Quecksilber, Pb = Blei. Geben Sie deshalb ver-
brauchte Batterien / Akkus bei einer kommunalen Sam-
melstelle ab.
Garantie
Das Produkt wurde nach strengen Qualitätsrichtlinien
sorgfältig produziert und vor Anlieferung gewissenhaft
geprüft. Im Falle von Mängeln dieses Produkts stehen
Ihnen gegen den Verkäufer des Produkts gesetzliche
Rechte zu. Diese gesetzlichen Rechte werden durch un-
sere im Folgenden dargestellte Garantie nicht einge-
schränkt.
Sie erhalten auf dieses Produkt 3 Jahre Garantie ab
Kaufdatum. Die Garantiefrist beginnt mit dem Kaufda-
tum. Bitte bewahren Sie den Original-Kassenbon gut
auf. Diese Unterlage wird als Nachweis für den Kauf
benötigt.
Tritt innerhalb von 3 Jahren ab dem Kaufdatum dieses
Produkts ein Material- oder Fabrikationsfehler auf, wird
das Produkt von uns – nach unserer Wahl – für Sie kosten-
los repariert oder ersetzt. Diese Garantie verfällt, wenn
das Produkt beschädigt, nicht sachgemäß benutzt oder
gewartet wurde.
Die Garantieleistung gilt für Material- oder Fabrikations-
fehler. Diese Garantie erstreckt sich nicht auf Produktteile,
die normaler Abnutzung ausgesetzt sind (z. B. Batterien)
und daher als Verschleißteile angesehen werden können
oder Beschädigungen an zerbrechlichen Teilen, z. B.
Schalter, Akkus oder die aus Glas gefertigt sind.
Drücken Sie an der Eieruhr
35
eine der drei Tasten,
um den Sound für ca. 5, 15 oder 30 Sekunden ein-
zuschalten.
Öffnen Sie die Ofentür
13
und die LED
35a
leuchtet.
Schließen Sie die Ofentür
13
und die LED
35a
schaltet sich aus.
Hinweis: Bei geöffneter Ofentür
13
schaltet sich
die LED
35a
automatisch aus.
Dunstabzugshaube mit Licht und
Sound (siehe Abb. W)
An der Dunstabzugshaube
37
befinden sich drei Tasten
(
37a
,
37b
,
37c
):
Drücken Sie die Ein- / Aus-Taste
37a
, um Licht und
Sound zu aktivieren / zu deaktivieren.
Drücken Sie die Licht-Taste
37b
, um das Licht ein-
und auszuschalten.
Hinweis: Das Licht schaltet sich automatisch aus.
Drücken Sie die Sound-Taste
37c
, um den Sound
ein- und auszuschalten.
Hinweis: Der Sound schaltet sich automatisch
aus.
Mikrowelle mit Licht und Sound
(siehe Abb. Z)
Öffnen Sie die Mikrowellentür
19
und das Licht
schaltet sich ein.
Hinweis: Das Licht schaltet sich automatisch aus.
Schließen Sie die Mikrowellentür
19
und das Licht
schaltet sich ebenfalls aus.
Drücken Sie die Start-Taste
34a
, um Licht und Sound
einzuschalten. Drücken Sie die Stopp-Taste
34b
, um
Licht und Sound auszuschalten.
Hinweis: Licht und Sound lassen sich nur bei
geschlossener Mikrowellentür
19
ein- und aus-
schalten.
Batterien einlegen/wechseln
Gehen Sie zum Einsetzen und Wechseln der Batte-
rien bitte vor wie in Abb. C‒E dargestellt.
Pflege und Lagerung
Verwenden Sie keine scharfen oder aggressiven
Reinigungsmittel.
Reinigen Sie das Produkt nur mit einem trockenen
Tuch.
Lagern Sie das Produkt immer trocken und bei
Zimmertemperatur.
Entsorgung
Die Verpackung besteht aus umweltfreundlichen Materi-
alien, die Sie über die örtlichen Recyclingstellen entsorgen
können.
b
a
Beachten Sie die Kennzeichnung der Verpa-
ckungsmaterialien bei der Abfalltrennung,
diese sind gekennzeichnet mit Abkürzungen
(a) und Nummern (b) mit folgender Bedeu-
tung: 1–7: Kunststoffe / 20–22: Papier und
Pappe / 80–98: Verbundstoffe.
Das Produkt und die Verpackungsmaterialien
sind recycelbar, entsorgen Sie diese getrennt
für eine bessere Abfallbehandlung. Das Triman-
Logo gilt nur für Frankreich.
Möglichkeiten zur Entsorgung des ausgedien-
ten Produkts erfahren Sie bei Ihrer Gemeinde-
oder Stadtverwaltung.
Werfen Sie Ihr Produkt, wenn es ausgedient
hat, im Interesse des Umweltschutzes nicht in
den Hausmüll, sondern führen Sie es einer
fachgerechten Entsorgung zu. Über Sammel-
stellen und deren Öffnungszeiten können Sie
sich bei Ihrer zuständigen Verwaltung infor-
mieren.
ACHTUNG! Nicht für Kinder unter 36 Monaten
geeignet! Lange Schnur. Strangulationsgefahr.
ACHTUNG! Nicht für Kinder unter 36 Monaten
geeignet! Kleine Teile. Erstickungsgefahr.
Hinweise zum Umgang
mit Batterien
Zum Entfernen und Einsetzen der Batterien gehen
Sie vor, wie in Abb. C ‒ E dargestellt.
Nicht aufladbare Batterien dürfen nicht erneut
aufgeladen werden.
Akkus dürfen nur unter Aufsicht von Erwachsenen
wieder aufgeladen werden.
Akkus müssen aus dem Spielzeug entfernt werden,
bevor sie aufgeladen werden.
Verschiedene Batterietypen oder neue und ge-
brauchte Batterien dürfen nicht gemischt verwendet
werden.
Batterien müssen entsprechend der korrekten
Polarität eingesetzt werden.
Erschöpfte Batterien müssen aus dem Spielzeug
entfernt werden.
Schließen Sie die Anschlusspole auf keinen Fall kurz.
Das Einsetzen und Entfernen der Batterien darf nur
von einem Erwachsenen durchgeführt werden.
Montage
Hinweis: Entfernen Sie sämtliches Verpackungsmate-
rial vom Produkt.
Hinweis: Sie benötigen einen zusätzlichen
Schraubendreher, um das Produkt zu montieren.
Für die Montage des Produkts beachten Sie die
Einzelschritte wie in den Abb. B–V dargestellt.
Hinweis: Achten Sie beim Einsetzen der Kochflächen
33
darauf, zuerst eine Seite seitlich in die Aussparung
der Küchenzeile einzuhaken (Abb. U).
Höhe einstellen
Das Produkt können Sie in drei verschiedenen Höhen
aufstellen. Die Füße haben unterschiedliche Höhen. Je
nachdem welche Seite (A oder B) der Füße Sie auf die
Beine des Produkts stecken, erhöht sich das Produkt:
Produkt Küchenzeilenhöhe in mm
ohne Füße ca. 560
mit Fußseite A ca. 600
mit Fußseite B ca. 620
An der Wand befestigen (siehe
Abb. V)
Das mitgelieferte Befestigungsmaterial ist nur für
normales, massives Mauerwerk geeignet. Informieren
Sie sich vor der Montage, welches Befestigungsma-
terial für Ihre Wand geeignet ist.
Vergewissern Sie sich vor dem Bohren, dass sich
weder Rohre noch elektrische Leitungen hinter der
Stelle befinden, an der Sie die Löcher bohren wollen.
Das Produkt darf nur von Erwachsenen an der
Wand montiert werden.
Funktionen
Kochflächen ein- und ausschalten
(siehe Abb. X)
Auf der Kochfläche
33
befinden sich zwei Tasten
33a
.
Drücken Sie die linke oder die rechte Taste
33a
,
um das Licht der jeweiligen Kochfläche sowie den
Sound ein- und auszuschalten.
Hinweis: Licht und Sound schalten sich automa-
tisch aus.
Herd mit Licht und Sound (siehe
Abb. Y)
Es gibt zwei Drehschalter
12a
(gelb und rot) sowie eine
Eieruhr
35
mit drei Tasten.
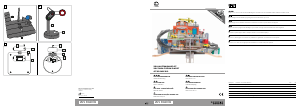
Spielküche
Einleitung
Wir beglückwünschen Sie zum Kauf Ihres
neuen Produkts. Sie haben sich damit für ein
hochwertiges Produkt entschieden. Die Bedie-
nungsanleitung ist Teil dieses Produkts. Sie enthält wich-
tige Hinweise für Sicherheit, Gebrauch und Entsorgung.
Machen Sie sich vor der Benutzung des Produkts mit al-
len Bedien- und Sicherheitshinweisen vertraut. Benutzen
Sie das Produkt nur wie beschrieben und für die ange-
gebenen Einsatzbereiche. Händigen Sie alle Unterlagen
bei Weitergabe des Produkts an Dritte mit aus.
Bestimmungsgemäße
Verwendung
Das Produkt fördert spielerisch die Fantasie und die
Kreativität und ist nur für den Einsatz in privaten
Haushalten vorgesehen. Das Produkt ist nicht für den
gewerblichen Einsatz bestimmt.
Lieferumfang
22 Einzelteile (
1
–
20
)
1 Kochtopf mit Deckel
21
1 Bratpfanne
22
1 Fleischgabel
23
1 Pfannenwender
24
1 Schneebesen
25
1 Ofenhandschuh
26
1 Geschirrtuch
27
1 Schürze
28
4 Griffe
29
4 Füße
30
1 Wasserhahn
31
1 Spülbecken
32
1 Kochfläche mit Batteriefach
33
1 Mikrowellen-Kunststoffplatte mit Batteriefach
34
1 Eieruhr
35
3 Haken
36
1 Dunstabzugshaube mit Batteriefach
37
4 AAA Batterien
38
2 AA Batterien
39
28 Schrauben ø 3,2 x 35 mm
A
8 Schrauben ø 4 x 35 mm
B
1 Schraube ø 5 x 28 mm
C
13 Schrauben ø 3,2 x 20 mm
D
6 Schrauben ø 4 x 16 mm
E
3 Schrauben ø 2,5 x 9 mm
F
1 Unterlegscheibe ø 14 mm
G
1 Schraube ø 4 x 40 mm
H
1 Dübel ø 8 x 35 mm
I
2 Unterlegscheiben ø 12 mm
J
2 Schrauben ø 4 x 12 mm
K
1 Wandaufhängung 49 x 16 x 27 mm
L
1 Montage- und Bedienungsanleitung
Technische Daten
Maße: ca. 70 x 97 x 30 cm (L x H x B)
Stromversorgung: 1,5 V
AA / LR6 x 2
1,5 V
AAA / LR03 x 4
Sicherheitshinweise
BEWAHREN SIE ALLE SICHERHEITSHINWEISE UND
ANWEISUNGEN SOWIE DIE VERPACKUNG FÜR
DIE ZUKUNFT AUF!
LEBENS- UND
UNFALLGEFAHR FÜR KLEINKIN-
DER UND KINDER! Lassen Sie Kinder
niemals unbeaufsichtigt mit dem Verpackungsmaterial
spielen. Es besteht Erstickungsgefahr durch das Ver-
packungsmaterial. Kinder unterschätzen oft die Ge-
fahren. Kinder sollten stets vom Verpackungsmaterial
ferngehalten werden. Die Verpackung sollte von ei-
nem Erwachsenen entfernt werden.
ACHTUNG! Alle Verpackungs- und Befestigungs-
materialien sind nicht Bestandteil des Produkts und
sollten aus Sicherheitsgründen stets entfernt wer-
den, bevor das Produkt den Kindern zum Spielen
übergeben wird.
ACHTUNG! Benutzung unter unmittelbarer Auf-
sicht von Erwachsenen.
Das Produkt ist geeignet für Kinder von 3–8 Jahre.
Aufgrund von Kleinteilen, die verschluckt werden
können, sollte die Montage / Demontage nur durch
Erwachsene erfolgen.
IAN 303644
SPIELKÜCHE / PLAY KITCHEN / CUISINE POUR ENFANT
SPIELKÜCHE
Montage-, Bedienungs- und Sicherheitshinweise
PLA Y KITCHEN
Assembly, operating and safety instructions
CUISINE POUR ENFANT
Instructions de montage, d‘utilisation et consignes de sécurité
SPEELKEUKEN
Montage-, bedienings- en veiligheidsinstructies
COCINA DE JUGUETE
Instrucciones de montaje, de uso y de seguridad
COZINHA DE BRINCAR
Indicações de montagem, utilização e segurança
DĚTSKÁ KUCHYŇKA
Pokyny k montáži, obsluze a bezpečnostní pokyny
A B
31
C
10
29
G
D
13
15
29
16
29
D
D
D
29
19
+
+
-
-
C
33
D
+
-
+
-
E
34
37
N O
B
12
1x
3
1 x
1
1 x
2
1 x
4
1 x
5
1 x
6
2 x
7
1 x
8
1 x
9
2 x
10
1 x
11
1 x
13
1 x
14
1 x
15
1 x
16
1 x
17
1 x
18
1 x
19
1 x
20
1 x
21
1 x
22
1 x
23
1 x
24
1 x
25
1 x
26
1 x
27
1 x
28
1 x
29
4 x
30
4 x
31
1 x
32
1 x
33
1 x
33 a
A
28 x
B
8 x
C
1x
D
13 x
E
6x
F
3x
34
1 x
35
1 x
36
3 x
37
1 x
38
4 x
39
2 x
G
1x
H
1x
I
1x
J
2x
K
2x
L
1x
F G
12 35
F
20
S
T U
P Q
R
A
B
33
33
39
33
38
38
F
7
A
8
A
H I
17 12
14
AA
13 A
J K
34
D
18
19
L
M
15
AD
A
16
5
4 10
37 26
D
A
E
11
B A
B
E
9
36
28
27
26
32
33
30
35
A
A
1
3
A
33 a
H
K
J
L
I
H I J LK
V
W
X
Y
Z
OFF
33
33a
37
37c37a
37b
13
34a 34b
19
8
12a
35
13
12
35a
LED
12a
35

Únase a la conversación sobre este producto
Aquí puedes compartir lo que piensas sobre Playtive IAN 303644 Play Kitchen. Si tiene alguna pregunta, primero lea atentamente el manual. Puede solicitar un manual utilizando nuestro formulario de contacto.
responder | Ha sido de gran ayuda (0) (Traducido por Google)
responder | Ha sido de gran ayuda (0) (Traducido por Google)