DIGI- X5 ha
s5
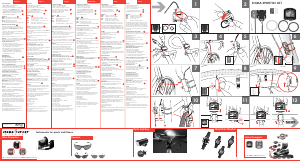
FUNCTIONS: SPD, DST, ODO, CLK, SCAN.
DIGI-
X8
ha
s
8 FUNCTIONS: SPD, DST, ODO, CLK, AVG, MAX, TM, SCAN.
DIGI- X10 has 10 FUNCT
IONS: SPD, DST, ODO, CLK, AVG, MAX, TM, TTM, SCAN, SPEED PACER.
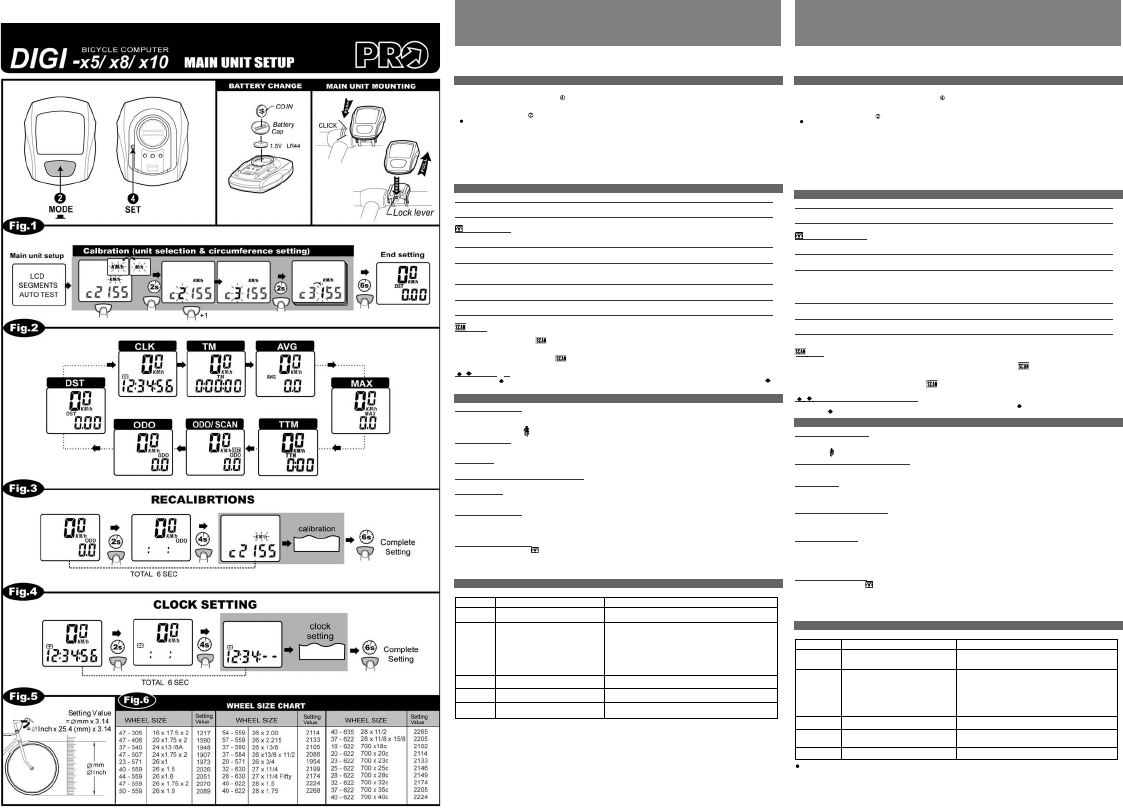
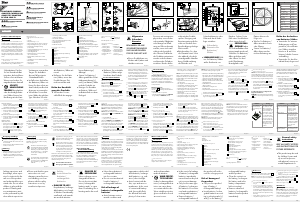
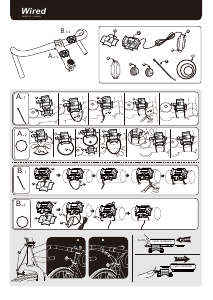
A). MAIN UNIT SETUP (Fig.1)
INITIATE THE COMPUTER
1.Be sure to press the All Clear (AC) key to clear all stored data and initiate the computer before using it or when replacing battery
ot
herw
ise the unit
m
a
y
m
a
lf
unct
i
on.
2.
The LCD segments will be tested automatically af
t
er the All Clear key is pressed.
3.Press the “MODE” button
to stop the LCD test, then the flicking “KM/h” and “c2155” will be displayed.
CA
LIBRA
TI
ON
UNIT SELECTION
1
)
.Pr
e
ss th
e
“M
OD
E
”
bu
tton
to
select “KM/h” or “M/h”(Mile/h).
2).
Hold t
he “
MO
DE” but
t
on till the f
lick
ering digi
t is changed t
othedigit
“
2
”
o
f
th
e
c2155 to recognize eit
her
KM/h or Mile/h as desired.
CIRCUM
FERENCE DATA
SET
T
ING
1).
Th
ede
f
ault is set at 2155mm
. Measur
ethevalue
for
your
w
heel
(Fig
.5)or
r
efer to th
e
q
uick tabl
epr
ovided in
the m
anual fo
ry
our
bicycle. (Fig. 6)
2). A quick press of the “MODE” button advances the flickering digit by 1.
3).
T
o chang
et
he flick
e
r
i
ng digit
,
hold dow
nt
he “
M
ODE”
but
t
on t
ill t
he f
lickeri
ng
digit mo
v
es to the nex
tdig
i
t.
4)
.
Hold down t
he “
MO
DE” but
t
on t
ill (about
6 seconds) it ju
mp
sout
the set
ting to stor
e the desir
ed data and complete
set
up.
B). FUNCTIONS (Fig
.
2)
SPD: Current Speed 0.0 – 199.9 Km/h or 120.0 Mile/h +/- 1%
The current speed is always displayed on the 4 digits set when riding.
DST: Trip
Di
stance 0.00 – 999.99 Km or Miles +/- 0.1%
The DST funct
i
on accumulates the distance data from the last RESET operation as long as the bicycle is being ridden.
CLK: 12HR Clock
It displays the current time on a 12HR clock.
TM: Riding Time 0H00M00S - 19H59M59S
The TM totals the riding ti
m
efr
om
the last RESET operation.
AVG: Average Speed 0.0 – 199.9 Km/h or 120.0 Mile/h +/- 0.1%
1. It is calculated from the DST divided by the TM; the average data counted is from the last RESET to current points.
2. I
t
display
san"
Err"
sy
mbol when either the TM is over 100 hours or the DST is over 1,000 km (or miles). Reset the unit in order to restart.
MAX: Maximum Speed 0.0 – 199.9 Km/h or 120.0 Mile/h +/- 1%
It shows the highest speed from the last RESET operation.
TTM: Total Riding Time 0H00M – 1999H59M
The TM totals the riding ti
m
efr
om
the last ALL CLEAR operation.
ODO: Odometer 0.0 – 19999.9 Km or Miles +/- 0.1%
The ODO accumulates the tota
ld
ista
n
c
e
as long as the bike is moving. The ODO data can be cleared by the ALL CLEAR operation only.
:
SCAN
1.
Aut
o-Scanning Display Mode
Pr
ess the MO
DE but
ton t
ill the“
” symbol is displayed. The computer will change the DST, CLK, TM, AVG, MAX, TTM and ODO
display
modes in a loop seq
uence aut
omatically ever
y
6 seconds.
2. Fix
ed Display M
ode
Pr
ess t
he MODE button to turn off
th
e“
” symbol and select a desired display mode; the computer will stop the auto-scanning
display oper
at
ion and the display
m
ode is set.
/
: Speed Pacer
It flashes the “ ” speed pacer arrow while the current speed is higher than the average speed and the down arrow “ ”
flickers conversely.
C). BUTTON and NORMAL OPERATIONS
AUTOMATIC START/STOP
1.The computer w
ill autom
atically begin counting SPD, ODO, DST, MAX, TTM, TM and AVG data upon riding and stop
counting data when riding i
s stopped.
2.The f
l
ickering symbol“
”indicates that the computer is at START status.
POWER AUTO ON
/OFF
To
pr
eserve battery, this computer will automatically switch off when it has not been used for about 10 minutes. The power will be
turned on automatically
by
riding the bicycle or by pressing the button.
MODE BUTTON
Quick
l
y press this button to
m
ove in a loop sequence from one basic function screen to another.
ALL CLEAR OPERATIONS (In
i
tiate the Computer)
Press the ALL CLEAR (AC) key to initiate the computer or use ALL CLEAR if any irregular data appears. It will clear all stored data.
RESET OPERATION
1. Hold down the “MODE” button till the LCD digit is blanked, then release it. The computer will RESET the DST, TM, AVG, MAX.
2. It cannot reset CLK, TTM and ODO data.
RECALIBRATIONS (Fig. 3)
1. Change the LCD display to ODO screen, hold down the “MODE” button till (about 6 seconds) it jumps into the calibrating screen.
2. Refer to t
he m
ain unit setup process t
o
adj
ust
the circumfer
ence.
3.
Hold dow
nt
he “
MO
DE”
but
to
n
till (
a
bout 6 seconds) it jumps out the recalibration mode to store the desired da
t
a and complete
re
calibr
at
i
ons.
12HR CL
OCK SE
TTING (F
ig. 4)
1. Change the LCD display to
“
” screen.
2. Press the “
M
ODE” button till (about 6 seconds) it jump
sint
o the clock adjusting
screen t
o set the clock.
3. A q
uick
press of t
he “M
O
D
E”
but
t
on advances the flick
e
ring digit by 1.
4. To change the flickering
dig
it, hold dow
nt
he “MODE”
but
ton till the flickering digit moves to
t
he next digit.
5.
Hold down the “MODE” but
t
on till (about
6 seconds)
it ju
m
p
sout
the sett
ing
to store t
he desir
ed data and complete
clock
set
t
ing
.
D).TROUBLE SHOOTING
Check the following before taking unit in for repairs.
PROBLEM
CHECK I
TEMS REMEDY
No display
1.I
s
the batt
er
y dead?
2.Is
there incor
re
ct
battery installation?
1.
Replace the batte
ry.
2.Be sure
t
h
at
the positive pole of the bat
t
er
y is facing t
he battery cap.
No current
Speed or
incorrect data
1. Is
it at
t
he recalibr
a
t
ing
or 12H
R
cl
oc
k
setting screen?
2. Are the contacts between the main
unit and the bracket poor?
3.Are the rela
tiv
e positions and gap of
sensor
and magnet correct?
4.Is the wi
r
ebr
ok
en?
5.I
s
the circumference correct?
1
.
Re
f
er to t
he
ad
j
u
s
ting procedure
and
complete the adjus
t
me
nt
.
2. Wipe contacts clean.
3.Refer to (Fig.D-1) and readjust data correctly.
4.Repair or replace wire.
5.Refer to "CALIBRATION" and enter correct value.
Irr
e
gular
display
Refer to the "MAIN UNIT SETUP" and initiate the computer again.
LC
D
is black
Did y
ou leave main unit under direct sunlight
w
hen not
r
i
ding t
he bike f
or a long t
i
m
e?
Place m
ain unit in the shade to retu
rn t
ono
rma
l
st
ate
.
No adv
er
se eff
ect on data.
Display is slow Is the temperature below 0°C(32°F)? Unit will return to normal state when the temperature rises.
PRECAUTIONS
1. This computer
canbeusedint
he rain but should not be used under water.
2.
Don’t
leave the main unit exposed to direct sunlight when not riding the bike.
3. Don’t disassemble the main unit or it
’s
accessories.
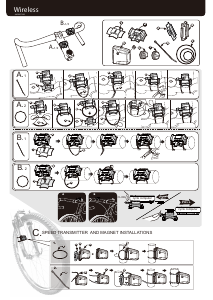
4. Check relative position and gap of sensor and magnet periodically.
5. Clean the contacts of the bracket and the bottom of the main unit periodically.
6. Don’t use thinner,
alcohol or
benz
ine t
o clean the main unit or its accessories when they become dirty.
Remem
ber
to
p
ay
at
tention to the road while riding.
DIGI- X5
ha 5 funzioni: SPD, DST, ODO, CLK, SCAN.
DIGI- X8 ha 8 funzioni: SPD, DST, ODO, CLK, AVG, MAX, TM, SCAN.
DIGI- X10
ha 10 funzioni: SPD, DST, ODO, CLK, AVG, MAX, TM, TTM, SCAN, SPEED PACER (conta passi).
EN IT
A). PREPARAZIONE DEL
COMPUTER (Fig. 1)
AVVIO DEL COMPUTER (azzeramento)
1.Accertarsi che venga premuto il pulsante AC (All clear)
per cancellare tutti i dati e che vengano effettuate tutte le operazioni di
av
vi
am
ent
o del comput
er pr
ima di utilizzarlo o quando si sostituisce la bat
t
eri
a,
altrimenti l’unità potrà for
n
ire risultati er
rati.
2.Quando si preme il pulsante AC, il com
put
er effettua una scansione aut
om
at
ica dei seg
menti del display
acr
ist
a
lli liquidi.
3.Premere il pulsante “MODE”
per interrompere la scansione. Di seguito compaiono le scritte lampeggianti “KM/h” e “c2155”.
CA
LIBRA
T
URA
1. SCELTA DELL’UNI
TA
’ DI MISURA
1).
Premere il pulsante “MODE” per selezionare “KM/h” (chilometri all’ora) o “M/h” (miglia all’ora).
2). Tenere premuto il pulsante MODE finché a lampeggiare è la cifra “2” della scritta c2155, quindi verificare la selezione desiderata
(km/h o
mi
g
l
ia
/h
).
2. IMPOSTA
Z
IONE DELLA CIRCONFERENZA
1). Il valore standard della circonferenza è fissato a 2155 mm. Misurare la circonferenza della vostra ruota (Fig. 5) o consultare la
t
abella fo
rnita dal manuale d’istruzioni della v
o
stra biciclett
a
.
(F
ig. 6)
2).
Una r
apida pressione del pulsante “MODE” f
a
avanzare di 1 unità
la cif
ra lampeggiante.
3).
Per cambiare la cifra lampeggiante, tenere premuto il pulsante “MODE” finché non compare la cifra successiva.
4).Tenere premuto il pulsante “MODE” (per circa 6 secondi) per memorizzare i dati desiderati e completare la regolazione.
B). FUNZIONI (Fig. 2)
SPD: Current Speed (velocità di corsa o istantanea) 0.0 – 199.9 km/h o 120.0 miglia/h +/- 1%
La velocità di corsa viene sempre visualizzata con quattro cifre durante la corsa.
DST: Trip distance (distanza del percorso) 0.00 – 999.99 km o miglia +/- 0.1%
La funzione DST calcola la distanza dall’ultima operazione di RESET (azzeramento) fino a quando la bicicletta non si ferma.
CLK: Orologio a 12 ore
Visualizza l’ora esatta in un orologio a 12 ore.
TM: Riding time (Durata del percorso) 0H00M00S - 19H59M59S
La funzione TM calcola la durata del percorso dall’ultima operazione di RESET (azzeramento).
AVG: Average Speed (Velocità media) 0.0 – 199.9 km/h o 120.0 miglia/h +/- 0.1%
1.La velocità media viene calcolata dividendo la DST (distanza del percorso) per TM (durata del percorso). La media viene quindi
calcolata dall’ultima operaz
ione di RESET (a
zzera
m
ent
o) f
i
no al punt
oat
t
uale.
2.Quando TM è superior
e
alle 100 ore oppure DST è super
ior
e a 1.000 k
m
(o m
i
g
lia)
, sul display compare il simbolo "Err" (c
he
significa Errore). Azzerare l’unità per ricominciare il conteggio.
MAX: Maximum speed (velocità massima) 0.0 – 199.9 km/h o 120.0 miglia/h +/- 1%
La funzione MAX visualizza la velocità più elevata raggiunta dopo l’ultima operazione di RESET (azzeramento).
TTM: Total Riding Time (Durata del percorso totale) 0H00M – 1999H59M
La funzione totalizza la durata del percorso totale dall’ultima operazione ALL CLEAR (AC).
ODO: Odometro (contachilometri)` 0.0 – 19999.9 km o miglia +/- 0.1%
La funzione ODO totalizza la distanza totale percorsa dalla bicicletta. Questi dati possono essere cancellati solo con la funzione ALL
CLEAR (
A
C)
.
: SCAN
1. Auto-scanning display Mode (display con scansione automatica)
Tene
re
premuto il pul
sa
n
t
e“M
O
DE”
f
inc
hé
sullo sche
r
mo a crist
a
lli
li
qui
d
ino
n
compare il
si
mbolo “
”. Il computer visualizzerà le funzioni DST,
CLK, TM, AVG, M
AX
,TTMeO
D
O automaticamente in successione ogni 6 secondi.
2.
Fixed display mode (d
isplay fi
sso)
Premere il pulsante MODE per eliminare il simbolo “
” e selezionare la funzione display desiderata. Il computer interromperà la
scansione automatica, mostrando solamente la funzione selez
i
onata.
/ : Speed Pacer (Indicatore di velocità)
Se la velocità istantanea è superiore rispetto alla velocità media, lampeggerà il simbolo “ ”. Se invece è inferiore, lampeggerà il
sim
bolo “
”.
C). PULSANTI E OPERAZIONI NORMALI
START / STOP AUTOMATICO
1.Il computer comincerà automaticamente il suo conteggio di SPD, ODO, DST, MAX, TTM, TM e AVG nel momento in cui si inizia la
cors
a,
mentre
sm
etterà di conteg
g
i
ar
e appena ci si fe
r
ma.
2
.Il
si
mb
ol
o“
”
lampeggiante significa che il computer si trova nello stato di START (avvio).
ACCENSIONE / SPEGNIMENTO AUTOMATICO
Per non consumare la batteria, il computer si spegne quando non viene utilizzato per circa 10 minuti. Si accenderà automaticamente
q
uando si r
iprende la cors
aosipr
eme il pulsante.
PULSANTE MODE
Premere questo pulsante per spostarsi in sequenza dal display di una funzione a un altro.
OPE
RA
ZIONI AC
(A
LL CLE
A
R)
(
per av
v
iare il comput
er
)
Prem
ere il pulsante AC per
avviare il com
puter
oppur
eper
cancellar
e
qualsiasi dat
oirr
eg
o
lar
e
, se dovesser
o
comparirne.
OPERAZIONE RESET (azzeramento)
1.Tenere premuto il pulsante “MODE” finché sullo schermo a cristalli liquidi non sarà visualizzato alcun dato, quindi lasciare il
pulsante. Il com
put
er azzererà
idat
im
e
morizzati di DST, TM, AVG, MA
X
.
2.Il pulsant
e RESET
non può azze
ra
re i dati CLK, TT
MeODO
.
RICALIBRATURE (Fig. 3)
1.Modificare lo schermo di visualizzazione a cristalli liquidi fino a posizionarsi sulla funzione ODO, tenere premuto il pulsante “MODE”
(per
cir
ca 6 secondi), finché non compare lo schermo
di calibr
a
t
ur
a
.
2.Far
erife
ri
m
ent
o alla sez
i
one D (
P
repar
azione del com
puter
)per
r
e
golare la cir
c
onferenza.
3.Tenere premuto il pulsante “MODE” (per circa 6 secondi) per uscire dallo schermo di calibratura, memorizzare i dati desiderati e completare
le calibrature.
OROLOGIO A 12 ORE (Fig. 4)
1.Visualizzare la funzione “ ” (clock, orologio) sul display a cristalli liquidi.
2.Pr
em
ere il pulsante “MODE”
(
per
cir
c
a 6 secondi)
f
i
nché per accedere al display di rego
laz
i
one dell’or
ologi
o.
3.Premere velocemente il pulsante “MODE
”
per
f
a
r
av
anzare di una unità
il v
alore
lam
peg
g
iante.
4.Per cambiare la cifra lampeggiante, tenere premuto il pulsante “MODE” finché non compare la cifra successiva.
5.Tenere premuto il pulsante “MODE”
(
per circa 6 secondi) per uscire dallo schermo di calibratura, m
e
morizzare i dati desiderati e
comp
leta
re
la r
eg
o
laz
ione dell’orolog
i
o.
D). IDENTIFICAZIONE DEI GUASTI
Prima di portare l’unità a riparare, effettuare i seguenti controlli:
PRO
BLE
MA COSA CONTROLLARE RIMEDIO
Nessuna
indicazione
l displa
1. La batteri
a è scar
ica?
2. La batter
i
a è stata installata in modo
corretto?
1.
Sost
it
uire
la batt
eria.
2. Assicurars
i
ch
ei
lpolopo
s
itivo
della batter
i
asiar
i
volto verso il
coperchio della batteria.
Non compare la
velocità di corsa
oidat
i non sono
corretti
1.
Si è allo schermo di regolazione dell’unità
principa
le o dell’or
ologio?
2. I contatti tra l’unità principale e il
supporto sono deboli?
3. Le posizioni del magnete e del sensore
elalorodistanzasonocorrette?
4. Il cavo è rotto?
5. La circonferenza impostata è corretta?
1. Fare rife
ri
mento alle ist
ruz
ioni di r
e
g
o
la-zione ed effe
t
t
uar
ele
operazioni in m
odo corr
et
t
o.
2. Pulire i contat
t
i.
3. Fare
rif
erimento alle fig. D-
1
e impostare i dati correttam
ent
e.
4.
Rip
arareosostituireilcavo
.
5
.F
are
rife
rime
nt
oa
lp
a
ra
grafo
“
CA
LI
BR
A
-
TURA
”
e
d
inseri
r
e
il
dato corre
t
to
.
isualizzazione
irregolare
Fare riferimento al paragrafo riparazione del “Computer” e
riavviare il computer.
display è scuro L’unità principale è stata esposta ai raggi
diretti del sole per un periodo in cui la
bicicletta non era in movimento?
Riporre l’unità principale all’ombra per riportarla allo stato di
normalità.
Questo fenomeno non compromette in alcun modo i dati.
visualizzazione è
troppo lenta
La temperatura è inferiore agli 0°C(32°F)? L’unità tornerà allo stato di normalità quando la temperatura
aumenta.
PRECAUZIONI
1.Quest
o
computer può essere usato in caso di pioggia ma non dovrebbe essere utilizza
t
o sott’acq
ua.
2.Non lasciar
e l’unità
pr
incip
ale sot
t
o
l’esposiz
ione dir
e
tt
adei
ragg
i
solari a meno che non si st
ia utilizz
ando la bicicletta.
3.Non smontare l’unità principale o i suoi accessori.
4.Controllare periodicamente la posizione e la distanza del sensore e del magnete.
5.Pulire periodicament
e i contatt
i del supporto e la parte infer
i
ore dell’unità principale.
6.
Non f
a
re
uso di diluent
i,
alcool o benz
ina per
pulir
el’
unità pr
incip
ale o i suoi accessori q
uando sono spor
chi.
7. Ricordarsi di prestare att
e
nzi
o
ne alla st
rada durant
el
a corsa.


Únase a la conversación sobre este producto
Aquí puedes compartir lo que piensas sobre Pro Digi-x8 Ciclocomputador. Si tiene alguna pregunta, primero lea atentamente el manual. Puede solicitar un manual utilizando nuestro formulario de contacto.
responder | Ha sido de gran ayuda (0) (Traducido por Google)