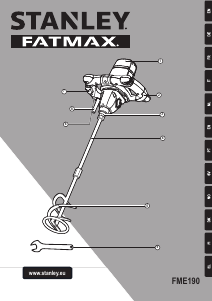
Manual de uso Stanley FME190-QS Mezclador de cemento

¿Necesita un manual para su Stanley FME190-QS Mezclador de cemento? A continuación puedes ver y descargar el manual en PDF gratis en español. Este producto actualmente tiene 1 pregunta frecuente, 0 comentarios y tiene 0 votos. Si este no es el manual que desea, , contáctenos.

¿Su producto tiene algún defecto y el manual no ofrece ninguna solución? Vaya a Repair Café para solicitar un servicio de reparación gratuito.

Manual de uso

Loading…

6
ENGLISH
(Original instructions)
Labels on tool
The following pictograms along with the date code are shown
on the tool:
:
Warning!Toreducetheriskofinjury,theuser
must read the instruction manual.
O
Wear safety glasses or goggles.
N
Wear ear protection.
6
Wear a dust mask.
Wear gloves when handling blades.
Electrical safety
#
This tool is double insulated; therefore no earth
wire is required. Always check that the power
supply corresponds to the voltage on the rating
plate.
u Inspect tool cords periodically. If the supply cord is
damaged, it must be replaced by the manufacturer or an
authorised Stanley Fat Max Service Centre in order to
avoid a hazard.
Voltage drops
Inrush currents cause short-time voltage drops. Under
unfavourable power supply conditions, other equipment may
be affected. If the system impedance of the power supply is
lowerthan0.34Ω,disturbancesareunlikelytooccur.
Using an extension cable
u Always use an approved extension cable suitable for the
powerinputofthistool(seetechnicaldata).Beforeuse,
inspect the extension cable for signs of damage, wear and
ageing.
u Replace the extension cable if damaged or defective.
When using a cable reel, always unwind the cable
completely. Use of an extension cable not suitable for the
power input of the tool or which is damaged or defective
mayresultinariskofreandelectricshock.
Features
This tool includes some or all of the following features.
1. Air vents
2. Handle (left & right)
3. Socket
4. Shaft
5. Stirrer
6. lock-on button
7. Variable speed switch
8. Power cord with plug
9. Mounting spanner 22mm (x 2)
Assembly.
Unpacking.
u Unpackallpartsandlaythemonaat,stablesurface.
u Remove all packing materials and shipping devices, if
applicable.
u Make sure the delivery contents are complete and free
ofanydamage.Ifyoundthatpartsaremissingorshow
damage do not use the product but contact your dealer.
Using an incomplete or damaged product represents a
hazard to people and property.
u Ensure that you have all the accessories and tools needed
for assembly and operation. This also includes suitable
personal protective equipment.
Warning! The product and the packaging are not children’s
toys! Children must not play with plastic bags, sheets and
small parts! There is a danger of choking and suffocation!
Setup
Warning! The product must be fully assembled before
operation! Do not use a product that is only partly assembled
or assembled with damaged parts! Follow the assembly
instructions step-by-step and use the pictures provided as a
visual guide to easily assemble the product! Do not connect
the product to power supply before it is completely assembled!
Stirrer
Warning! Stirrers are available in different types and with
different shape and diameters. Always use the correct
stirrer according to the intended use! Observe the technical
requirements of this product (see section “Technical
specications”)whenpurchasingandusingstirrer!Stirrer
becomes hot during use! Handle them carefully! Wear
protective gloves when handling stirrer in order to avoid
injurieslikeburnsandcuts!
Attaching (Fig.A, Fig.B, Fig.C, Fig.D)
u Align the stirrer (5) with the shaft (4). Screw the stirrer (5)
clockwise onto the lower end of the shaft (4) (Fig. A).
u Lock the welded nut of the shaft (4) with one mounting
spanner (9) and secure the stirrer (5) clockwise with the
other(9)grippingtheweldednut(Fig.B).
Note!Tightentheconnectionhandtightatrst,beforeusing
the spanners.
u Align the shaft (4) with the socket (3). Screw the shaft end
with welded nut clockwise into the socket (3) (Fig. C).
u Lock the socket (3) with one mounting spanner (9) and
secure the shaft (4) clockwise with another mounting
spanner (9) gripping the welded nut (Fig. D).
Descargue el manual en Español (PDF, 2.02 MB)
(Piense en el medioambiente y solo imprima este manual si es de verdad necesario)

Loading…

Puntuación

Dé su opinión de la Stanley FME190-QS Mezclador de cemento calificando el producto. ¿Quiere compartir su experiencia con este producto o hacer una pregunta? Deje un comentario en la parte inferior de la página.
¿Estás satisfecho con elStanley FME190-QS Mezclador de cemento?
No
Sea el primero en calificar este producto
0 votos

Únase a la conversación sobre este producto

Aquí puedes compartir lo que piensas sobre Stanley FME190-QS Mezclador de cemento. Si tiene alguna pregunta, primero lea atentamente el manual. Puede solicitar un manual utilizando nuestro formulario de contacto.

Más sobre este manual

Entendemos que es bueno tener un manual en papel para tus Stanley FME190-QS Mezclador de cemento. Siempre puedes descargar el manual desde nuestro sitio web e imprimirlo tú mismo. Si deseas tener un manual original te recomendamos contactar con Stanley. Es posible que puedan proporcionar un manual original. ¿Estás buscando el manual de tu Stanley FME190-QS Mezclador de cemento en otro idioma? Elija su idioma preferido en nuestra página de inicio y busque el número de modelo para ver si lo tenemos disponible.

Especificaciones

Marca Stanley
Modelo FME190-QS
Categoría Mezcladores de cemento
Tipo de archivo PDF
Tamaño del archivo 2.02 MB

Todos los manuales para Stanley Mezcladores de cemento
Más manuales de Mezcladores de cemento

Preguntas frecuentes sobre Stanley FME190-QS Mezclador de cemento

Nuestro equipo de atención al cliente busca información útil sobre los productos y responde a las preguntas frecuentes. Si encuentra inexactitudes en las preguntas frecuentes, indíquenoslo usando nuestro formulario de contacto.

¿Puedo guardar herramientas eléctricas en un cobertizo o garaje? Verificado

En general, las herramientas eléctricas se pueden guardar en un cobertizo o en un garaje, aunque a veces haga frío allí. Sin embargo, para prolongar la vida útil de la herramienta eléctrica, es mejor guardarla en un lugar seco y sin grandes fluctuaciones de temperatura. En un cobertizo o garaje, las diferencias de temperatura pueden provocar la formación de condensación, lo que puede provocar oxidación. Además, las herramientas que funcionan con baterías duran menos y no se cargan tan bien a temperaturas muy bajas. Para estar seguro de cómo debe almacenarse su herramienta eléctrica, lea siempre detenidamente el manual del usuario.

Ha sido de gran ayuda (6) Leer más
Manual de uso Stanley FME190-QS Mezclador de cemento

Productos relacionados

Categorias relacionadas