
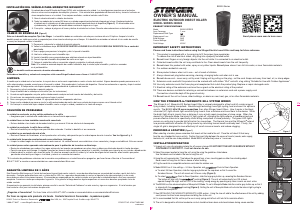
CÓMO ESCOGER UNA UBICACIÓN
Al seleccionar una ubicación, debe recordar que los insectos serán atraídos a la unidad de
m
odo que no debe poner la unidad cerca de donde hay actividad humana. Escoja una
u
bicación alejada unos 7.50 m [25 pies] del área que está tratando de proteger. Si hay una
f
uente de agua cercana, coloque la unidad entre usted y el agua ya que el agua es a menudo un
campo de reproducción para insectos voladores nocivos. Dependiendo en el número del
m
odelo, la unidad está diseñada para cubrir áreas hasta de 1/2 (UV15), 1 (UV40/UVB45) y
1
1/2 (UV801) acres. (Consulte la ilustración 1)
INSTALLACIÓN/OPERACIÓN
1
. Desempaque la unidad, guarde todos los materiales de empaque para almacenarla fuera de
e
stación.
2
. Seleccione la ubicación apropiada para colgar su unidad usando la información anterior.
Para el Modelo UVB45 – use el cordón gratuito incluido en la caja para colgar la unidad.
3. Cuelgue la unidad a unos 2.10 m [7 pies] por encima del suelo en un árbol, poste de
m
ontaje u otro objeto vertical. Nunca monte la unidad en una casa u otro edificio.
4
. Enchufe el cordón en un cordón de extensión compatible certificado para uso exterior.
5
. La unidad estará encendida una vez que sea conectada a una fuente eléctrica. Esta unidad
n
o tiene un interruptor “on/off” [encender/apagar]. Deje pasar hasta 5 minutos para que la bombilla se encienda completamente.
6
. Esta unidad está diseñada para soportar lluvias moderadas pero debe desmontarse y almacenarse bajo techo durante épocas de clima severo.
7
. Se recomienda que esta unidad sea puesta en uso a principios de primavera y dejada hasta fines de otoño para reducir eficazmente la población de insectos.
8. Para incrementar la eficacia de la unidad, se pueden usar los señuelos disponibles (ver “accesorios”) ya que añaden un olor químico para atraer a los insectos a la unidad.
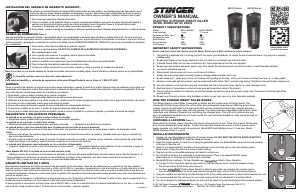
9. El modelo UVB45 tiene 2 ajustes – Operación de 24 Horas u Operación Automática. (Consulte la ilustración 2)
1. Para seleccionar la Operación de 24 Horas, deslice el botón gris en la tapa hacia abajo en la modalidad . La unidad permanecerá encendida 24 horas al día.
2. Para seleccionar la Operación Automática, deslice el botón gris en la tapa hacia arriba en la modalidad . La unidad se encenderá automáticamente al anochecer, operará
durante toda la noche y se apagará en la mañana.
INSTALACIÓN DEL SEÑUELO NOSQUITO MOSQUITO OCTENOL
Encontrará un Señuelo NOsquito Mosquito Octenol (NS16) gratuito incluido con la mayoría de los Matamosquitos Stinger. Las investigaciones han demostrado que el Octenol es
e
ficaz en atraer muchas especies de mosquitos y moscas picadoras. El señuelo NOsquito Mosquito Octenol es un potente señuelo de 1660 mg con propiedades de liberación lenta
y aumenta la eficacia de atraer y matar mosquitos con el Matainsectos Stinger.
Para obtener mejores resultados, reemplácelo cada 30 días.
1
. Remueva la cubierta pelando el papel de aluminio.
2
. Los modelos UV15, UV40 y UVB45 tienen un soporte especialmente diseñado incorporado a la base. Basta empujar el señuelo en este soporte. El señuelo debe encajar
firmemente y las lengüetas de tensión deben soportarlo apretado en su sitio.
3. Para removerlo – separe las lengüetas de tensión con sus dedos, tire del señuelo y descarte debidamente en un recipiente para basura.
4. La unidad modelo UV801 tiene un pequeño casete que sostiene el señuelo. Basta colocar el señuelo dentro del casete y fijarlo al cuerpo de la jaula.
CAMBIO DE BOMBILLAS
Use sólo bombillas de reemplazo StingerMC. Estas bombillas tienen una vida útil promedio de 1,000 horas y deben reemplazarse anualmente para mantener su óptima eficiencia
ultravioleta. Aunque la luz de las bombillas pueda ser visible para usted, su capacidad de atraer insectos disminuye con el paso del tiempo. Si la bombilla no se enciende o el
color de la luz cambia a amarillo o naranja es tiempo de reemplazar la bombilla. (Consulte la ilustración 3)
1. Desenchufe y retire la unidad completa de su posición colgante.
2. Voltee la unidad boca abajo, abra la tapa de la bombilla y remueva la bombilla usada.
3. Inserte la nueva bombilla asegurándose que esté debidamente asentada en su receptáculo.
4. Cierre la tapa de la bombilla encajándola en su sitio.
5. Coloque la unidad nuevamente en su posición colgante y vuélvala a enchufar en el tomacorrientes.
Nota: Si la unidad no se enciende después de reemplazar la bombilla, bájela, retire la bombilla y vuélvala a colocar en el receptáculo.
LIMPIEZA
Como la unidad mata a los insectos, la mayoría de sus restos serán vaporizados o caerán a través de la unidad. Algunos restos se quedáran en las rejillas y con el paso del tiempo
reducirán la eficacia de este dispositivo. Asegúrese de limpiar su unidad en forma regular para lograr la máxima eficiencia. El tiempo entre limpiezas variará dependiendo de sus
poblaciones de insectos. Revise su unidad con frecuencia y limpie todos los restos de insectos que vea.
1. Desenchufe y retire la unidad completa de su posición colgante.
2. Remueva la bombilla de la unidad para evitar daños (vea los instrucciones anteriores).
3. Usando una pequeña brocha o varilla, mueva con cuidado todos los restos de insectos del forro exterior y de las rejillas interiores.
4. Si cuenta con aire comprimido, puede usarlo para limpiar su unidad.
5.
Nunca use agua para limpiar su unidad, el agua puede dañar los componentes eléctricos.
6. Tenga mucho cuidado de no mover las rejillas de sus apoyos.
7. Una vez que la unidad esté limpia, vuelva a colocar las bombillas, reponga la unidad en su posición colgante y conecte la fuente de energía.
Nota: Si ocurre un arco eléctrico después de la limpieza, desenchufe la unidad y retírela de la posición colgante. Revise las rejillas y asegúrese que no estén tocando en ningún
punto. Use una varilla para doblar con cuidado las rejillas alejando unas de otras.
CHOOSING A LOCATION
When selecting a location, you want to remember the insects will be lured to the unit
s
o do not put the unit near human activity. Choose a location about 25 feet away from
t
he area you are trying to protect. If there is a water source nearby, place the unit
b
etween you and the water because water is often a breeding ground for flying insect
pests. Depending on the model number, the unit is designed to cover areas up to 1/2
a
cre (UV15), 1 acre (UV40/UVB45), and 1 1/2 acre (UV801). (Fig. 1)
INSTALLATION/OPERATION
1. Unpack unit, save all packaging material for off-season storage.
2
. Select the proper location to hang your unit using the information above. For
M
odel UVB45 – use the bonus cord included in the box to hang the unit.
3
. Hang the unit approximately 7 feet above the ground from a tree, mounting pole or
o
ther free standing object. Never mount the unit from house or other building.
4. Plug cord into a compatible extension cord rated for outdoor use.
5. The unit will be on once it is connected to an electrical source. This unit does not
have an “on/off” switch. Please allow up to 5 minutes for the bulb to light
c
ompletely.
6
. This unit is designed to withstand moderate rain but should be taken down and stored indoors during severe weather.
7
. It is recommended that this unit be put to use in early spring and left out until late fall to maximize effects.
8
. Using the available lures (see “accessories”) will add to the effectiveness of the unit by adding a chemical scent to attract more insects to the unit.
9
. Model UVB45 has 2 settings – 24 Hour Operation or Automatic Operation. (Fig. 2)
a
. To select 24 Hour Operation, slide the grey button on the cap down into the mode. The unit will remain on 24 hours a day.
b
. To select Automatic Operation, slide the grey button on the cap up into the mode. The unit will turn on automatically at dusk, operate through the night
and turn off in the morning.
INSTALLING THE NOSQUITO MOSQUITO OCTENOL LURE
You will find a Nosquito octenol lure (NS16) included with most Stinger Insect Killers. Research has shown that octenol is effective in attracting many species of
mosquitoes and biting flies. This lure has slow release properties and increases the effectiveness of luring mosquitoes to the unit. For best results, replace
e
very 30 days.
1
. Open lure by either removing lure from pouch or peeling off the foil lid.
2. Models UV15, UV40 and UVB45 have a specially designed holder built into the base. Simply push the lure into this holder. The lure should fit snuggly and the
t
ension tabs should hold it tightly in place. (Fig. 3)
3. To remove – spread the tension tabs with your fingers, pull out the lure and discard appropriately in a trash receptacle.
4. Model UV801 unit has a small cassette which holds the lure. Simply place the lure into the cassette and attach to the body of the cage.
CHANGING BULBS
Only use Stinger™ replacement bulbs. These bulbs have an average life of 1000 hours and should be replaced annually to maintain optimal UV effectiveness.
Even though the bulb’s light may be visible to you, its ability to attract insects diminishes over time. If the bulb fails to light or the color of the light changes to
yellow or orange it is time to replace the bulb. (Fig. 4)
1. Unplug and remove entire unit from hanging position.
2. Turn unit upside down, open the bulb cap and remove old bulb.
3. Insert the new bulb making sure it is properly seated in the socket.
4. Close the bulb cap by snapping it into place.
5. Place unit back into the hanging position and plug back into the outlet.
Note: If unit fails to light after replacing bulb, take unit down and remove the bulb and reseat it in the socket.
CLEANING
As the unit kills insects, most of the insect remains will be vaporized or fall down through the unit. Some remains may be left on the grids and over time may
reduce the effectiveness of this device. Make sure to regularly clean your unit to achieve maximum effectiveness. The time in between each cleaning will vary
depending on your insect populations. Check your unit frequently and clean any insect remains you see.
1. Unplug and remove entire unit from hanging position.
2. Remove bulb from unit to avoid damage (see above instructions).
3.
Using a small brush or stick, gently remove any insect remains from outer casing and inner grids.
4. If available, you may use compressed air to clean out your unit.
5. Never use water to clean your unit, water could damage the electrical components.
6. Be very careful not to move the grids from the seatings.
7. Once the unit is clean, replace the bulbs, return the unit to the hanging position and reconnect to power source.
Note: If arcing occurs after cleaning, unplug unit and remove from hanging position. Check the grids and make sure they are not touching in any place. Gently
use a stick to bend grids away from each other.
TROUBLESHOOTING
Symptom:
Solution:
Unit will not light, no apparent grid voltage - Make sure unit is plugged into working outlet.
Unit will not light, grid has voltage - Check bulb to make sure it is seated properly.
- Replace bulb if necessary.
Unit will light, no apparent grid voltage - Unplug unit and check grids to make sure they are not touching and seated properly. Adjust as needed.
Unit appears to be working properly but insect populations do not seem reduced
- Check grids and make sure there is voltage.
- Check surrounding area for sitting water, insects breed in these areas and should be eliminated from the source.
- Allow more time; it will take some time for the insects to find the unit and also for there to be an impact on their reproductive cycles.
-
T
r
y moving the unit to another area of the yard. If you are in between the unit and the source of the insects, they will have to fly by you to get
to the unit and you may actually notice an increase in insects.
Unit is constantly arcing (sparking) - Clean unit per the instructions in the “Cleaning” section of this manual.
- Check the grids and make sure they are not touching, adjust as needed.
If the above troubleshooting doesn’t solve your problems or you have any other questions, please call consumer relations at 800-477-0457 or email
[email protected].
DIAGNÓSTICO Y SOLUCIÓN DE PROBLEMAS
Síntoma Solución
La unidad no se enciende, no parece haber voltaje en la rejilla
- Asegúrese que la unidad esté enchufada en un receptáculo operativo
La unidad no se enciende, la rejilla tiene voltaje - Revise la bombilla para asegurarse que esté debidamente asentada
- Reemplace la bombilla si es necesario
La unidad se enciende, no parece haber voltaje en la rejilla - Desenchufe la unidad y revise las rejillas para asegurar que no estén tocando ningún punto y que estén bien asentadas. Ajuste según sea necesario.
La unidad parece estar funcionando bien pero las poblaciones de insectos - Revise las rejillas y asegúrese que hay voltaje
- Inspeccione los alrededores para ver si hay agua estancada, los insectos se reproducen en estas áreas y deben ser eliminados de la fuente
- Espere más tiempo; se requiere algo de tiempo para que los insectos encuentren la unidad y también para que haya un impacto en sus ciclos reproductivos.
- Pruebe de mover la unidad a otra zona del patio. Si está usted entre la unidad y la fuente de los insectos, ellos tratarán de volar hacia usted para llegar a la unidad y usted puede notar
un incremento en el número de insectos.
La unidad está formando constantemente un arco eléctrico (chispeando - Limpie la unidad de acuerdo a las instrucciones en la sección “Limpieza” de este manual.
- Revise las rejillas y asegúrese que no se estén tocando, ajuste según sea necesario.
Si las indicaciones anteriores no resuelven sus problemas o si tiene otras preguntas, sír
vase llamar a relaciones con el cliente al 800-477-0457 o por correo electrónico a
[email protected].
I
lustración 2
Stinger
Á
rboles
Charca
C
asa
25'
I
lustración 1
I
lustración 2
I
lustración
3
F
igure 1
F
igure 2
F
igure 3
Figure 4


Únase a la conversación sobre este producto
Aquí puedes compartir lo que piensas sobre Stinger UV801 Repelente electrónico las plagas. Si tiene alguna pregunta, primero lea atentamente el manual. Puede solicitar un manual utilizando nuestro formulario de contacto.