FUNCIONAMIENTO DE SU TERMÓMETRO DIGITAL RAPIDREAD DE VICKS
Consejo: para mediciones más rápidas, complete los pasos 1 y 2 antes de insertar el termómetro.
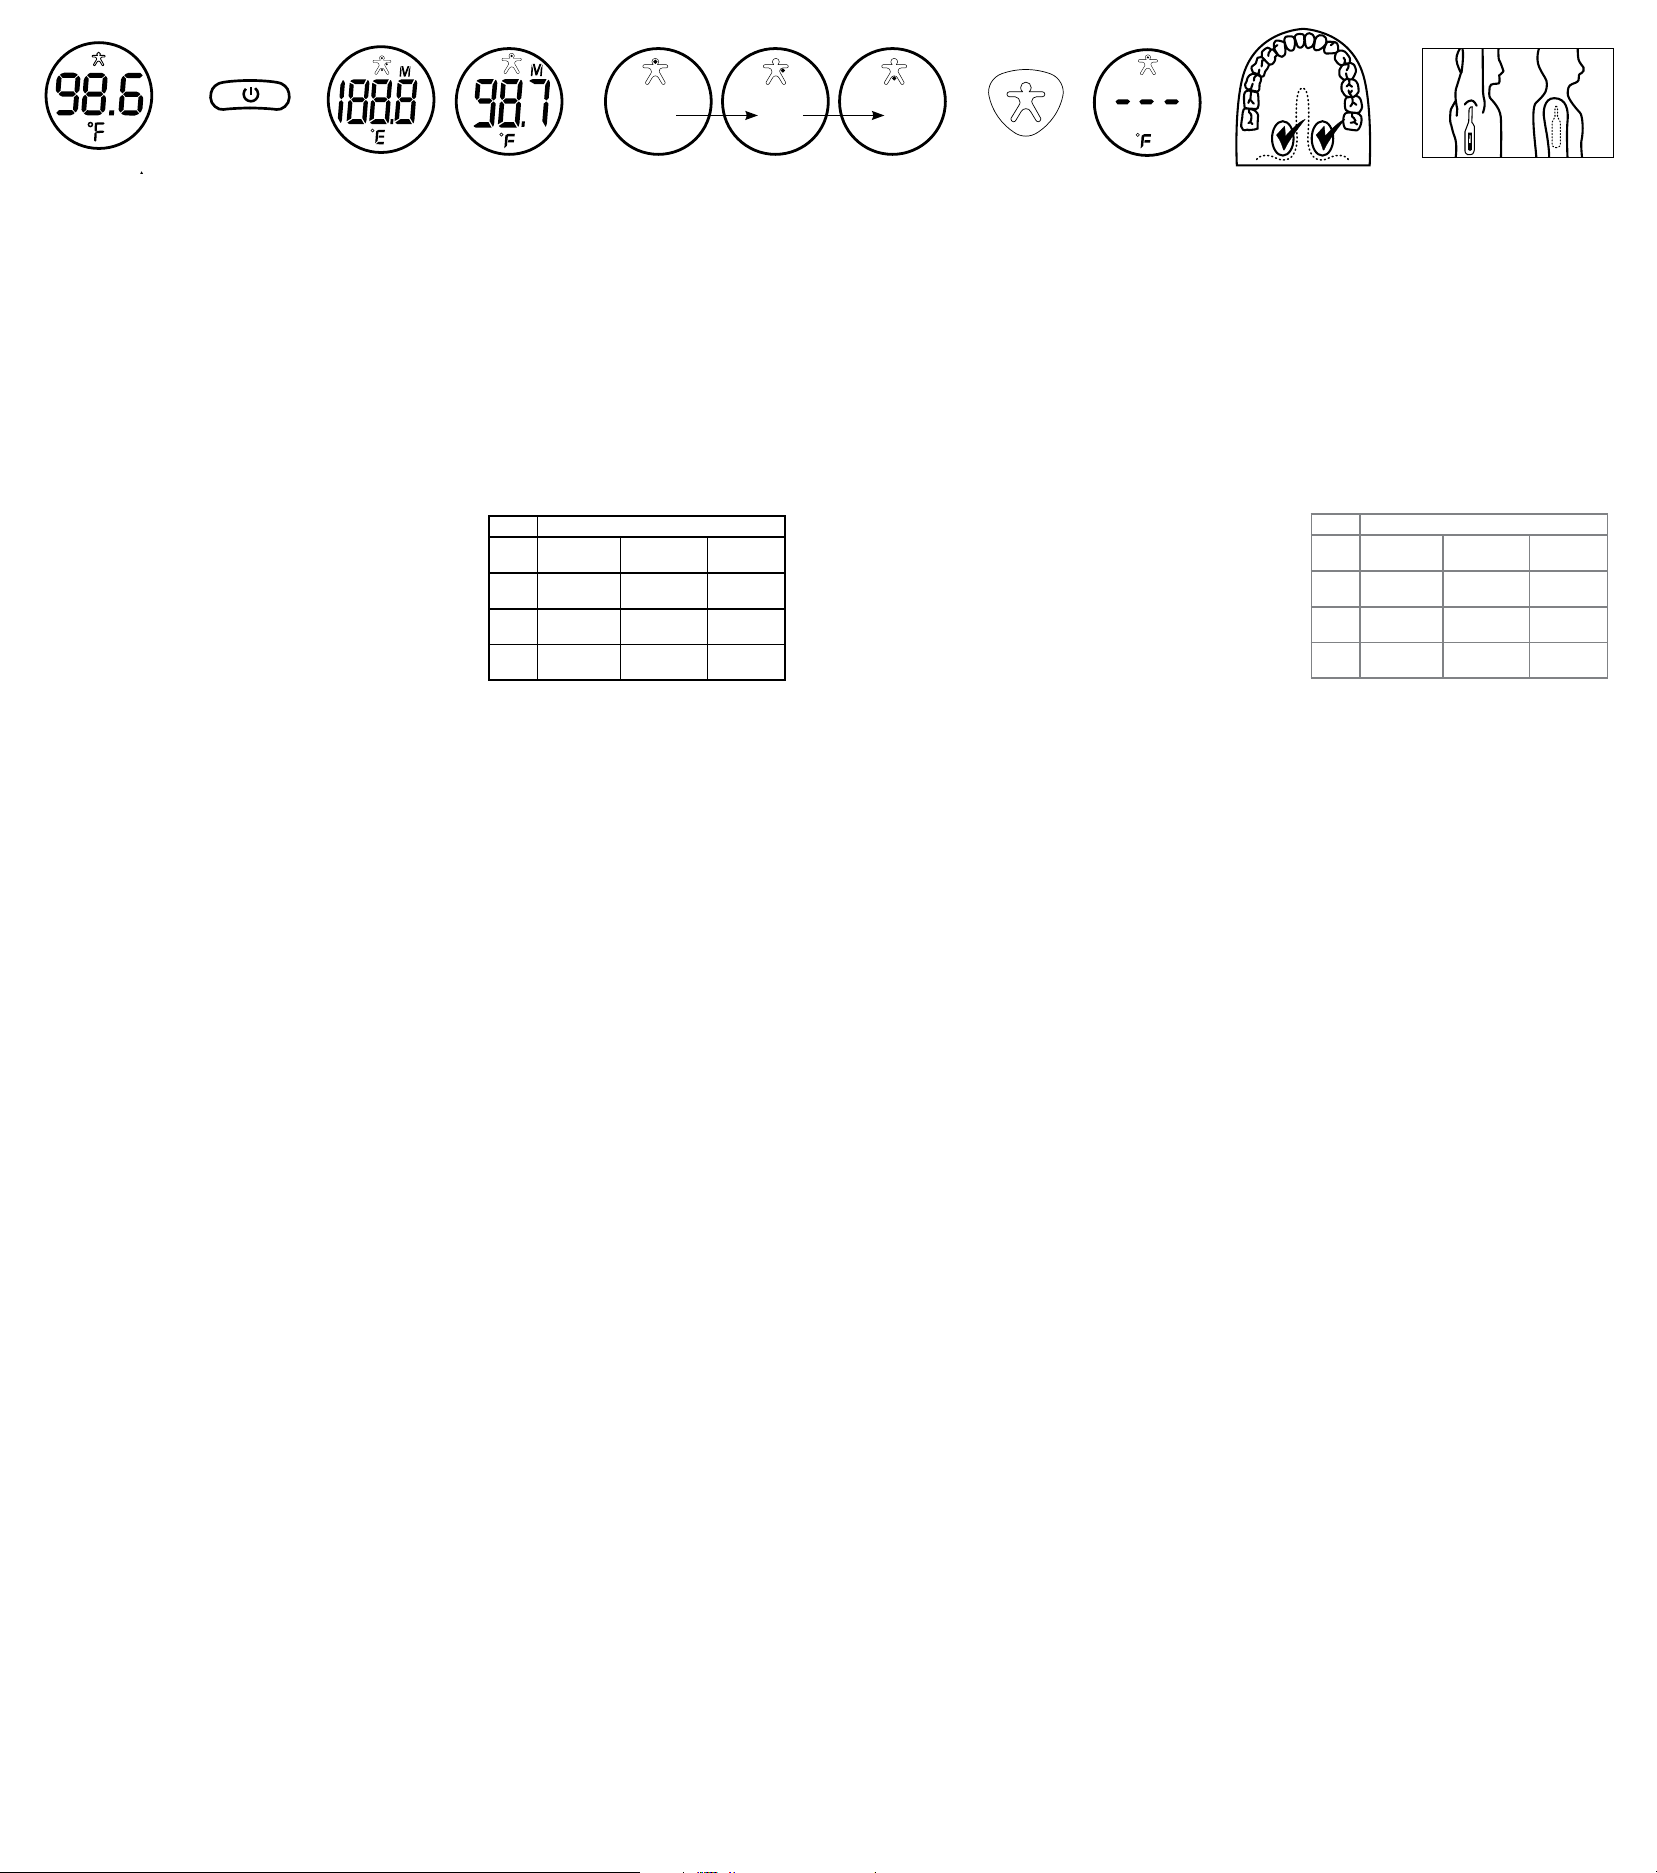
1. ENCENDER LA UNIDAD
a. Encienda la unidad presionando el botón de Encendido/Apagado (Fig. 1).
b. Se escuchará una señal sonora y la pantalla parpadeará en Rojo/Amarillo/Verde durante 1 segundo.
c. Espere a que la unidad esté lista – La pantalla realizará una autocomprobación (Fig. 2).
– La pantalla mostrará la última medición durante 2 segundos (Fig. 3).
– Después de que se muestre la última medición, la pantalla entrará en modo listo (Fig. 4).
2. SELECCIONAR EL ÁREA DE MEDICIÓN DE TEMPERATURA
a. El termómetro entrará en el modo de selección de área después de mostrar la última memoria.
b. Los íconos de selección de sitio circularán de oral a axilar a rectal. (Fig. 4).
c. Cuando el ícono muestre el área de medición deseada, presione y suelte el
botón azul de SELECCIÓN DE ÁREA (Fig. 5).
d. El área elegida parpadeará durante 3 segundos y luego se mostrará la
pantalla de dispositivo listo (Fig. 6). Ahora puede tomar una lectura en el
área que seleccionó.
e. En cualquier momento puede elegir un área alternativa presionando nuevamente el
botón de selección de área (Fig. 5) durante el período de confirmación de 3 segundos.
ADVERTENCIA: Para lecturas precisas, deben coincidir el área seleccionada
en el termómetro con el área de medición en el paciente.
3. TOMAR UNA MEDICIÓN DE TEMPERATURA
Uso Oral
a. Se recomienda utilizar una cubierta en la sonda para el Uso Oral para
prevenir la transmisión de gérmenes.
b. Coloque el termómetro debajo de la lengua. Es importante colocar bien la punta del termómetro debajo de la lengua para obtener una lectura
buena y precisa (Fig. 7). Coloque la punta del sensor en las áreas marcadas con “3”. Mantenga la boca cerrada y no se mueva para ayudar
a asegurar una medición precisa.
c. Cuando la medición esté completa, se escucharán dos pitidos. Puede entonces retirar el termómetro. El termómetro luego emitirá un pitido
con la lectura visualizada.
d. Deseche la cubierta de la sonda usada y lave el termómetro como se recomienda.
Uso Bajo el Brazo (Axilar): Este método se utiliza para bebés y niños pequeños.
a. Limpie la axila con una toalla.
b. Coloque la punta de la sonda debajo del brazo para que la punta toque la piel y coloque el brazo junto a su cuerpo (Fig. 8). Con un niño pequeño,
a veces es útil abrazar al niño para mantener su brazo a un lado de su cuerpo. Esto asegura que el aire de la habitación no afecte la lectura.
c. Cuando la medición esté completa, se escucharán dos pitidos. Puede entonces retirar el termómetro. El termómetro luego emitirá un pitido
con la lectura visualizada.
Nota: Este método produce una temperatura 1° más baja que una temperatura tomada oralmente.
d. Lave el termómetro como se recomienda.
Uso Rectal: Comúnmente se utiliza para bebés, niños pequeños, o cuando se dificulta tomar una temperatura oral o axilar.
a. Cubra la punta del termómetro con una cubierta para sonda y lubrique con un gel a base de agua para facilitar su inserción. NO use vaselina
(petrolato). Lea la etiqueta del lubricante para asegurarse que está utilizando el tipo adecuado.
b. Acueste al paciente de lado. Si el paciente es un bebé, la posición apropiada para un bebé es acostado sobre su estómago con las piernas colgando hacia
abajo, ya sea a través de sus rodillas o en el borde de la cama o cambiador. Esto acomoda el recto del bebé para una inserción segura y fácil del termómetro.
c. Inserte suavemente la punta del termómetro NO MÁS DE 1/2 pulgada (1 cm) en el recto. Si detecta resistencia, deténgase. Sostenga el
termómetro en su lugar durante la medición.
d. Cuando la medición esté completa, se escucharán dos pitidos. Puede entonces retirar el termómetro. El termómetro luego emitirá un pitido
con la lectura visualizada.
Nota: Este método produce una temperatura aproximadamente 1° más alta que una temperatura tomada oralmente.
e. Deseche la cubierta de la sonda usada y lave el termómetro como se recomienda.
4. ESTABLECER UN ÁREA DE MEDICIÓN DE TEMPERATURA PREFERIDA
Para guardar un área de medición de temperatura preferida, de modo que el área preferida se seleccione automáticamente cuando el
termómetro esté ENCENDIDO, siga estos pasos.
a. Asegúrese que el termómetro esté APAGADO.
b. Presione y mantenga presionado el botón azul de SELECCIÓN DE SITIO y, sin soltarlo, luego presione y mantenga presionado el botón gris de
ENCENDIDO. Deje de presionar ambos botones cuando aparezca el ícono de selección de sitio con 3 puntos intermitentes.
c. Presione el botón de SELECCIÓN DE ÁREA hasta que se seleccione el área de medición de temperatura deseada.
d. Espere 4 segundos para que el punto del indicador del área deje de parpadear.
e. Presione el botón de ENCENDIDO para APAGAR el termómetro.
f. El área de medición de temperatura preferida se seleccionará automáticamente cuando el termómetro se ENCIENDA.
NOTA: Con un área de medición de temperatura preferida seleccionada, se puede seguir seleccionando un área de medición de temperatura alternativa
durante cada uso presionando el botón azul de SELECCIÓN DE ÁREA cuando el ícono de selección de área aparezca después de ENCENDER el termómetro.
g. Para quitar el ajuste de área de medición de temperatura preferida, abra la tapa de la pila, retire la pila y vuelva a insertarla.
IMPORTANTE: Para asegurar lecturas precisas, debe siempre tomar una lectura de la temperatura en el área en el paciente que corresponda al área
seleccionada en el termómetro (oral, axilar, o rectal).
5. FUNCIÓN DE PRECISION INSIGHT
Precisión InSight
®
le ayuda a entender mejor el significado de la temperatura de su hijo con el color indicado en la pantalla. La pantalla
muestra Verde si no hay fiebre, Amarillo si hay fiebre, y Rojo si hay fiebre alta. Con Precisión InSight
®
, el color de la pantalla se
personaliza basado en el sitio de medición como se muestra en la gráfica de la derecha.
6. APAGAR LA UNIDAD
Apague el termómetro presionando el botón de Encendido/Apagado. Si se le olvida apagarlo, el termómetro se apagará automáticamente
después de aproximadamente 30 segundos.
OPERATING YOUR VICKS RAPIDREAD DIGITAL THERMOMETER
Tip: For fastest measurements, complete steps 1 and 2 before inserting the thermometer.
1. TURNING THE UNIT ON
a. Turn unit on by pressing the On/Off button (Fig. 1).
b. A beep will sound and the display will flash Red/Yellow/Green for 1 second.
c. Wait for unit to get ready – The display will perform a self-test (Fig. 2).
– The display will show last measurement for 2 seconds (Fig. 3).
– After last measurement is displayed, the display will enter ready mode (Fig. 4).
2. SELECTING A TEMPERATURE MEASUREMENT SITE
a. After the last memory is displayed, the thermometer enters the site selection mode.
b. The site selection icons will cycle from oral to underarm to rectal. (Fig. 4).
c. When the icon displays the desired measurement site, press and release
the blue SITE SELECTION button (Fig. 5).
d. The chosen site will flash for 3 seconds and then display the ready screen
(Fig. 6). You may now take a reading at the site you selected.
e. You may choose an alternate site by pressing the site selection button
again (Fig. 5) at any time during the 3 second confirmation period.
WARNING: For accurate readings, you must match the site selected on
the thermometer with the measurement site on the patient.
3. TAKING A TEMPERATURE MEASUREMENT
Oral Use:
a. It is suggested to use a probe cover for Oral Use to prevent the spread of germs.
b. Place thermometer under the tongue. It is important to place the tip of the thermometer well under the tongue to get a good, accurate
reading. (Fig. 7) Place sensor tip in areas marked with “3”. Keep mouth closed and sit still to help ensure an accurate measurement.
c. When the measurement is complete, two beeps will sound. You may then remove the thermometer. The thermometer will then beep
with the displayed reading.
d. Dispose of used probe cover and wash the thermometer as recommended.
Under-the-arm (Axillary) Use: This method is used for babies and young children.
a. Wipe the underarm with a towel.
b. Place the probe tip under the arm so the tip is touching the skin and position your arm next to your body (Fig. 8) . With a young child,
it is sometimes helpful to hug the child to keep their arm next to their body. This ensures that the room air does not affect the reading.
c. When the measurement is complete, two beeps will sound. You may then remove the thermometer. The thermometer will then beep
with the displayed reading.
Note: This method may produces a temperature 1° lower than a temperature taken orally.
d. Wash the thermometer as recommended.
Rectal Use: Commonly used for babies, young children, or when it is difficult to take an oral or underarm temperature.
a. Cover the thermometer’s tip with a probe cover and lubricate with a water-soluble jelly for easier insertion. DO NOT use petroleum jelly. Read
the label of the lubricant to be sure you are using the right kind.
b. Lay the patient on his/her side. If the patient is an infant, the proper position for a baby is to lay on its stomach with legs hanging down, either
across your knees or at the edge of a bed or changing table. This positions the infant’s rectum for safe and easy insertion of the thermometer.
c. Gently insert the tip of the thermometer NO MORE THAN 1/2 inch into the rectum. If you detect resistance, stop. Hold the thermometer in
place during measurement.
d. When the measurement is complete, two beeps will sound. You may then remove the thermometer. The thermometer will then beep with the
displayed reading.
Note: This method produces a temperature approximately 1° higher than a temperature taken orally.
e. Dispose of used probe cover and wash the thermometer as recommended.
4. SET A PREFERRED TEMPERATURE MEASUREMENT SITE
To save a preferred temperature measurement site, so that the preferred site will be automatically selected when the thermometer is turned ON,
follow these steps.
a. Make sure the thermometer is turned OFF.
b. Press and hold the blue SITE SELECTION button and, without releasing it, then press and hold the gray POWER button. Release both buttons
when the site selection icon appears with 3 flashing dots.
c. Press the SITE SELECTION button until the desired temperature measurement site is selected.
d. Wait 4 seconds for the site indicator dot to stop flashing.
e. Press the POWER button to turn the thermometer OFF.
f. The preferred temperature measurement site will be automatically selected when the thermometer is turned ON.
NOTE: With a preferred temperature measurement site selected, an alternate temperature measurement site can still be selected during each use
by pressing the blue SITE SELECTION button when the site selection icon appears after the thermometer is turned ON.
g. To remove the preferred temperature measurement site setting, open the battery door, remove the battery and reinsert it.
IMPORTANT: To ensure accurate readings, you must always take a temperature reading at the site on the patient that corresponds to the site
selected on the thermometer (oral, underarm, or rectal).
5. PRECISION INSIGHT FEATURE
Precision InSight
®
helps you to better understand the meaning of your child’s temperature with the color indicated on the display. The screen
displays Green if no fever, Yellow if fever, and Red if high fever. With Precision InSight
®
, the screen color is customized based upon the
measurement site as shown on the chart to the right.
6. TURNING THE UNIT OFF
Turn the thermometer off by pressing the On/Off button. If you forget to turn it off, the thermometer will automatically turn off after approximately
30 seconds.
Site Temperature Ranges and Meaning
Oral
96.4 - 99.4°F
35.8 - 37.4 °C
99.5 - 101.3 °F
37.5 - 38.5 °C
101.4+ °F
38.6+ °C
Under-
arm
96.2 - 99.2 °F
35.7 - 37.3 °C
99.3 - 101.1 °F
37.4 - 38.4 °C
101.2+ °F
38.5+ °C
Rectal
97.3 - 100.3 °F
36.3 - 37.9 °C
100.4 - 102.2 °F
38.0 - 39.0 °C
102.3+ °F
39.1+ °C
Normal
(Green)
Fever
(Yellow)
High Fever
(Red)
Área Rangos de Temperatura y Significados
Oral
96.4 - 99.4°F
35.8 - 37.4 °C
99.5 - 101.3 °F
37.5 - 38.5 °C
101.4+ °F
38.6+ °C
Axilar
96.2 - 99.2 °F
35.7 - 37.3 °C
99.3 - 101.1 °F
37.4 - 38.4 °C
101.2+ °F
38.5+ °C
Rectal
97.3 - 100.3 °F
36.3 - 37.9 °C
100.4 - 102.2 °F
38.0 - 39.0 °C
102.3+ °F
39.1+ °C
Normal
(Verde)
Fiebre
(Amarillo)
Fiebre alta
(Rojo)
IMPORTANTE: Antes de usar por
primera vez, quite la etiqueta
de la pantalla.
Fig. 7 Fig. 8Fig. 1 Fig. 2 Fig. 3
Fig. 6
Fig. 5Fig. 4
IMPORTANT: Before first use,
remove label from the display.


Únase a la conversación sobre este producto
Aquí puedes compartir lo que piensas sobre Vicks VDT972US Termómetro. Si tiene alguna pregunta, primero lea atentamente el manual. Puede solicitar un manual utilizando nuestro formulario de contacto.