Settings
This table below helps you to select the basic settings
for the ingredients you want to prepare.
Min. - max.
amount
(g)
Time
(mins.)
Temp.
(°C)
Extra
informaton
Thin
frozen fries
300-700 9-16 200
Thick frozen
fries
300-700 11-20 200
Home-made
fries
300-800 16-20 200
Home-made
potato wedges
300-800 18-22 180
Home-made
potato cubes
300-750 12-18 180
Rosti 250 15-18 180
Potato gratin 500 15-18 200
Steak 100-500 8-12 180
Pork chops 100-500 10-14 180
Hamburger 100-500 7-14 180
Sausage roll 100-500 13-15 200
Drumsticks 100-500 18-22 180
Chicken breast 100-500 10-15 180
Spring rolls 100-400 8-10 200
Frozen chicken
nuggets
100-500 6-10 200
Frozen fish
fingers
100-400 6-10 200
Frozen bread
crumbed cheese
snacks
100-400 8-10 180
Stuffed
vegetables
100-400 10 160
Cake 300 20-25 160
Quiche 400 20-22 180
Muffins 300 15-18 200
Sweet snacks 400 20 160
= Shaking ingredients halfway through the
preparation time.
= Add 1/2 tbsp. of oil.
= Use oven-ready.
= Use baking tin / oven dish.
MAKING HOME-MADE FRIES
1. Make the potatoes peel and slice.
2. Wash the potato sticks thoroughly and dry them
with kitchen paper.
3. Pour 1/2 tablespoon of olive oil in a bowl, put the
sticks on top and mix until the sticks are coated
with oil.
4. Remove the sticks from the bowl with your fingers
or a kitchen utensil so that excess oil stays behind
in the bowl. Put the sticks in the basket.
5. Fry the potato sticks according to the instructions
in the section “Settings”.
CARE AND MAINTENANCE
1. Remove the mains plug from the wall socket and
make sure the appliance is cooled down.
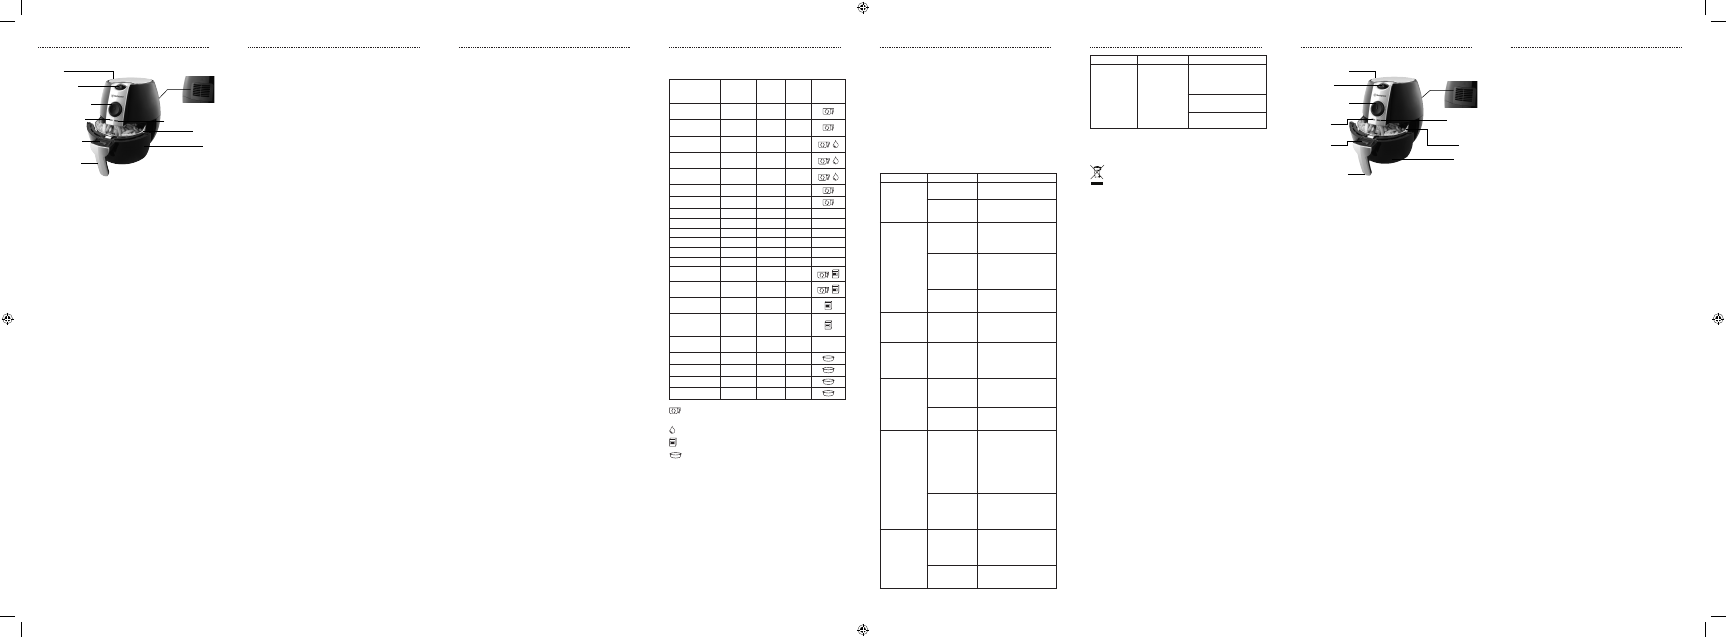
Air outlet
openings
Heating-up light
Basket
Pan
Aberturas de
salida de aire
Indicador
luminoso de
calentamiento
Cesta
Cubeta
1 2 3 764 5
English Español
Air inlet
Temperature
control knob
Timer / power-on
knob
Power ON light
Basket release
button
Basket handle
Entrada de aire
Control de
temperatura
Temporizador /
interruptor de
encendido
Indicador
luminoso de
encendido
Botón de
liberación de la
cesta
Asa de la cesta
INTENDED USE
This device is suitable for frying food only. Any other
use may result in damage to the device or injuries.
IMPORTANT SAFEGUARDS
General
1. Read this manual before rst use thoroughly. It
contains important information for your safety
as well as for the use and maintenance of the
equipment. Keep these instructions for future
reference and pass it on with the device.
2. Pay particular attention to the warnings on the
device and in this instruction manual.
3. Use the device only for its intended purpose.
Improper use may lead to hazards.
4. This device is designed for household use only,
not for staff kitchen areas in shops, offices and
other working environments, farm houses, by
clients in hotels, motels and other residential
type environments, bed and breakfast type
environments use. It is not suitable for commercial
use.
5. In the event of improper use or wrong operation,
we do not accept any liability for resulting
damages.
6. The use of accessories and components not
expressly recommended by the manufacturer
may result in injuries or damages and voids the
warranty.
7. This device is not intended to be used by persons
(including children) with reduced physical, sensory
or mental abilities or lack of experience and /
or lack of knowledge unless they are supervised
by a person responsible for their safety or have
received instructions on how to use the device.
8. Children should be supervised to ensure that they
do not play with the device.
9. Never leave the device unsupervised while it is
switched on.
10. Do not place heavy objects on top of the device.
11. Never immerse electrical parts of the device in
water during cleaning or operation. Never hold the
device under running water.
12. Do not under any circumstances attempt to repair
the device yourself. For servicing and repairs,
please consult an authorised dealer or qualified
customer service centre.
13. This device should not be operated with an
external clock timer or separate remote control
system.
Power supply
1. The mains voltage must match the information on
the rating label of the device.
2. The power plug is used as the disconnect device.
Please be sure that the power plug is in operable
condition.
3. Only removing the power plug can separate the
device completely from the mains supply.
4. Avoid damages to the power cord that may be
caused by kinks or contact with sharp corners.
5. Make sure, the device, including power cord and
power plug are not exposed to hot surfaces.
6. Only unplug from the power outlet by the plug
itself. Do not pull on the cord.
7. Disconnect the power plug when the device is not
in use, in case of malfunctions, prior to attaching
accessories and prior to each cleaning.
8. If the power cord or the casing of the device is
damaged or if the device is dropped, the device
may not be used before it is examined by a
professional electrician.
9. A damaged power cord may only be replaced by
the manufacturer or a workshop commissioned by
the manufacturer or by a similarly qualified person
in order to avoid hazards.
Installation location
1. Place the device on a at, sturdy and heat-resistant
surface.
2. Put the device in a place which is out of reach of
children.
3. Do not operate this device near ammable
materials (e.g. curtains, textiles, walls) and never
cover it. Ensure that there is always a sufficient
safe distance from ammable materials.
4. Use this device in dry indoor areas only and never
outdoors.
5. Warning: Do not use this device near water or
heavy moisture; e.g. in a damp basement or beside
a swimming pool or bathtub.
6. In order to reduce the risk of fire and electric
shock, do not expose the device to fire (fireplace,
grill, candles, cigarettes and so on) or water (water
drops, water splashes, vases, tubs, ponds and so
on).
7. Keep this device away from all heat sources like
for example, ovens, hot plates and other heat-
producing devices/objects.
8. Protect this device from extreme heat (over
35°C) and cold (under 5°C) as well as from direct
sunlight and dust.
Specific safety instructions
1. Do not cover the air inlet and the air outlet when
the appliance is working.
2. Fill the pan with oil may cause a re hazard.
3. During hot air frying, hot steam is released through
the air outlet openings. Keep your hands and face
at a safe distance from the steam and form the air
outlet openings.
4. Also be careful of hot steam and air when you
remove the pan from the appliance.
5. Clean the device and other accessories after
each use. Refer to the Chapter CARE AND
MAINTENANCE.
BEFORE FIRST USE
1. Carefully take the device and its accessories out of
the packaging. Retain the packaging in case you
would like to store the device away or transport
it at a later date. If you choose to dispose of the
packaging, then please do so according to the
applicable legal regulations.
2. Check the packaging contents for completeness
and damages. Should the contents in the
packaging not be complete or be damaged, do
not use the device. Return it to your retail outlet
immediately.
3. Clean the device and all accessories before
the first use. Refer to the chapter CARE AND
MAINTENANCE.
USING THE RAPID AIR FRYER
1. Carefully pull the pan out of the fryer.
2. Place the ingredients in the basket.
3. Slide the pan back into the fryer.
WARNING: Never use the pan without the basket
in it.
CAUTION: Do not touch the pan during and in
short-time after use, as it gets very hot. Only hold
the pan by the handle.
4. Turn the temperature control knob to the proper
temperature. You may refer section ‘Settings’ to
determine the right temperature .
5. Determine the required preparation time for the
ingredient. You may refer section ‘Settings’ to
determine the required preparation time.
6. To switch on the appliance, turn the timer knob to
the required preparation time.
• The timer starts counting down the set preparation
time.
• During the hot air frying process, the heating-up
light comes on and goes out from time to time.
This indicates that the heating element is switched
on and off to maintain the set temperature.
• Excess oil from the ingredients is collected on the
bottom of the pan.
• Some ingredients require to shake halfway during
the preparation time. By this way, pull the pan out
of the appliance by the handle and shake it. Then
slide the pan back into the fryer.
7. When you hear the timer bell, the set preparation
time has elapsed. Pull the pan out of the appliance
and place it on the heat-resistant holder.
• You can manually switch off the appliance by
turning timer knob to zero anticlockwise.
• Press the basket release button and lift the basket
out of the pan, empty the basket into a bowl or
onto a plate.
Tips
• Add 3 minutes to the preparation time when you
start frying while the fryer is cold.
• Shaking smaller ingredients halfway during the
preparation time optimizes the end result and can
help prevent unevenly fried ingredients.
• Add some oil to fresh potatoes for a crispy result.
Fry your ingredients in the fryer within a few
minutes after you adding the oil.
• Do not prepare extremely greasy ingredients such
as sausages in the air fryer.
• Snacks can be prepared in an oven can also be
prepared in the air fryer.
• Place a baking tin or oven dish in air fryer basket if
you want to bake a cake or quiche or if you want
to fry fragile ingredients or filled ingredients.
• You can also use the air fryer to reheat ingredients.
To reheat ingredients, set the temperature to 150°C
for up to 10 minutes.
USO
Este dispositivo solo es adecuado para freír alimentos.
Cualquier otro uso puede dañar el aparato o provocar
heridas
MEDIDAS IMPORTANTES DE SEGURIDAD
General
1. Lea atentamente este manual antes de
usarlo por primera vez. Contiene información
importante para su seguridad, así como para el
uso y mantenimiento del equipo. Guarde estas
instrucciones para futura referencia y transmítalas
con el aparato.
2. Preste especial atención a las advertencias
presentes en el aparato y en este manual de
instrucciones.
3. Utilice el aparato sólo para los fines previstos. El
uso inadecuado puede dar lugar a riesgos.
4. Este aparato está diseñado sólo para uso
doméstico. No es adecuado para uso comercial.
5. En el caso de uso incorrecto o mal funcionamiento,
no aceptamos ninguna responsabilidad por los
daños resultantes.
6. El uso de accesorios y componentes que no estén
expresamente recomendados por el fabricante
puede resultar en lesiones o daños y anula la
garantía.
7. Este aparato no está diseñado para ser utilizado
por personas (incluidos niños) con discapacidades
físicas, sensoriales o mentales o falta de
experiencia y/o conocimiento, a menos que estén
supervisados por una persona responsable de su
seguridad o hayan recibido instrucciones sobre
cómo utilizar el aparato.
8. Es necesario supervisar a los niños para asegurarse
de que no jueguen con el dispositivo.
9. No deje el aparato desatendido mientras está
encendido.
10. No coloque objetos pesados sobre la parte
superior del dispositivo.
11. No sumerja las piezas eléctricas del dispositivo
en agua durante la limpieza o funcionamiento. No
sujete el dispositivo bajo agua corriente.
12. Bajo ninguna circunstancia intente reparar
el aparato usted mismo. Para reparaciones y
operaciones de mantenimiento, consulte a un
distribuidor autorizado o centro de atención al
cliente cualificado.
13. Este aparato no debe utilizarse con un
temporizador externo o un sistema separado de
control remoto.
2. Wipe the outside of the appliance with a moist
cloth.
3. Clean the pan and basket with hot water, some
washing-up liquid and a non-abrasive sponge.
NOTE: The pan and basket are dishwasher-proof.
5. Clean the inside of the appliance with hot water
and non-abrasive sponge.
6. Clean the heating element with a cleaning brush to
remove any food residues.
CAUTION: Never use solvents and abrasives, hard
brushes, metallic or sharp objects for cleaning.
Solvents are harmful to health and attack the plastic
parts. Abrasive cleaners and tools scratch the surface.
TROUBLESHOOTING
Problem Possible cause Solution
The air fryer
does not work
The appliance is
not plugged in
Put the mains plug in an
earthed wall socket
You have not set
the timer
Turn the timer knob to the
required preparation time
to switch on the appliance
The ingredients
fried with the
air fryer are
not done
The amount of
ingredients
in the basket is
too big
Put smaller batches of
ingredients in the basket.
Smaller batches are fried
more evenly
The set
temperature is
too low
Turn the temperature
control knob to the
required temperature
setting (see section
‘Settings’)
The preparation
time is too short
Turn the timer knob to the
required preparation time
(see section ‘Settings’)
The ingredients
are fried
unevenly in the
air fryer
Ingredients that
lie on top of
or across each
other (e.g. fries)
Shake the ingredients
halfway through the
preparation time
Fried snacks
are not crispy
when they
come out of
the air fryer
You used a type
of snacks meant
to be prepared
in a traditional
deep fryer
Use oven snacks or lightly
brush some oil onto the
snacks for a crispier result
I cannot slide
the pan into
the appliance
properly
There are
too many
ingredients in
the basket
Put smaller batches of
ingredients in the basket
The basket is
not placed in the
pan correctly
Push the basket down
into the pan until you hear
a click
White smoke
comes out of
the appliance
You are
preparing greasy
ingredients
When you fry greasy
ingredients in the air fryer,
a large amount of oil will
leak into the pan. The oil
produces white smoke and
the pan may heat up more
than usual. This does not
affect the appliance or the
end result
The pan still
contains grease
residues from
previous use
White smoke is caused by
grease heating up in the
pan. Make sure you clean
the pan properly after
each use
Fresh fries are
fried unevenly
in the air fryer
You did not soak
the potato sticks
properly before
you fried them
Soak the potato sticks
in a bowl for at least 30
minutes, take them out
and dry them with kitchen
paper
You did not use
the right potato
type
Use fresh potatoes and
make sure they stay firm
during frying
8
Fuente de alimentación
1. La tensión de red debe coincidir con la
información en la etiqueta del dispositivo.
2. El cable de alimentación se utiliza como
dispositivo de desconexión. Asegúrese de que
el cable de alimentación esté en condiciones de
funcionamiento.
3. Sólo retirando el cable de alimentación se puede
separar completamente el dispositivo de la red
eléctrica.
4. Evite daños al cable de alimentación que puedan
ser causados por torceduras o el contacto con
bordes afilados.
5. Asegúrese de que el dispositivo, incluyendo el
cable de alimentación y el enchufe, no se exponga
a superficies calientes.
6. Asegúrese de que no se puede tirar del cable.
Coloque el cable de manera que no se pueda
tropezar con él. No se recomienda utilizar cables
de extensión con las freidoras.
7. Desconectar de la toma de corriente solo
mediante el enchufe. No tire del cable.
8. Si el cable de alimentación o la carcasa del
dispositivo están dañados o si el dispositivo se ha
caído, el dispositivo no puede utilizarse antes de
ser examinado por un electricista profesional.
9. Un cable de alimentación dañado sólo puede
ser reemplazado por el fabricante, un taller
encargado por el fabricante o por una persona
calificada para evitar riesgos.
Ubicación de la instalación
1. Coloque el aparato sobre una supercie plana,
sólida y resistente al calor.
2. Coloque el dispositivo en un lugar que esté fuera
del alcance de los niños.
3. No utilice este dispositivo cerca de materiales
inamables (por ejemplo, cortinas, textiles,
paredes) y no lo cubra. Asegúrese de que siempre
existe una distancia de seguridad suficiente
respecto a los materiales inamables.
4. Utilice este aparato sólo en interiores secos y
nunca al aire libre.
5. Advertencia: No utilice este aparato cerca del
agua o humedad pesada, por ejemplo, en un
sótano húmedo o al lado de una piscina o bañera.
6. Con el fin de reducir el riesgo de fuego o descarga
eléctrica, no exponga el aparato al fuego
(chimenea, parrilla, velas, cigarrillos y otros)
o agua (gotas de agua, salpicaduras de agua,
oreros, bañeras, estanques y similares).
7. Mantenga el aparato alejado de fuentes de calor
como por ejemplo, hornos, placas calientes y
otras fuentes de calor.
8. Proteja este dispositivo contra el calor (más de 35
°C) y el frío (menos de 5 °C) excesivos, así como
de la luz solar directa y el polvo.
Instrucciones específicas de seguridad
1. No cubra las aperturas de entrada y salida de aire
cuando el aparato esté en funcionamiento.
2. Llenar la cubeta de aceite puede provocar riesgo
de incendio.
3. Al freír con aire caliente, el aparato libera vapor
caliente a través de las aperturas para salida de
aire. Mantenga las manos y la cara a una distancia
segura del vapor y de las aperturas de salida de
aire.
4. Tenga cuidado con el aire y el vapor caliente al
retirar la cubeta del aparato.
5. Limpie el aparato y otros accesorios tras
Problem Possible cause Solution
Fresh fries
are not crispy
when they
come out of
the air fryer
The crispiness
of the fries
depends on the
amount of oil
and water in the
fries
Make sure you dry the
potato sticks properly
before you add the oil
Cut the potato sticks
smaller for a crispier result
Add slightly more oil for a
crispier result
DISPOSAL
Proper disposal of this product.
This label indicates that, in the EU, electronic
devices cannot be disposed of with regular
household waste.
Please use the return or collections systems of
your municipality or contact the seller where you
purchased this product.
INFORMATION AND SERVICE
If you have question or concerns about your product,
please visit our website:
www.westinghouse-lifestyle.com, or contact our
oversea offices/agents.
In line with our policy of continuous product
development, we reserve the right to change product,
packaging and documentation specifications without
notice.

Únase a la conversación sobre este producto
Aquí puedes compartir lo que piensas sobre Westinghouse WKAF988 Freidora. Si tiene alguna pregunta, primero lea atentamente el manual. Puede solicitar un manual utilizando nuestro formulario de contacto.
responder | Ha sido de gran ayuda (0)
responder | Ha sido de gran ayuda (0)