Manual de uso Yuraku Yur.Cam DPC13 Cámara digital

¿Necesita un manual para su Yuraku Yur.Cam DPC13 Cámara digital? A continuación puedes ver y descargar el manual en PDF gratis en español. Este producto actualmente tiene 7 preguntas frecuentes, 0 comentarios y tiene 0 votos. Si este no es el manual que desea, , contáctenos.

¿Su producto tiene algún defecto y el manual no ofrece ninguna solución? Vaya a Repair Café para solicitar un servicio de reparación gratuito.

Manual de uso

Loading…
Yur.Cam DPC13 Yur.Cam DPC13 Yur.Cam DPC13
All specification and information are subject to changes without further notice.
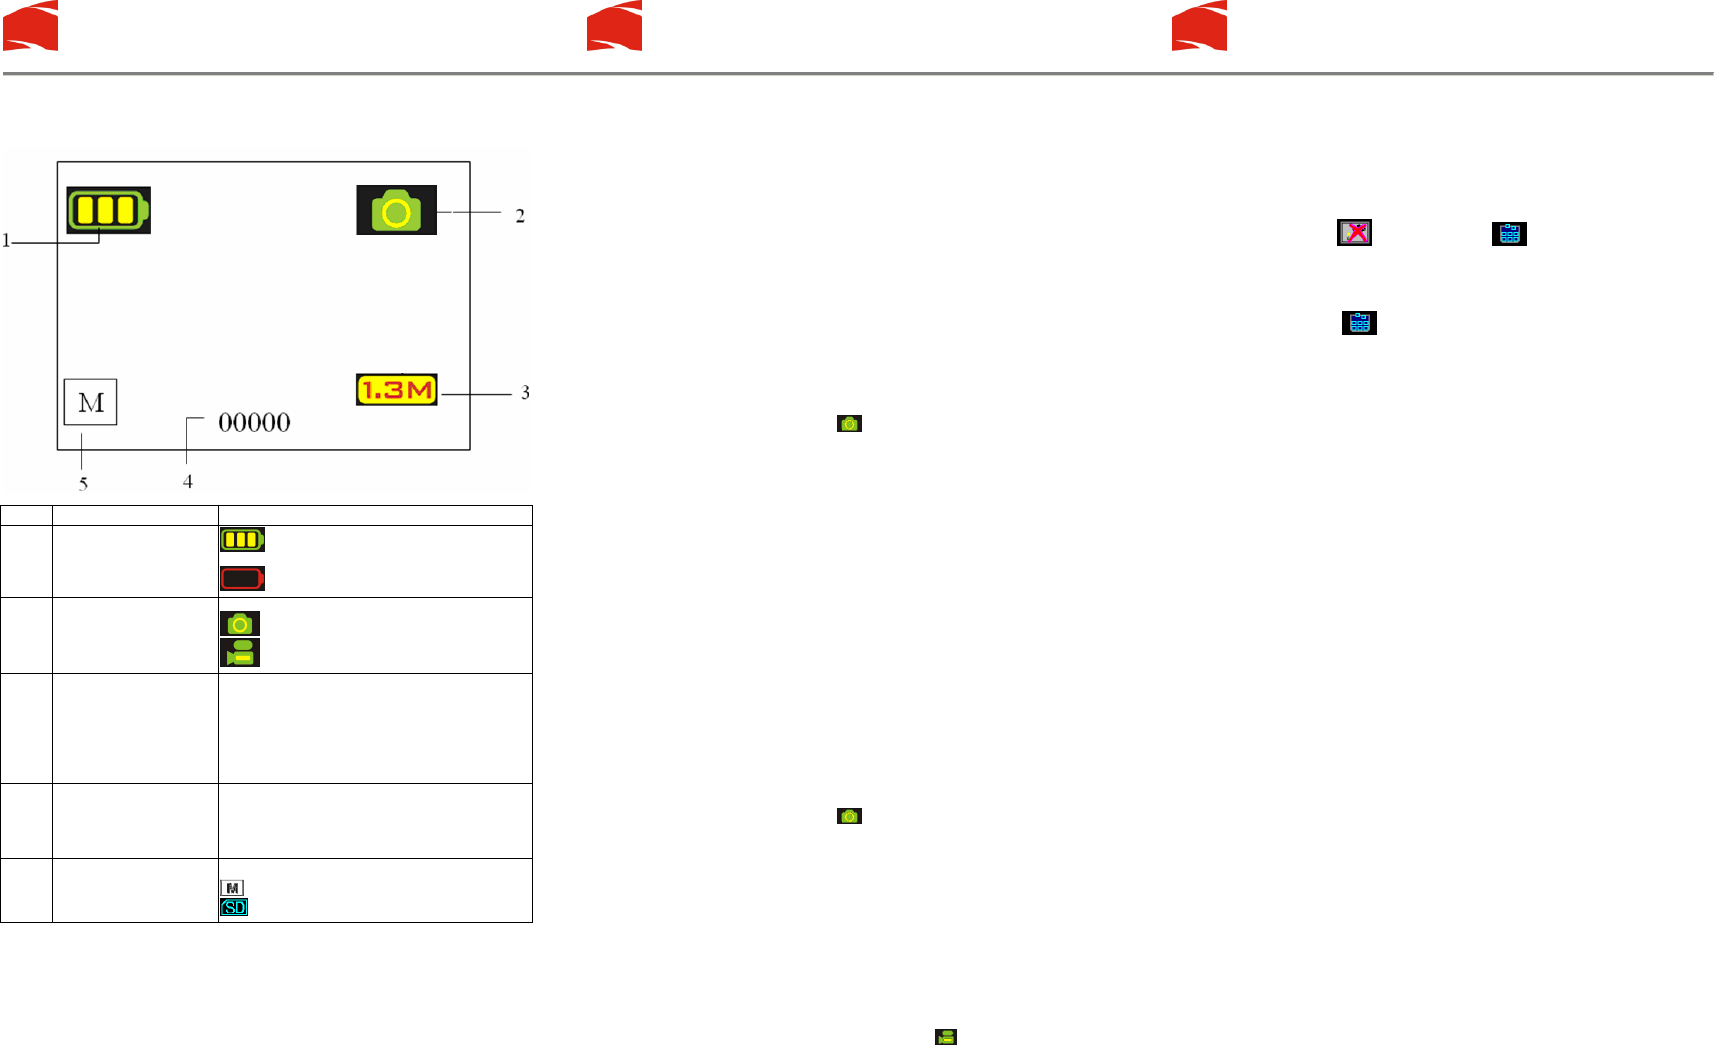
4. Explanation of the status icons on the LCD
screen
Item Function Description
1
Battery indicator
The batteries are full.
The batteries are empty.
2
Recording mode
Setting for taking photographs
Setting for recording videos
3
Camera resolution
Displays the resolution.
5M=2560x1920;
3M = 2048x1536;
1.3 M=1280x960;
VGA=640x480;
QVGA=320 x 240
4
Photo / Video counter
Photo mode :Photo No. have, been taken.
Video mode: Video recording time in second;
Playback mode: current number
. of pictures or
video clips
5
Memory or SD card
indicator
Indicates memory or SD card.
: Pictures stored in built-in memory.
: Pictures stored in SD card.
5. Using the camera
5.1 Installing the batteries
1. Open the battery door.
2. Insert 2 AAA alkaline batteries into the camera according to the correct
polarity marked in the battery compartment.
3. Turn on the camera
Slide the power to activate. Slide it again to turn this Digital Camera off.
5.2 Inserting a memory card (not included)
This camera has built-in internal memory. This memory can be extended with a
SD memory card (not included).
Follow the instructions given below to insert the optional SD memory card into
the camera.
1. Open the camera’s battery door by sliding it downwards.
2. Insert the SD card into the slot.
3. Press the SD card completely into the camera and then close the door.
Open the door and press on the memory card if you wish to remove it.
Note: There is only one right direction to insert the SD memory card into the slot.
Do not force the card into the slot, or else it may damage both the camera and
the SD memory card.
Note: The SD memory card must be formatted before taking photographs. See
the following sections for more information.
5.3 Setting your camera
In the mode you can set all the option of you camera;
1. Press MODE to select the mode (picture or video) you want to set;
2. Press MODE and hold it to enter system setting menu;
3. Select what you want to set by NEXT, and press OK to confirm;
4. Set the option you selected by NEXT, and press OK again to confirm;
5. Press MODE to exit.
5.4 Taking photographs
1. Slide the power ON/OFF to activate your Digital Camera.
2. Set the camera to photo mode ( ).
3. Use the LCD screen to aim the object you wish to photograph.
4. Press Shutter button and hold the camera steadily for 2 to 3 sec, until the
LCD display turn on again.
5. You can press and hold MODE to set proper resolution, Self-time shot and
so on, and press shutter to confirm, and press and hold MODE again to return.
Note: If you take photographs with the default camera settings, it is possible
that the quality of the photographs will not always be optimal. Different
surroundings produce different results. Adjust the camera settings as
required.
5.5 Zoom in and out
The camera can zoom in up to 4 times in preview mode by pressing ZOOM
(1x-4x-1x), and you can also use it to zoom in/out photographs in playback
mode.
5.6 Taking photographs using self-timer function
You can use the self-timer function when you wish to take a photograph of
yourself or when you wish to photograph an object where the camera must be
as still as possible, for example on the stand.
1. Set the camera to photo mode ( ).
2. Press and hold the MODE button. The quick menu will appear.
3. Press NEXT to select self-timer mode, and press OK to confirm
4. Setting the time with NEXT button(10S), and press OK to confirm
5. Press MODE to complete your setting. The self-timer function is now
ready for use, and the ICON will be shown on the top of the LCD.
6. Aim the object you wish to photograph.
7. Press the shutter button to take a photograph.
8. The photograph will be taken after the time delay you set, and the camera
will beep once.
5.7 Recording video clips
1. Press the MODE button to select video mode ( ),
2. Press the shutter button to start recording video, press the shutter button
again for a pause. The video clip will now be saved as an AVI file in the
camera memory.
3. You can press and hold MODE to set proper resolution, and press shutter
to confirm.
5.8 Playback photographs or video clips
1. Press Playback button , it will show video clips or photos picture on the
LCD
2. Press NEXT to review next the photo or video clip.
3. Press MODE again to exit the Playback mode.
Note: The video clip will auto run if you select it until you select others.
5.9 Delete photographs and video clips
You can choose to delete a single photograph / video clip, or Format the
memory.
Follow the instructions given below to delete photograph/video clips.
1.
Press playback button, enter playback mode.
2. Select the photo or video clip you want to delete with NEXT key;
3. Press and hold MODE button to enter the menu,
4. Select Delete one / Format memory with NEXT key, Press OK
to confirm.
5. Select and press OK to confirm again, you will exit the menu.
6. You can also press and hold MODE to exit.
NOTE: ‘Format memory
’, the files in camera will be deleted all.
6. Press the smile button to send out “smile”
sound before taking photo
7. Installing the camera driver
The driver in the CD has to be installed for windows ME, Windows 2000,
Windows XP Windows Vista to use as a PC cam only. (Download picture /video
is driver free).
7.1 Uninstalling old drivers and devices
There is a chance for a conflict between the new driver and an existing driver in
the computer. In that case, it is better to remove those drivers before installing
the new driver.
1. Enter Windows ‘Safe Mode’ (press F8 when starting Windows and then
select ‘Safe Mode’ from the menu which will be displayed).
2. Click on ‘Start – Settings – Control Panel’ and double-click on
‘Add/Remove Programs’ icon.
3. Find all the programs for similar, old devices and remove these by clicking
on the ‘Add/Remove’ button. When in ‘Safe Mode’, it is possible for some
programs to appear twice. In that case, remove all the programs which
appear twice.
4. Restart the computer.
7.2 Installing the driver for Windows ME / Windows
2000 / Windows XP/Windows Vista
Note: Make sure all other programs are closed during the installation process.
Note: During installation for Windows XP, you may receive a message saying
that the driver has not been signed. This does not cause a problem for the
functionality of the program. Please click "Yes" to continue.
Note: For example, ‘D: \’ is used to indicate the CD-ROM drive. This may be
different for your computer.
1. Insert the CD-ROM into your computer’s CD-ROM drive. The installation
program will start automatically. If it does not start automatically, please do
the following:
a) Select 'Run' from Windows Start menu.
b) Type [D:\SETUP.EXE] and click on 'OK' to start the Software Installer.
2. The Software Installer will appear.
3. Select the language you wish to use for the installation.
4. Click on ‘Install driver to start the installation of the camera driver.
5. Follow the on-screen instructions.
7.3 Connecting the camera
The camera can be connected to the computer in two different modes: mass
storage device and PC camera.
Descargue el manual en Español (PDF, 0.49 MB)
(Piense en el medioambiente y solo imprima este manual si es de verdad necesario)

Loading…

Puntuación

Dé su opinión de la Yuraku Yur.Cam DPC13 Cámara digital calificando el producto. ¿Quiere compartir su experiencia con este producto o hacer una pregunta? Deje un comentario en la parte inferior de la página.
¿Estás satisfecho con elYuraku Yur.Cam DPC13 Cámara digital?
No
Sea el primero en calificar este producto
0 votos

Únase a la conversación sobre este producto

Aquí puedes compartir lo que piensas sobre Yuraku Yur.Cam DPC13 Cámara digital. Si tiene alguna pregunta, primero lea atentamente el manual. Puede solicitar un manual utilizando nuestro formulario de contacto.

Más sobre este manual

Entendemos que es bueno tener un manual en papel para tus Yuraku Yur.Cam DPC13 Cámara digital. Siempre puedes descargar el manual desde nuestro sitio web e imprimirlo tú mismo. Si deseas tener un manual original te recomendamos contactar con Yuraku. Es posible que puedan proporcionar un manual original. ¿Estás buscando el manual de tu Yuraku Yur.Cam DPC13 Cámara digital en otro idioma? Elija su idioma preferido en nuestra página de inicio y busque el número de modelo para ver si lo tenemos disponible.

Especificaciones

Marca Yuraku
Modelo Yur.Cam DPC13
Categoría Cámaras digitales
Tipo de archivo PDF
Tamaño del archivo 0.49 MB

Todos los manuales para Yuraku Cámaras digitales
Más manuales de Cámaras digitales

Preguntas frecuentes sobre Yuraku Yur.Cam DPC13 Cámara digital

Nuestro equipo de atención al cliente busca información útil sobre los productos y responde a las preguntas frecuentes. Si encuentra inexactitudes en las preguntas frecuentes, indíquenoslo usando nuestro formulario de contacto.

¿Cómo evitar los "ojos rojos" en las fotos? Verificado

El efecto "ojos rojos" en las fotos se produce por recibir demasiada luz en los ojos en poco tiempo. Este efecto es incluso mayor en un entorno oscuro. Se puede hacer lo siguiente para evitarlo: evitar que la gente mire directamente a la cámara, producir más luz, hacer la foto más cerca o disminuir el uso de la función

Ha sido de gran ayuda (392) Leer más

¿Qué es un megapíxel? Verificado

Un megapíxel (MP) equivale a un millón de pixeles. Los megapíxeles se usan, entre otras cosas, para indicar la resolución de las cámaras digitales y videocámaras. Por ejemplo, una cámara que produce imágenes de 1280x960 píxeles tiene una resolución de aproximadamente 1,3 MP. Aunque hay muchos factores que influyen en la calidad de una imagen, se puede decir que, en general, cuantos más megapíxeles, mejor imagen.

Ha sido de gran ayuda (369) Leer más

¿Es necesario agotar mi batería de iones de litio antes de volver a cargarla? Verificado

No, no es necesario. Con las baterías más antiguas esto ocurría. Las baterías de iones de litio se pueden cargar después del uso y se pueden retirar del cargador cuando sea necesario.

Ha sido de gran ayuda (307) Leer más

¿Qué significa SD? Verificado

SD son las siglas de Secure Digital. Las tarjetas SD son el medio de almacenamiento estándar para muchas cámaras digitales.

Ha sido de gran ayuda (268) Leer más

La pila de mi dispositivo está oxidada. ¿Puedo seguir usándolo con seguridad? Verificado

Sí, todavía puede usar el dispositivo con seguridad. En primer lugar, retire la pila oxidada. Nunca la toque con sus manos desnudas al hacerlo. A continuación, limpie el compartimento de la pila con un bastoncillo de algodón mojado en vinagre o zumo de limón. Déjelo secar e inserte nuevas pilas.

Ha sido de gran ayuda (240) Leer más

¿Cuál es la mejor manera de almacenar una batería de iones de litio por un período de tiempo prolongado? Verificado

La mejor manera de guardar una batería de iones de litio es a una temperatura de entre 5 y 45 grados centígrados. También es una buena idea asegurarse de que la batería esté cargada en un 67 % antes de almacenarla.

Ha sido de gran ayuda (227) Leer más

¿En qué condiciones funcionará óptimamente mi batería de iones de litio? Verificado

Las baterías de iones de litio funcionan de forma óptima a una temperatura de entre 5 y 45 grados centígrados. Con un tiempo muy frío o cálido puede notar que la batería se agota antes. No se recomienda la carga a temperaturas inferiores a 5 o superiores a 45 grados centígrados.

Ha sido de gran ayuda (220) Leer más
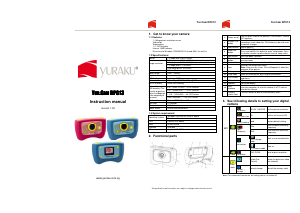
Manual de uso Yuraku Yur.Cam DPC13 Cámara digital

Productos relacionados

Categorias relacionadas

×
Download