Manual de uso Black and Decker AS210 Plancha

¿Necesita un manual para su Black and Decker AS210 Plancha? A continuación puedes ver y descargar el manual en PDF gratis en español. Este producto actualmente tiene 4 preguntas frecuentes, 0 comentarios y tiene 0 votos. Si este no es el manual que desea, , contáctenos.

¿Su producto tiene algún defecto y el manual no ofrece ninguna solución? Vaya a Repair Café para solicitar un servicio de reparación gratuito.

Manual de uso

Loading…

6
5
2. Turn the fabric-select dial to the appropriate setting for your fabric. (Read
garment’s label to help you determine fabric type.) The temperature ready light
glows until it reaches the appropriate temperature. It then cycles on and off
during ironing.
Tip: If unsure of a garment’s fiber, test a small area (on an inside seam or hem)
before ironing.
3. For optimum performance, let the iron stand for 90 seconds before beginning
to iron.
4. When finished ironing, turn the fabric-select dial to lowest heat setting, move
the selector to and unplug the iron.
Note: If you need to add water while ironing, unplug the iron and follow above
steps.
Important: Always stand the iron on its heel rest when powered on but not in use.
3-WAY AUTOMATIC SHUTOFF
The automatic shutoff feature in your iron works as follows:
•Oncetheironreachesappropriatetemperature,itwillturn
off after 30 seconds of inactivity if left on its soleplate
or tipped over on its side. If left vertically on its heel rest,
it will shut off after 8 minutes (F).
•Assoonasyoupickuptheiron,itwillstartheating
again. Wait for iron to reheat completely before resuming
operation.
SURGE OF STEAM
Horizontal
1. With the water tank filled to the MAX mark, set fabric-select dial to the
appropriate temperature setting (between 4 and 6) and let iron stand on its
heel rest about 90 seconds.
2. For best performance, use surge of steam at 5-second intervals.
Vertical
1. Be sure the water tank is filled to the MAX mark. Hang the garment to be
steamed on a clothes hanger. (Curtains or drapes can be steamed once
they are hung.) Set the fabric-select dial to the appropriate temperature
setting (between 4 and 6) and let iron stand on its heel rest about 90
seconds.
2. Hold the iron close to, but not touching, the fabric.
3. Pull the fabric tight in your free hand and pump the
CLEAN
MAX
MIN
button
as you move the iron over the fabric (G).
SPRAY
Use to dampen tough wrinkles at any setting.
1. Check that the water tank is filled with water.
2. Press the
CLEAN
MAX
MIN
button.
Note: If spray is weak, pump the button a few times.
ANTI-DRIP SYSTEM
The anti-drip system prevents water spotting at low temperatures.
EMPTYING THE WATER TANK (OPTIONAL)
1. Turn the fabric-select dial to Min. Unplug the iron and
let it cool.
2. Open the water-fill cover.
3. Empty the water by holding the iron over a sink with the tip
pointing down and to one side. Water will empty out of water-
fill opening (H).
Care and Cleaning
This product contains no user serviceable parts. Refer service to qualified service
personnel.
CLEANING OUTSIDE SURFACES
1. Make sure iron is unplugged and has cooled completely. Wipe the soleplate
and outer surfaces with a soft cloth dampened with water. Add mild household
detergent. Never use abrasives, heavy-duty cleansers, vinegar or scouring pads
that may scratch or discolor the iron.
2. After cleaning, steam iron over an old cloth to remove any residue from the
steam vents.
AUTO CLEAN
®
SYSTEM
To keep the steam vents free of any buildup, about once a month follow these
instructions.
1. Fill the water tank well below the MAX line. Plug in the iron.
2. Turn the fabric-select dial to 6 and stand the iron on its heel rest. Allow it to
heat until the temperature-ready light goes out and comes on again.
3. Turn fabric-select dial to Min, unplug the iron and hold over a sink with the
soleplate facing down.
4. Press and hold the AUTO CLEAN
®
button. Be careful, as hot
water and steam will come out of the steam vents (J). Continue
to hold the AUTO CLEAN
®
button until all the water has
emptied. If necessary, rock iron side-to-side and front-to-back.
5. When finished, release the button, stand the iron on its heel
rest and plug it in. Heat for about 2 minutes to dry out any
remaining water.
STORING YOUR IRON
1. Unplug the iron and allow it to cool.
2. Check that the selector is set to .
3. Store vertically on its heel rest to prevent water leaking from the soleplate.
G
H
J
8 minutes
30 seconds
F
Descargue el manual en Español (PDF, 1.3 MB)
(Piense en el medioambiente y solo imprima este manual si es de verdad necesario)

Loading…

Puntuación

Dé su opinión de la Black and Decker AS210 Plancha calificando el producto. ¿Quiere compartir su experiencia con este producto o hacer una pregunta? Deje un comentario en la parte inferior de la página.
¿Estás satisfecho con elBlack and Decker AS210 Plancha?
No
Sea el primero en calificar este producto
0 votos

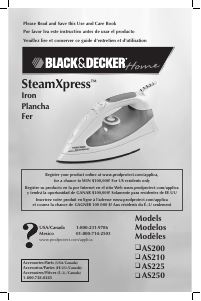
Únase a la conversación sobre este producto

Aquí puedes compartir lo que piensas sobre Black and Decker AS210 Plancha. Si tiene alguna pregunta, primero lea atentamente el manual. Puede solicitar un manual utilizando nuestro formulario de contacto.

Más sobre este manual

Entendemos que es bueno tener un manual en papel para tus Black and Decker AS210 Plancha. Siempre puedes descargar el manual desde nuestro sitio web e imprimirlo tú mismo. Si deseas tener un manual original te recomendamos contactar con Black and Decker. Es posible que puedan proporcionar un manual original. ¿Estás buscando el manual de tu Black and Decker AS210 Plancha en otro idioma? Elija su idioma preferido en nuestra página de inicio y busque el número de modelo para ver si lo tenemos disponible.

Especificaciones

Marca Black and Decker
Modelo AS210
Categoría Planchas
Tipo de archivo PDF
Tamaño del archivo 1.3 MB

Todos los manuales para Black and Decker Planchas
Más manuales de Planchas

Preguntas frecuentes sobre Black and Decker AS210 Plancha

Nuestro equipo de atención al cliente busca información útil sobre los productos y responde a las preguntas frecuentes. Si encuentra inexactitudes en las preguntas frecuentes, indíquenoslo usando nuestro formulario de contacto.

¿Puedo limpiar la suela de mi plancha con un estropajo? Verificado

No, porque esto podría dañar la suela. Use un paño húmedo o una esponja suave para limpiarla.

Ha sido de gran ayuda (365) Leer más

¿Cuál es la diferencia entre una plancha de vapor y una plancha normal? Verificado

La mayor ventaja de una plancha de vapor es que elimina las arrugas más fácilmente debido al uso del vapor. Por el contrario, una plancha normal es mucho más ligera y a menudo más barata.

Ha sido de gran ayuda (297) Leer más

La suela de mi plancha se ha descolorido. ¿Puedo seguir planchando con ella? Verificado

Es posible planchar, pero existe la posibilidad de que se pegue a la ropa de color claro.

Ha sido de gran ayuda (246) Leer más

¿Puedo planchar los botones? Verificado

No, porque dañará la suela de la plancha impidiendo que ésta funcione correctamente. Nunca planche los botones, las cremalleras u otros objetos duros.

Ha sido de gran ayuda (170) Leer más
Manual de uso Black and Decker AS210 Plancha

Productos relacionados

Categorias relacionadas