KA5286
EN | Instruction manual
NL | Gebruiksaanwijzing
FR | Mode d’emploi
DE | Bedienungsanleitung
ES | Manual de usuario
PT | Manual de utilizador
IT | Manuele utente
SV | Bruksanvisning
PL | Instrukcja obsługi
CS | Návod na použití
SK | Návod na použitie
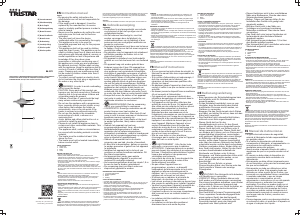
PARTS DESCRIPTION / ONDERDELENBESCHRIJVING / DESCRIPTION DES PIÈCES / TEILEBESCHREIBUNG /
DESCRIPCIÓN DE LAS PIEZAS / DESCRIÇÃO DOS COMPONENTES / DESCRIZIONE DELLE PARTI /
BESKRIVNING AV DELAR / OPIS CZĘŚCI / POPIS SOUČÁSTÍ / POPIS SÚČASTÍ
1
3
2
WWW.TRISTAR.EU
Tristar Europe B.V. | Jules Verneweg 87
5015 BH Tilburg | The Netherlands
ENInstruction manual
SAFETY
• By ignoring the safety instructions the
manufacturer can not be hold responsible for
the damage.
• If the supply cord is damaged, it must be
replaced by the manufacturer, its service
agent or similarly qualified persons in order to
avoid a hazard.
• Never move the appliance by pulling the cord
and make sure the cord can not become
entangled.
• The user must not leave the device
unattended while it is connected to the supply.
• This appliance is only to be used for
household purposes and only for the purpose
it is made for.
• This appliance shall not be used by children
aged less than 8 years. This appliance can be
used by children aged from 8 years and above
and persons with reduced physical, sensory or
mental capabilities or lack of experience and
knowledge if they have been given
supervision or instruction concerning use of
the appliance in a safe way and understand
the hazards involved. Children shall not play
with the appliance. Keep the appliance and its
cord out of reach of children aged less than 8
years. Cleaning and user maintenance shall
not be made by children unless older than 8
and supervised.
• To protect yourself against an electric shock,
do not immerse the cord, plug or appliance in
the water or any other liquid.
• WARNING: In order to avoid overheating,
do not cover the heater.
• CAUTION: Some parts of this product can
become very hot and cause burns. Particular
attention has to be given where children and
vulnerable people are present.
• Children of less than 3 years should be kept
away unless continuously supervised.
• Do not use the appliance with a programmer,
timer, separate remote-control system or any
other device that switches the heater on
automatically, since a fire risk exists if the
heater is covered or positioned incorrectly.
• Do not use this heater in the immediate
surroundings of a bath, a shower or a
swimming pool.
• Joists, beams and rafters shall not be cut or
notched to install the appliance.
• Please do not install the appliance close to
curtains and other combustible materials. This
could cause a fire.
• The appliance shall, under no circumstances,
be covered with insulating material or similar
material.
• The heater must be installed at least 1,8m
above the floor.
• The heater must not be located immediately
below a socket-outlet.
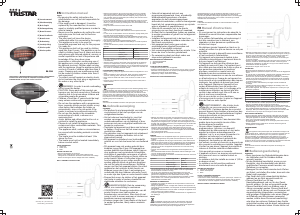
PARTS DESCRIPTION
1. Heater unit
2. Switch cord
3. Base
BEFORE THE FIRST USE
• Remove all packaging of the device.
• Putthepower cable intothe socket.(Note: Make surethe
voltagewhich is indicated on the devicematchesthe localvoltage
beforeconnecting the device.Voltage220V-240V 50/60Hz)
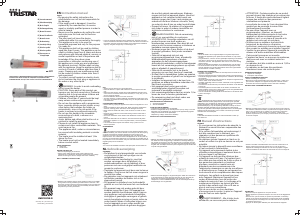
WALL ASSEMBLY INSTRUCTIONS
• Mark the hole positions using a pencil and drill 4 holes into a suitably
strong exterior wall by positioning the wall bracket (2) a minimum 2m
above the ground. Ensure the holes are straight by using a spirit level
(not included). Using an impact drill (not included), bore the holes in the
positions you have just marked.
• Insert 4x universal wall plugs (C) into the drilled holes. Insert 4x screws
(B) into the wall plugs leaving heads proud. Attach the bracket to the
heater (1) using 3x screws (A) inserting these into the threaded holes on
the back of unit.
• Hang the bracket onto the 4 screws in the wall.
USE
• Always plug the device into a grounded outlet.
• Place the device in a place with at least 50 cm free space around the
unit.
• In case of rain or bad weather never use the device, unplug directly from
the outlet and store the appliance in a dry place.
• Make sure that children, people with mental disabilities and pets never
come close to the heater. Never touch the heater, it is very hot, you can
get very seriously injured!
• Pull the switch cord to set the desired heating mode.
• The following table lists the different heat settings. For another position
pull the cord.
• To switch off the device pull the cord several times until the symbol 0
appears.
Symbol Heating mode Output
0 Off 0 watt
1 Low power 650 watt
2 Medium power 1300 watt
3 High power 2000 watt
• The patio heater is not thermostatically controlled and continues to emit
heat until it is switched off. Always keep an eye on the patio heater while
it is switched on.
• Attention! when using the device with a low amperage of the electrical
network, for example when you are at a camping-site. In position 1 it
should be possible to use the device on a low ampera electrical network.
But to shut off the device, the positions 2 and 3 have to be selected, this
can cause an overloaded electrical network.
CLEANING AND MAINTENANCE
• Before cleaning, unplug the appliance and wait for the appliance to cool
down.
• Clean the appliance with a damp cloth. Never use harsh and abrasive
cleaners, scouring pad or steel wool, which damages the device.
• Never clean the heater with water, never immerse it in water or other
liquid.
• Regularly remove dirt and vermin behind the grill of the heater with a
vacuum cleaner.
ENVIRONMENT
This appliance should not be put into the domestic garbage at the
end of its durability, but must be offered at a central point for the recycling
of electric and electronic domestic appliances. This symbol on the
appliance, instruction manual and packaging puts your attention to this
important issue. The materials used in this appliance can be recycled. By
recycling of used domestic appliances you contribute an important push to
the protection of our environment. Ask your local authorities for information
regarding the point of recollection.
Support
You can find all available information and spare parts at www.tristar.eu!
NLGebruiksaanwijzing
VEILIGHEID
• De fabrikant is niet aansprakelijk voor schade
voortvloeiend uit het niet opvolgen van de
veiligheidsinstructies.
• Als het netsnoer beschadigd is, moet het
worden vervangen door de fabrikant, de
onderhoudsmonteur van de fabrikant of door
personen met een soortgelijke kwalificatie om
gevaar te voorkomen.
• Verplaats het apparaat nooit door aan het snoer
te trekken. Zorg ervoor dat het snoer nergens in
verstrikt kan raken.
• De gebruiker mag het apparaat niet onbeheerd
achterlaten wanneer de stekker zich in het
stopcontact bevindt.
• Dit apparaat is uitsluitend voor huishoudelijk
gebruik en voor het doel waar het voor bestemd
is.
• Dit apparaat mag niet worden gebruikt door
kinderen jonger dan 8 jaar. Dit apparaat kan
worden gebruikt door kinderen vanaf 8 jaar en
door personen met verminderde lichamelijke,
zintuiglijke of geestelijke vermogens of gebrek
aan de benodigde ervaring en kennis indien ze
onder toezicht staan of instructies krijgen over
hoe het apparaat op een veilige manier kan
worden gebruikt alsook de gevaren begrijpen
die met het gebruik samenhangen. Kinderen
mogen niet met het apparaat spelen. Houd het
apparaat en het netsnoer buiten bereik van
kinderen jonger dan 8 jaar. Laat reiniging en
onderhoud niet door kinderen uitvoeren, tenzij
ze ouder zijn dan 8 jaar en onder toezicht staan.
• Dompel het snoer, de stekker of het apparaat
niet onder in water of andere vloeistoffen om
elektrische schokken te voorkomen.
• WAARSCHUWING: Dek de verwarming
niet af, om oververhitting te voorkomen.
• VOORZICHTIG: Sommige onderdelen van dit
product kunnen zeer heet worden en
brandwonden veroorzaken. Men dient dit met
name in acht te nemen wanneer er kinderen en
kwetsbare mensen aanwezig zijn.
• Kinderen jonger dan 3 jaar dienen uit de buurt
te worden gehouden, tenzij onder constante
toezicht.
• Gebruik het apparaat niet met een
programmeringseenheid, timer, afzonderlijk
afstandsbedieningssysteem of andere
apparaten die het verwarmingssysteem
automatisch inschakelen, omdat er brandgevaar
heerst als het verwarmingssysteem op onjuiste
wijze is afgedekt of gepositioneerd.
• Gebruik de verwarmer niet in de directe
omgeving van een bad, douche of zwembad.
• Er dient niet in dwarsbalken, balken en spanten
te worden gesneden of gekerft om het apparaat
te installeren.
• Installeer het apparaat niet in de buurt van
gordijnen en andere brandbare materialen. Dit
kan brand veroorzaken.
• Het apparaat dient onder geen enkele
omstandigheden afgedekt te worden met
isolerend of soortgelijk materiaal.
• Het verwarmingssysteem dient ten minste 1,8 m
boven de vloer te worden geïnstaleerd.
• De verwarming dient niet direct onder een
stopcontact geplaatst te worden.
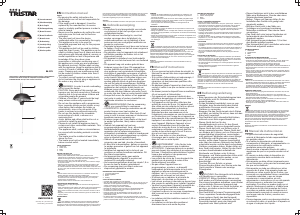
BESCHRIJVING VAN ONDERDELEN
1. Verwarmingsapparaat
2. Bedieningskabel
3. Basis
VOOR HET EERSTE GEBRUIK
• Verwijder alle verpakking van het apparaat.
• Sluit de voedingskabel aan op het stopcontact.(Let op: Zorg er voor het
aansluiten van het apparaat voor dat het op het apparaat aangegeven
voltage overeenkomt met de plaatselijke
netspanning.Voltage:220V-240V 50/60Hz)
INSTRUCTIES VOOR WANDMONTAGE
• Markeer de locaties van de gaten met een potlood en boor 4 gaten in
een buitenmuur die stevig genoeg is. Plaats de muurbeugel (2) hierbij op
een hoogte van minstens 2 meter vanaf de grond. Controleer met een
waterpas (niet meegeleverd) of u de gaten recht hebt aangebracht. Boor
de gaten met een klopboormachine (niet meegeleverd) op de locaties die
u zojuist hebt gemarkeerd.
• Steek de 4 universele pluggen (C) in de geboorde gaten. Steek de 4
schroeven (B) in de pluggen. Zorg daarbij dat de koppen nog licht
uitsteken. Bevestig de beugel met 3 schroeven (A) aan de verwarming
(1). Dit doet u door de schroeven in de schroefgaten aan de achterkant
van het apparaat te steken.
• Hang de beugel aan de 4 schroeven in de muur.
GEBRUIK
• Steek de stekker van het apparaat altijd in een geaard stopcontact.
• Bevestig het apparaat op een plaats met minimaal 50 cm vrije ruimte
rondom.
• Gebruik het apparaat nooit bij regen of slecht weer, maar haal direct de
stekker uit het stopcontact en berg het apparaat op een droge plaats op.
• Zorg dat kinderen, mensen met een geestelijke beperking en huisdieren
nooit dicht in de buurt van de verwarmer kunnen komen. Raak de
verwarmer nooit aan. Het apparaat is zeer heet en u kunt zeer ernstig
gewond raken!
• Trek aan het schakelkoord om de gewenste verwarmingsstand in te
stellen.
• De onderstaande tabel bevat de verschillende warmte-instellingen. Trek
voor een andere stand aan het koord.
• Trek om het apparaat uit te schakelen verschillende malen aan het koord
tot het teken 0 verschijnt.
Symbool Verwarmingsstand Vermogen
0 Uit 0 watt
1 Laag vermogen 650 watt
2 Middenvermogen 1350 watt
3 Hoog vermogen 2000 watt
• De terrasverwarmer wordt niet via een thermostaat geregeld en blijft
warmte uitstralen tot hij wordt uitgeschakeld. Houd een ingeschakeld
terrasverwarmer constant in het oog.
• Let op! als u het apparaat met een elektriciteitsnet met een lage
stroomsterkte gebruikt, bijvoorbeeld op de camping. In stand 1 moet
gebruik van het apparaat via een elektriciteitsnet met een lage
stroomsterkte mogelijk zijn. Om het apparaat uit te schakelen, moeten
echter standen 2 en 3 worden geselecteerd en hierdoor kan het
elektriciteitsnet overbelast raken.
REINIGING EN ONDERHOUD
• Verwijder voor reiniging de stekker uit het stopcontact en wacht tot het
apparaat is afgekoeld.
• Reinig het apparaat met een vochtige doek. Gebruik nooit agressieve of
schurende reinigingsmiddelen, schuursponzen of staalwol; dit beschadigt
het apparaat.
• Reinig de terrasverwarmer nooit met water en dompel het apparaat nooit
onder in water of een andere vloeistof.
• Verwijder regelmatig achter het rooster verzameld vuil en ongedierte met
een stofzuiger.
MILIEU
Dit apparaat mag aan het einde van de levensduur niet bij het
normale huisafval worden gedeponeerd, maar moet bij een speciaal
inzamelpunt voor hergebruik van elektrische en elektronische apparaten
worden aangeboden. Het symbool op het apparaat, in de
gebruiksaanwijzing en op de verpakking attendeert u hierop. De in het
apparaat gebruikte materialen kunnen worden gerecycled. Met het
recyclen van gebruikte huishoudelijke apparaten levert u een belangrijke
bijdrage aan de bescherming van ons milieu. Informeer bij uw lokale
overheid naar het inzamelpunt.
Support
U kunt alle beschikbare informatie en reserveonderdelen vinden op
www.tristar.eu!
FRManuel d'instructions
SÉCURITÉ
• Si vous ignorez les instructions de sécurité, le
fabricant ne saurait être tenu responsable des
dommages.
• Si le cordon d'alimentation est endommagé, il
doit être remplacé par le fabricant, son
réparateur ou des personnes qualifiées afin
d'éviter tout risque.
• Ne déplacez jamais l'appareil en tirant sur le
cordon et veillez à ce que ce dernier ne soit pas
entortillé.
• Ne laissez jamais le dispositif sans surveillance
s'il est connecté à l'alimentation.
• Cet appareil est uniquement destiné à des
utilisations domestiques et seulement dans le
but pour lequel il est fabriqué.
• Cet appareil ne doit pas être utilisé par des
enfants de moins de 8 ans. Cet appareil peut
être utilisé par des enfants de 8 ans ou plus et
des personnes présentant un handicap
physique, sensoriel ou mental voire ne
disposant pas des connaissances et de
l'expérience nécessaires en cas de surveillance
ou d'instructions sur l'usage de cet appareil en
toute sécurité et de compréhension des risques
impliqués. Les enfants ne doivent pas jouer
avec l'appareil. Maintenez l'appareil et son
cordon d'alimentation hors de portée des
enfants de moins de 8 ans. Le nettoyage et la
maintenance utilisateur ne doivent pas être
confiés à des enfants sauf s'ils ont 8 ans ou
plus et sont sous surveillance.
• Afin de vous éviter un choc électrique,
n'immergez pas le cordon, la prise ou l'appareil
dans de l'eau ou autre liquide.
• AVERTISSEMENT: Afin d’éviter toute
surchauffe, ne recouvrez pas le radiateur.
• ATTENTION: Certaines parties de ce produit
peuvent devenir très chaudes et provoquer des
brûlures. Il faudra être particulièrement vigilant
lorsque des enfants ou des personnes
vulnérables sont présents.
• Les enfants de moins de 3 ans devraient être
gardés hors de proximité à moins d’être
continuellement surveillés.
• Ne pas utiliser l'appareil avec un
programmateur, minuteur, un dispositif
indépendant de télécommande ou tout autre
appareil qui allume automatiquement le
radiateur, car il y a un risque d’incendie si le
radiateur est recouvert ou mal placé.
• N’utilisez pas ce radiateur à proximité de
baignoires, de douches ou de piscine.
• Les solives, poutres et chevrons ne devront pas
être coupés ou entaillés pour installer l’appareil.
• Veuillez ne pas placer l’appareil à proximité de
rideaux et d’autres matériaux inflammables.
Cela pourrait provoquer un incendie.
• L’appareil ne devra, en aucunes circonstances,
être recouvert avec un matériel isolant ou
similaire.
• Le radiateur doit être installé au moins à 1,80 m
au-dessus du sol.
• Le radiateur ne doit pas être positionné
directement sous une sortie de prise.
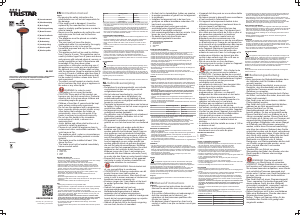
DESCRIPTION DES PIÈCES
1. Appareil de chauffage
2. Cordon d'interrupteur
3. Base
AVANT LA PREMIÈRE UTILISATION
• Retirez l’emballage de l'appareil.
• Branchez le cordon d’alimentation à la prise.(Remarque: Veillez à ce
que la tension indiquée sur l’appareil corresponde à celle du secteur
local avant de connecter l'appareil.Tension220-240V 50/60Hz)
INSTRUCTIONS D'ASSEMBLAGE MURAL
• Marquez la position des trous avec un crayon et percez 4trous dans un
mur extérieur suffisamment solide, en positionnant le support mural (2) à
au moins 2 m au-dessus du sol. Veillez à ce que les trous soient bien
droits en utilisant un niveau à bulle (non compris). À l'aide d'une
perceuse à percussion (non compris), forez les trous aux endroits que
vous avez marqués.
• Insérez 4 chevilles universelles (C) dans les trous forés. Insérez 4 vis (B)
dans les chevilles en laissant dépasser les têtes. Fixez le support à
l'appareil de chauffage (1) à l'aide de 3 vis (A) en les insérant dans les
trous filetés à l'arrière de l'appareil.
• Suspendez le support aux 4 vis au mur.
UTILISATION
• Branchez toujours l'appareil sur une prise de terre.
• Placez l'appareil en préservant toujours au moins 50 cm de dégagement
autour.
• En cas de pluie ou d'intempérie, n'utilisez jamais l’appareil, débranchez-
le directement de la prise et rangez-le dans un endroit sec.
• Assurez-vous que les enfants, les personnes présentant un handicap
mental ou les animaux domestiques ne s'approchent pas du chauffage.
Ne touchez jamais le chauffage car il est très chaud et vous risquez de
vous blesser gravement!
• Tirez sur le cordon d’alimentation pour régler le mode souhaité de
chauffage.
• La table suivante liste les différents réglages de chauffage. Pour une
autre position, tirez sur le cordon.
• Pour arrêter l'appareil, tirez à plusieurs reprises sur le cordon pour que
s'affiche le symbole 0.
Symbole Mode de chauffage Sortie
0 Arrêt 0 watt
1 Faible puissance 650 watt
2 Puissance moyenne 1300 watt
3 Puissance élevée 2000 watt
• Le chauffage de patio ne dispose pas de commande thermostatique et
continue d'émettre de la chaleur jusqu'à son arrêt. Gardez toujours un
œil sur le chauffage de patio lorsqu'il est sous tension.
• Faites attention si vous utilisez l'appareil avec un réseau électrique à
faible ampérage, ainsi sur un terrain de camping. En position 1, il devrait
être possible d'utiliser l'appareil avec un réseau électrique à faible
ampérage. Mais pour arrêter l'appareil, les positions 2 et 3 doivent être
sélectionnées ce qui risque de surcharger le réseau électrique.
NETTOYAGE ET ENTRETIEN
• Avant le nettoyage, débranchez l'appareil et attendez qu'il refroidisse.
• Nettoyez l'appareil avec un chiffon humide. N'utilisez pas de produits
nettoyants agressifs ou abrasifs, de tampons à récurer ou de laine de
verre, ceux-ci pourraient endommager l'appareil.
• Ne nettoyez jamais le chauffage et ne l'immergez jamais dans l'eau ou
un autre liquide.
• Retirez régulièrement la saleté et les vermines derrière la grille du
chauffage avec un aspirateur.
ENVIRONNEMENT
Cet appareil ne doit pas être jeté avec les déchets ménagers à la
fin de sa durée de vie, il doit être remis à un centre de recyclage pour les
appareils électriques et électroniques. Ce symbole sur l'appareil, le
manuel d'utilisation et l'emballage attire votre attention sur un point
important. Les matériaux utilisés dans cet appareil sont recyclables. En
recyclant vos appareils, vous contribuez de manière significative à la
protection de notre environnement. Renseignez-vous auprès des autorités
locales pour connaître les centres de collecte des déchets.
Support
Vous retrouvez toutes les informations et pièces de rechange sur
www.tristar.eu!
DEBedienungsanleitung
SICHERHEIT
• Beim Ignorieren der Sicherheitshinweise kann
der Hersteller nicht für Schäden haftbar
gemacht werden.
• Ist das Netzkabel beschädigt, muss es vom
Hersteller, dem Kundendienst oder ähnlich
qualifizierten Personen ersetzt werden, um
Gefahren zu vermeiden.
• Bewegen Sie das Gerät niemals durch Ziehen
am Kabel, und stellen Sie sicher, dass sich das
Kabel nicht verwickelt.
• Das Gerät darf nicht unbeaufsichtigt bleiben,
während es am Netz angeschlossen ist.
• Dieses Gerät darf nur für den
Haushaltsgebrauch und nur für den Zweck
benutzt werden, für den es hergestellt wurde.
• Dieses Gerät darf nicht von Kindern unter 8
Jahren verwendet werden. Dieses Gerät darf
von Kindern ab 8 Jahren und von Personen mit
eingeschränkten körperlichen, sensorischen
oder geistigen Fähigkeiten oder einem Mangel
an Erfahrung und Kenntnissen verwendet
werden, sofern diese Personen beaufsichtigt
oder über den sicheren Gebrauch des Geräts
unterrichtet wurden und die damit verbundenen
Gefahren verstanden haben. Kinder dürfen mit

Únase a la conversación sobre este producto
Aquí puedes compartir lo que piensas sobre Tristar KA-5286 Calentador exterior. Si tiene alguna pregunta, primero lea atentamente el manual. Puede solicitar un manual utilizando nuestro formulario de contacto.