english
OPERATIONS
Al instalarlo en un rack, permita la salida de aire caliente del aparato.
Maneje con cuidado el cable de la corriente.
Sujete el enchufe cuando se desconecta el equipo de la corriente.
Mantenga el equipo alejado del agua, humedad y suciedad.
Desconecte el equipo de la corriente cuando no se use por un periodo
largodetiempo.
No obstruya los agujeros de ventilación (en los equipos que tienen
agujeros de ventilación).
No introduzca objetos extraños en el equipo.
No deje insecticidas, gasolina… cerca del aparato.
el equipo bajo ningún concepto.Nunca desmonte o modifique
INSTALACIÓN
CARACTERÍSTICAS DEL EQUIPO
·
·
·
·
·
·
·
·
·
·
·
·
·
·
10 segundos de memoria anti choque
Comienzo instantáneo
Seamless loop
Ajuste de Pitch: +/-100% (+/-0.1%). Para MP3 (+/-16% )
Sampler con 4 bancos de memoria y memoria para la función CUE
(hot Cue) , <5 sec. por cada banco
Función Auto Cue (-48dB)
500 *4 sampler (Cues) memorizables
Selección entre tiempo reproducido, tiempo restante y tiempo total
Reproducción simple y continua
Relay Playback entre dos reproductores
S/PDIF digital audio RCAcoaxial
LCD display
Master Tempo (Tempo Lock)
Reproducción de ficheros MP3
58
PREPARACIÓN DEL EQUIPO
1-Al revisarel contenido de la caja debemos encontrar:
2- Para instalarelequipo.
PRECAUCIÓN
·
·
·
·
Unidad Principal
Manual de Instrucciones
Un cable RCA
Un cable AC de conexión a red
1. Instalar el equipo sobre una superficie horizontal.
2. Asegúrese de que el reproductor se instala en una zona
ventilada y no expuesta a rayos solares directos, extrema
humedad o alta temperatura.
3. Posicione el equipo lo más lejos posible de televisores y
aparatos de radio.
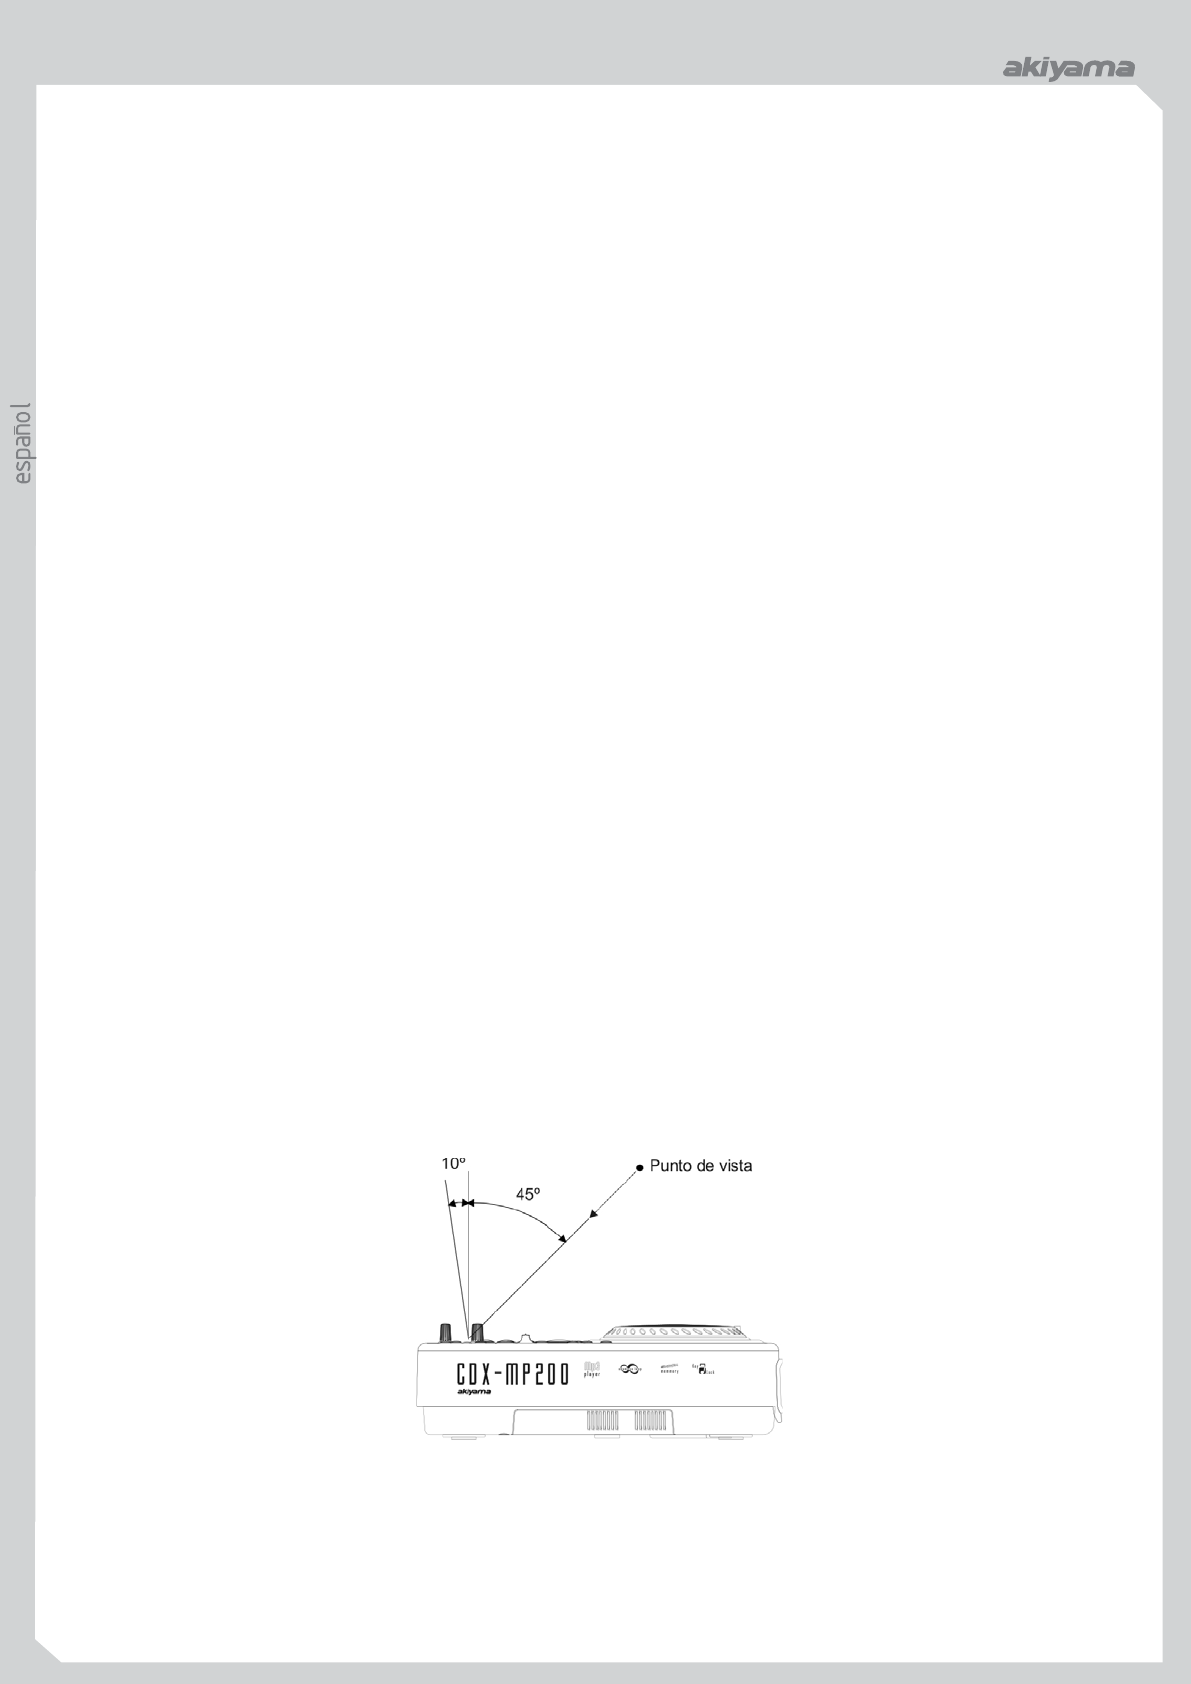
El aparato funcionará correctamente cuando esté montado con el
panel frontal a 15 grados de la vertical. Si el equipo está
excesivamente inclinado los discos pueden no funcionar
correctamente.
La pantalla luminosa LCD de la unidad está diseñada para verse
claramente con los ángulos que se muestran en la Figura.
Conexiones: ATENCIÓN:
1) Desconectar el interruptor de encendido, “Power”.
2) Conectar el cable RCA a la entada del mezclador.
Asegúrese de usar los cables que le suministramos. Utilizar cualquier
otro cable puede dañar el equipo. Asegúrese de desconectar el equipo
antes de conectar los cables, de otro modo podría dañar el equipo.
1. Opening and Closing
2. Loading discs
3. SelectingTracks
4. Starting Playback
5. Stopping Playback
6. Pausing
7. Cueing
Cue point setting:
8.Auto cue
9. Frame search
10. Scanning (fast forward/fast reverse)
11. Loop play
b-
c-
d-
e-
12. SEAMLESS LOOPPLAY(CONT.)
a-
b-
c-
FOR SHORTER LOOP:
FOR LONGER LOOP:
This operation only works when the power
is on. Press the OPEN/CLOSE button to open or close the disc tray.
OPEN/CLOSE button is provided on the main unit or press PLAY
button, the disc tray automatically closes. If tray is not closed after 60
seconds it will close automatically and pause.
The disc tray cannot be opened during playback to prevent playback
from being interrupted if the OPEN/CLOSE button is pressed
accidentally. Stop playback, then press the OPEN/CLOSE button.
Hold the disc by the edges and place it on the disc tray. Do not touch
the single surface (the glossy side).
When using 12cm discs, place the disc in the outer tray guides.
CAUTION:
Do not play foreign objects on the disc tray, and do not place more
than one disc in the disc tray at a time. Doing so may result in
malfunction.
Do not push the disc tray in manually when the power is off, as this
may result in malfunction and damage the player.
Select desired track using NUMBER Buttons or press the TRACK
SEARCH Buttons once to move to one higher or lower track or Hold
the TRACK buttons in to change tracks continuously at a higher
speed.
When a new track is selected during playback, playback begins as
soon as the search operation is completed.
Press the PLAY/PAUSE button during the pause or cue to start
playback.
The PLAY indicator lights when playback starts.
There are two ways to stop playback.1)Press the PLAY/PAUSE
button during playback to pause at that point2) Press the CUE button
during playback to return to the position at which playback
started(Back Cue).
Press the PLAY/PAUSE button to switch between play and pause.
The PAUSE indicator lights when the pause mode is set.
"Cueing" is the action of preparing for playback; when the Cue button
is pressed, playback return to the cue point and enters pause mode.
When the PLAY/PAUSE button is pressed during the cue mode,
playback starts.
A. Playback starts from pause (using the jog wheel
to set the start point) or skip to a new track during play or pause.
The beginning play point will be set to the cue point.
Or
B. Press the IN/R.CUE button during playback to set the new cue
point (“CUE on the fly”).
To return to Cue point press Cue Button. This will return to pointAor
B above.
The player has completed the cue or pause operation and is waiting
for the play start command.
When the PLAY/PAUSE button is pressed, playback starts.
C.To memory cues.
When disk is loaded, the cue point is set to the first source of music.
If track is changed before pressing play, the cue point is changed to
the new starting point.
If you pause during playback this also sets the new cue point.
This is done by first pausing then using the jog wheel to set the
starting point (When you use the jog wheel the monitor function
allows you to hear what is playing.) Once you reach your desired
starting point, you can set a cue (starting) point by pressing
PLAY/PAUSE button.
To turn the search wheel forward or reverse will give you a fast search
through a disc or track.You will scan forward or reverse at 4 different
speeds depending on how much you turn the wheel.
You can create a seamless loop between two points continuously.
Press PLAY/PAUSE BUTTONsoaCDisplaying.
The PLAY/PAUSE BUTTON'SLEDlights(figure1).
Press IN/R.CUE BUTTON . This sets the starting point of the
SEAMLESS LOOP.The IN/R.CUE BUTTON LED will light (figure
2).
Press OUT/EXIT BUTTON to set desired ending point of the
SEAMLESS LOOP. You will know you are in SEAMLESS LOOP
mode because IN/R.CUE and OUT/EXIT LED will light and flash.
LOOP INDICATOR in LCD DISPLAY will also flash. Sound will
continue with no interruption (SEAMLESS LOOP)(figure 3).
To exit SEAMLESS LOOP, press OUT/EXIT BUTTON . LED
will stay on but not flash. Music will resume normal play (figure 4).
To replay loop, press the RELOOP BUTTON. IN/ R.CUE and
OUT/EXIT LED and LOOP INDICATOR in LCD DISPLAY will all
begin flashing again (figure 5).
(Must be in SEAMLESS LOOP mode). If a SEAMLESS LOOP
has not been created, follow instructions on this page for creating a
SEAMLESS LOOP. If a SEAMLESS LOOP has already been
created, press RELOOPBUTTON to reenter the SEMALESS LOOP
mode.
Next, press OUT/EXIT BUTTON to return to normal play (figure
6).ThisdisengagestheSEAMLESSLOOPmode.
Press OUT/EXIT BUTTON again for new desired ending point of
the loop (figure 7).
press OUT/EXITBUTTON quickly.
Wait until the song plays several frames,
then press OUT/EXITBUTTON.
Fig.2
SEAMLESSLOOP
OUT
IN
Fig.3
SEAMLESSLOOP
OUT
IN
Fig.4
SEAMLESSLOOP
OUT
IN
Fig.5
SEAMLESSLOOP
OUT
IN
Fig.6
SEAMLESSLOOP
OUT
IN
Fig.7
SEAMLESSLOOP
OUT
IN
Fig.1
CUE
cdx-mp200
cdx-mp200 cdx-mp200


Únase a la conversación sobre este producto
Aquí puedes compartir lo que piensas sobre Akiyama CDX-MP200 Reproductor de CD. Si tiene alguna pregunta, primero lea atentamente el manual. Puede solicitar un manual utilizando nuestro formulario de contacto.