Copyright © 2014 Peruzzo Italy - MADE IN ITALY5/12
660_FIRENZE_02/02/15
E GB D
MONTAJE CORREAS F1 SUPERIORES
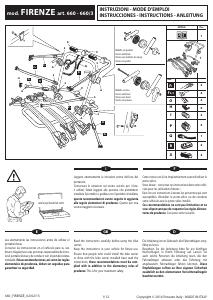
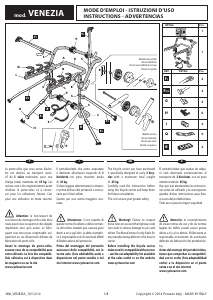
1. Introduzca las protecciones H en los ganchos G , .
2. Ensamble las correas F1 superiores en el portabici-
cletas tal como se muestra en prestando aten-
ción a su correcta introducción en la hebilla,
.
3. Verifique que las correas estén firmemente sujetas,
tirando de las mismas
.
SUJECIÓN DEL PORTABICICLETAS
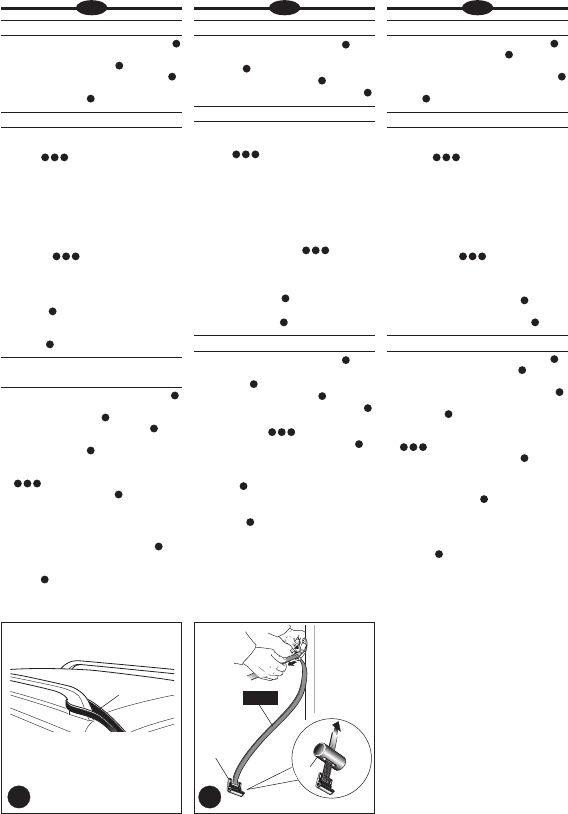
1. Limpie las partes de la carrocería que entrarán en
contacto con los soportes P de caucho del portabi-
cicletas, .
2. Apoye el portabicicletas sobre el coche y enganche
las correas F1 en el borde superior de la puerta
trasera o bien en el borde delantero del maletero.
Ajuste la altura del portabicicletas tirando de las
correas hasta alcanzar la posición correcta.
3. Ajuste el arco de apoyo de las bicicletas D de tal
modo que quede inclinado hacia arriba al menos
10° con respecto al plano horizontal, tal como se
muestra en .
4. Para vehículos con spoiler, las correas superiores
F1 no tienen que estar en contacto con el spoi-
ler mismo, puesto que podrían provocar daños.
Proceda entonces a su correcta sujeción, según se
explica en .
5. Con coches provistos de barras longitudinales (rai-
ling), es mejor el enganche de la correa F1 según
explica la .
MONTAJE DE LAS CORREAS F2
LATERALES
1. Introduzca las protecciones H en los ganchos G , .
2. Ensamble las correas F2 laterales en el portabicicle-
tas tal como se muestra en , prestando atención
a su correcta introducción en la hebilla .
3. Verifique que las correas estén firmemente sujetas,
tirando de las mismas .
4. Introduzca los ganchos G de las correas F2 a los
lados de la puerta trasera o de la tapa del maletero,
.
5. Tire con una fuerza de 2,5 Nm, .
⚠
ATENCIÓN
A pesar de estar dotados de protección, en contacto
con vidrio o plástico, los ganchos de fijación G pue-
den causar daños y abolladuras; en tal caso, utilice el
adaptador I (si está incluido) y siga el esquema que se
muestra en . En la lista de coches se indican los casos
en que se debe usar el adaptador I (si el adaptador I no
está incluido en el paquete del portabicicletas, puede
adquirirlo por separado en el punto de venta).
3
4
5
5
7 8 9
7 8 9
6
10
3
11
5
5
13 14 15
16
11
12
FITTING THE STRAPS F1 TOP
1. Insert the protectors H on the clasps G , .
2. Assemble the top straps F1 on the bike carrier as
shown in
, paying attention to the correct
direction of entry in the buckle,
.
3. Check the hold of the straps by pulling on them,
.
SECURING THE BIKE CARRIER
1. Clean the parts of the bodywork that will be in
contact with the rubber supports P of the bike
carrier, .
2. Place the bike carrier on the car and hook the
straps F1 on the top edge of the door or the front
edge of the bonnet. Adjust the height of the bike
carrier by pulling the straps until reaching the cor-
rect position.
3. Adjust the bike-holder arch D in such a way that it
is tilted upwards by at least 10° compared to the
horizontal plane as shown in .
4. For vehicles with spoiler, the upper straps F1 must
not be in contact with the spoiler because they
could cause damage. Therefore proceed with cor-
rect fixing as shown in .
5. With cars equipped with railing, use the clasp of
strap F1 as shown in .
FITTING THE STRAPS F2 SIDE
1. Insert the protectors H on the clasps G , .
2. Assemble the side straps F2 on the bike carrier
as shown in , paying attention to the correct
direction of entry in the buckle, .
3. Check the hold of the straps by pulling on them, .
4. Insert the clasps G of the straps F2 at the sides of the
rear door or boot, .
5. Pull with the application of a force of 2.5 Nm, .
⚠
ATTENTION
The clasps G , , though provided with protectors, can
cause breakage or denting in contact with glass or plas-
tic; in this case use the adapter I , if included, and follow
the diagram in . The car adaptability list highlights
the cases in which the adapter I must be used ( if adapt-
er I is not included in the package, you can purchase
one separately at the sales outlet).
3
4
5
5
7 8 9
7 8 9
6
10
3
11
5
5
13 14 15
16
11
12
MONTAGE DER OBEREN RIEMEN F1
1. Die Schutzkappen H auf die Haken G stecken, .
2. Die (oberen) Riemen F1 , wie in gezeigt, auf den
Fahrradträger montieren. Achten Sie darauf, dass
er in der richtig herum in die Schnalle eintritt, .
3. Durch kräftiges Ziehen prüfen, ob die Riemen fest-
sitzen,
.
BEFESTIGUNG DES FAHRRADTRÄGERS
1. Die Teile der Karosserie säubern, die mit den
Gummiauflagen P des Fahrradträgers in Berührung
kommen,
.
2. Den Fahrradträger an das Auto legen und die
Riemen F1 an der Oberkante der Heckklappe oder
der Vorderkante des Kofferraumdeckels einhaken.
Die Höhe des Fahrradträgers regulieren. Dazu an
den Riemen ziehen, bis der Fahrradträger sich in der
korrekten Position befindet.
3. Den Fahrradauflagebügel D so verstellen, dass er
um mindestens 10° zur Horizontalen nach oben
geneigt ist, wie in gezeigt.
4. Bei Fahrzeugen mit Spoiler dürfen die oberen
Riemen F1 nicht mit dem Spoiler in Berührung
kommen, weil sie Schäden verursachen können.
Die Riemen korrekt festzurren, wie in dargestellt.
5. Bei Fahrzeugen mit Dachreling sollte der Riemen
F1 besser so eingehängt werden, wie in gezeigt.
ANBRINGEN DER SEITLICHEN RIEMEN F2
1. Die Schutzkappen H auf die Haken G stecken, .
2. Die (seitlichen) Riemen F2 , wie in gezeigt, auf
den Fahrradträger montieren. Achten Sie darauf,
dass er richtig herum in die Schnalle eintritt, .
3. Durch kräftiges Ziehen an den Riemen prüfen, ob
sie festsitzen, .
4. Die Haken G der Riemen F2 an den Seiten der
Heckklappe oder des Kofferraumdeckels einführen,
.
5. Mit einer Kraft von 2,5 Nm anziehen, .
⚠
ACHTUNG
Die Befestigungshaken G sind zwar mit einem
Schutz versehen, können aber bei Kontakt mit Glas
oder Kunststoff Bruchstellen oder Beulen verursa-
chen. Verwenden Sie in diesem Fall den Adapter I ,
wenn er zum Lieferumfang gehört, und folgen Sie
dem Schema . In der Adaptionsfähigkeitsliste sind
die Autos gekennzeichnet, bei denen der Adapter I
verwendet werden muss (ist der Adapter I nicht in der
Verpackung des Fahrradträgers enthalten, kann er sepa-
rat beim Händler erworben werden).
3
4
5
5
7 8 9
7 8 9
6
10
3
11
5
5
13 14 15
16
11
12
F1
10
11
F
2
I
G


Únase a la conversación sobre este producto
Aquí puedes compartir lo que piensas sobre Peruzzo Firenze Porta bicicleta. Si tiene alguna pregunta, primero lea atentamente el manual. Puede solicitar un manual utilizando nuestro formulario de contacto.